How to set up Org, Site and User Account on the VIGI App
Contents
Configuration for Creating an Organization via VIGI App
Configuration for Creating a Site on via VIGI App
Configuration for Creating an User Account via VIGI App
Introduction
The objective of this article is to provide a comprehensive guide on setting up a User account, Site and Organization on VIGI APP.
Requirements
- VIGI App
- VMS Cloud
Configuration
To set up Organization via VIGI App, an organization must already exist in your TP-Link VMS Cloud account. If you don’t have one, create it on the VMS Cloud platform (https://vms.tplinkcloud.com) before using the VIGI App for setup.
The following section provides the configuration steps for setting up a User account, Site and Organization via the VIGI App.
Configuration for Creating an Organization via VIGI App
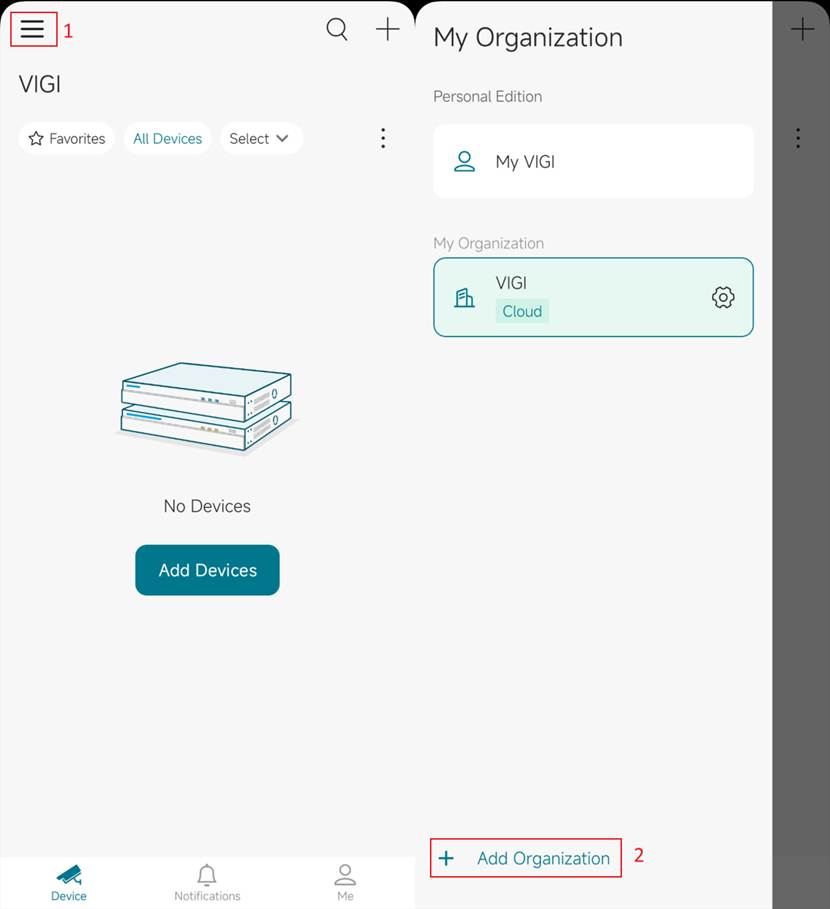
Step 1. Click the Three-bar menu in the top left corner and tap on Add Organization.
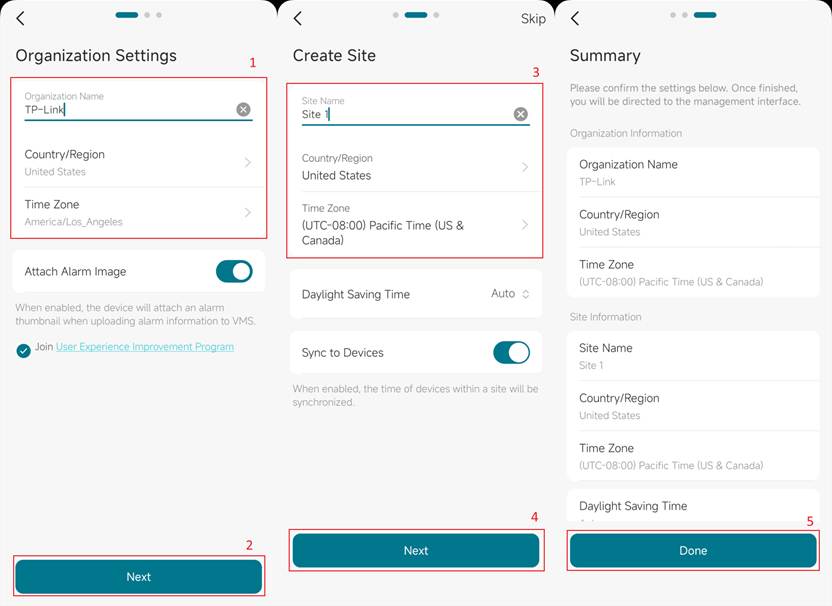
Step 2. In Organization Settings page, please specify its name, Country/Region, Time Zone. You may choose to Skip or configure the site on Create Site page. A Site Name, Country/Region, Time Zone would be required. With all filled in, the App will bring you to Summary page for review. Click Done if you confirm all information.
Configuration for Creating a Site on via VIGI App
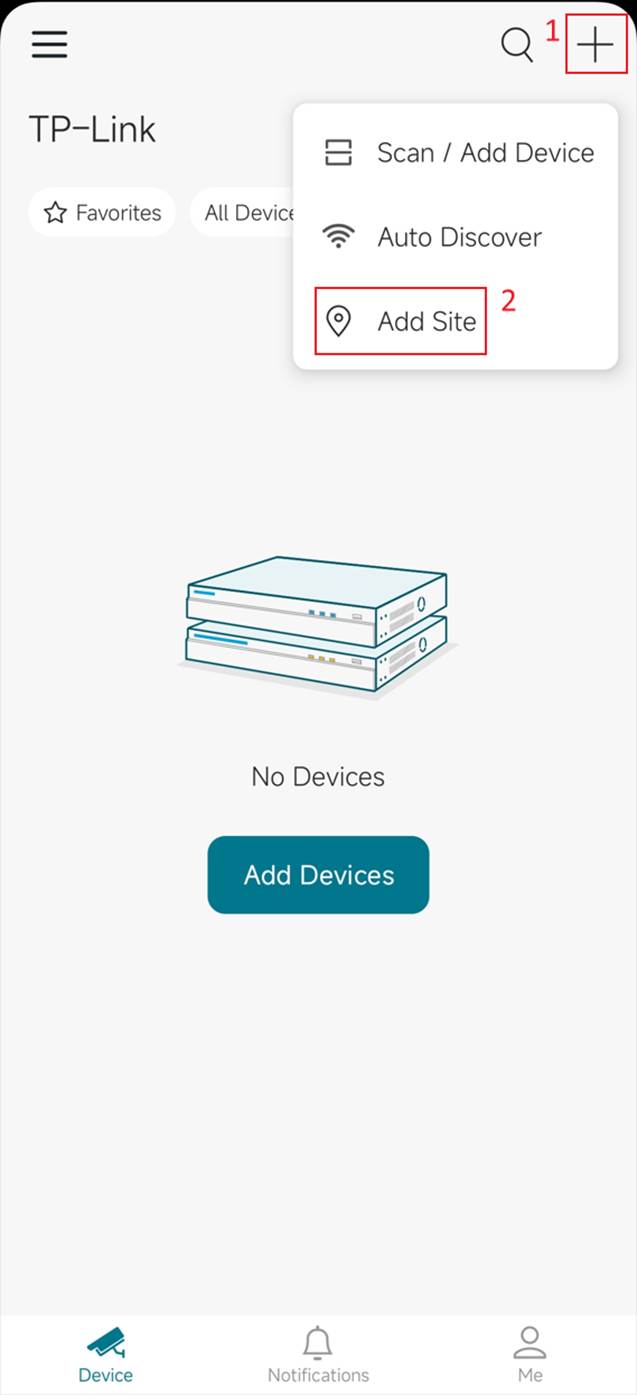
Step 1. In the main menu, click the plus button, then Add Site.
If you pressed next after creating an Organization you will arrive at the same screen in Step 2.
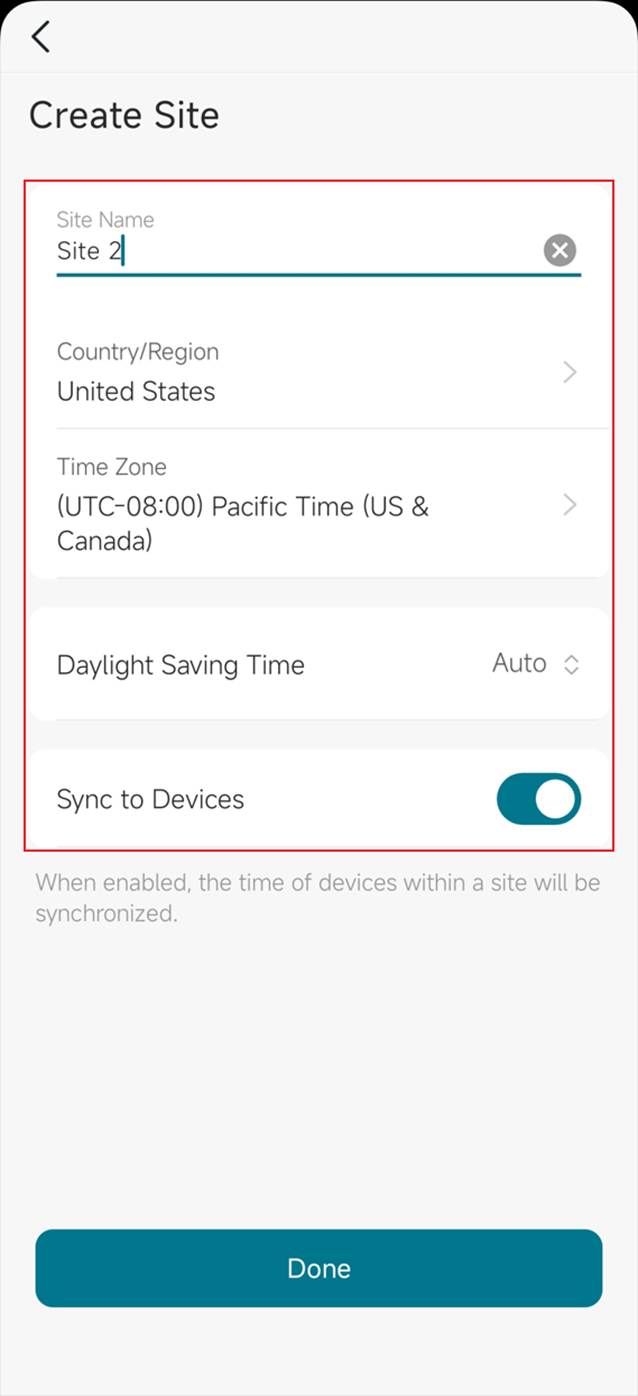
Step 2. Create a Site Name, Country/Region, Time Zone, Daylight Saving Time and click Done.
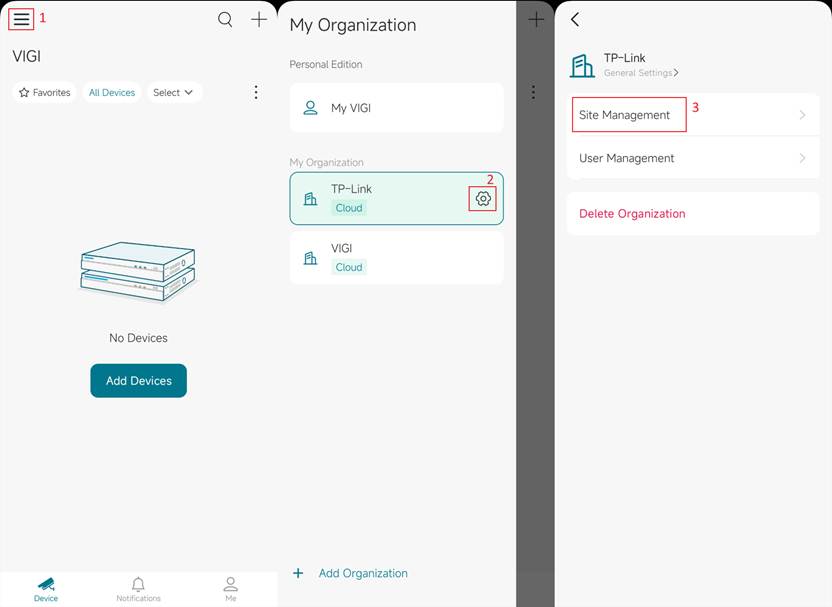
The other way to create sites is under the organization page. To get there, please navigate to the three-bar menu > Gear icon next to organization > Site management.
Configuration for Creating an User Account via VIGI App
If you would like to grant site privileges to your family members or colleagues, you can invite their TP-Link ID as a viewer, an admin even a super admin.
Step 1. Navigate to the three-bar menu > Gear icon next to organization > User management.

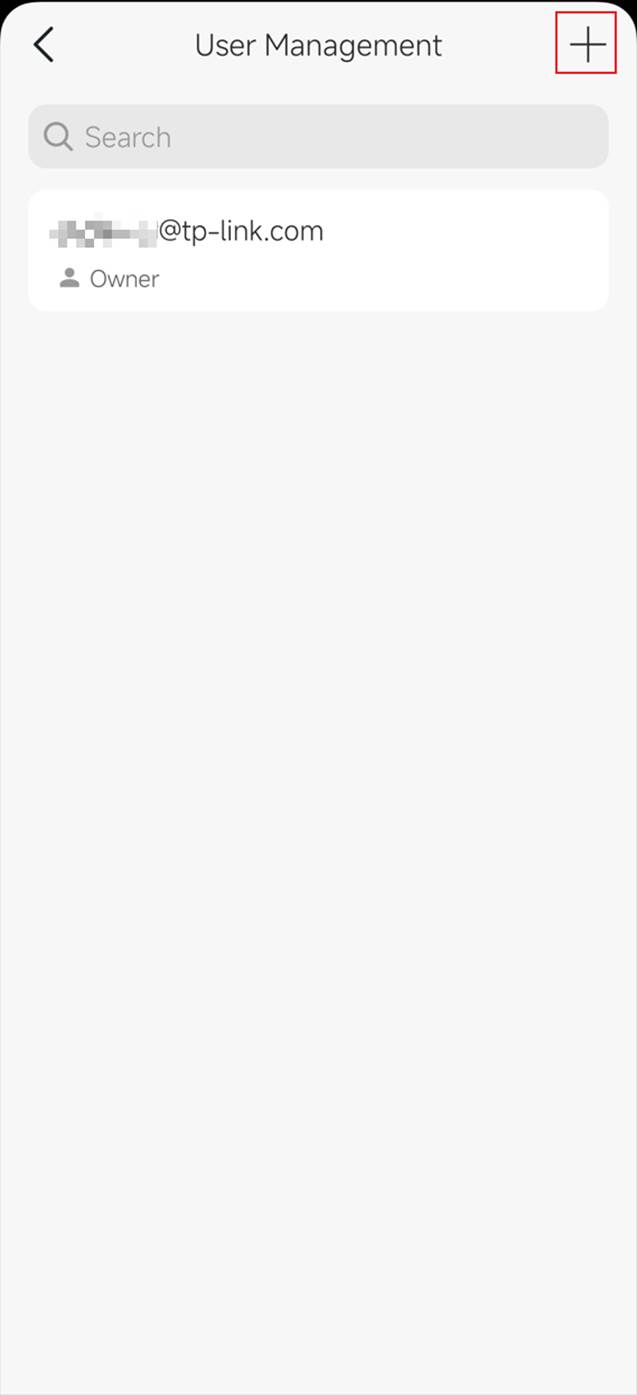
Step 2. The management page shows the current users that belong to this organization. Tap on the + button on the upper right, you can add another user to the organization.
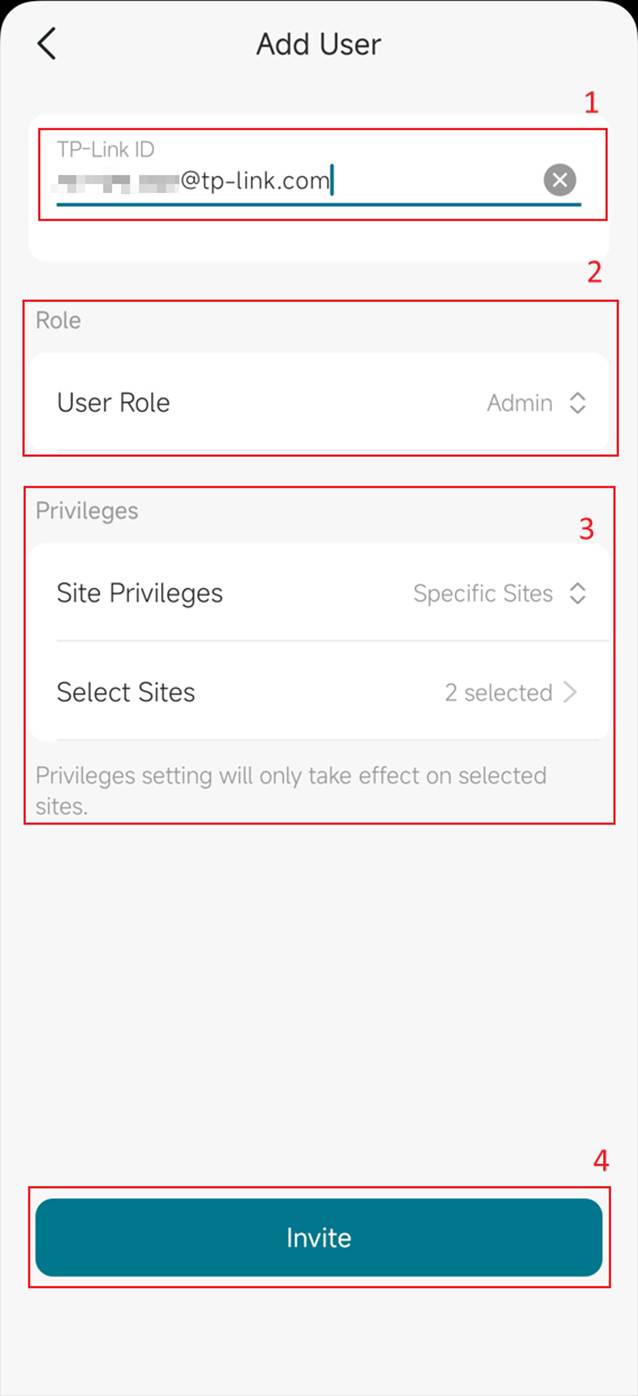
Step 3. Please fill in the TP-Link ID of the user to be invited and specify its role. The difference among roles can be found below:
|
Role Name |
Description |
|
Owner |
The one who creates the organization and owns the highest permission by default. |
|
Super Admin |
This role has all permissions and can access all resources. |
|
Admin |
This role has all permissions but can only view specific users and sites. |
|
Operator |
This role can perform all device operations but lacks permissions for user and system management. |
|
Viewer |
This role can only view video resources and has no operation or system management permissions. |
|
Live Only User |
This role can only view live video. |
If the new users is going to be Admin, Operator, Viewer or Live Only User, you need to specify available sites, too. It can be a single one or multiple ones.
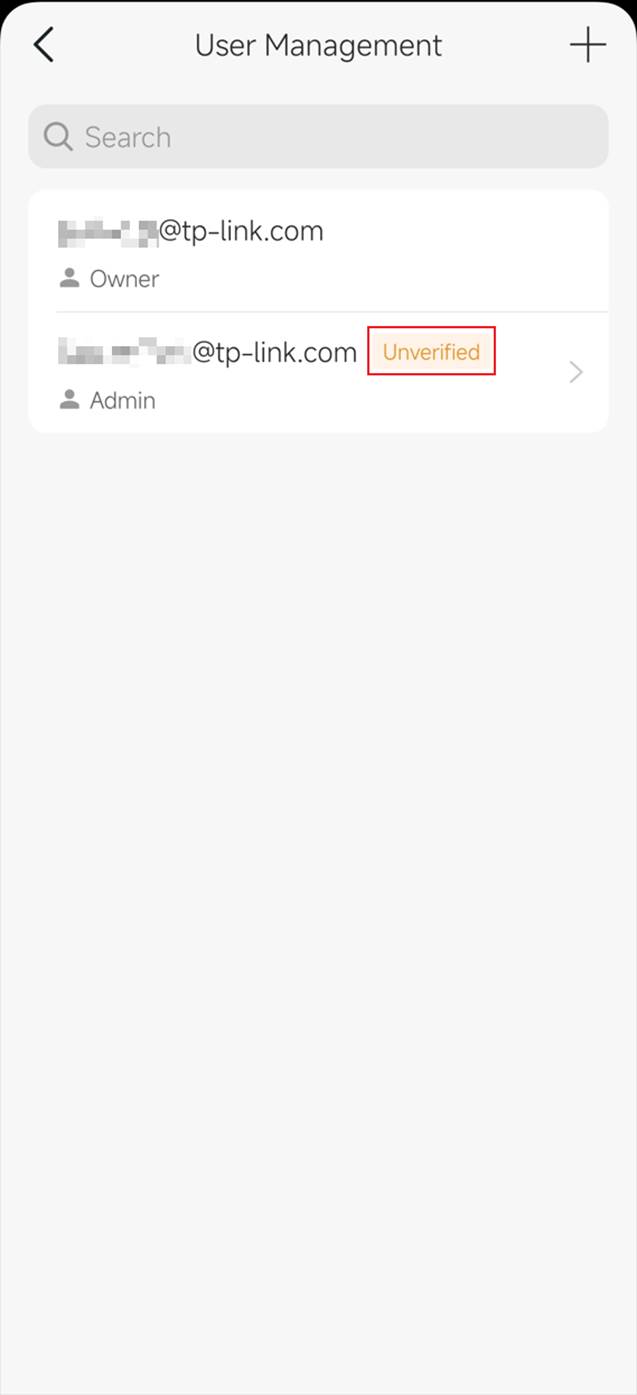
Step 4. If the invitation is sent, you will find another user on the User Management page. Meanwhile, an invitation email would be sent to the corresponding email address and also You can directly receive notification cards in the personal version of the VIGI APP, and there are also cards in the organization list on the sidebar. When the invitee accepts, he would have the access to the organization by logging in VIGI App or VIGI Cloud Platform with his TP-Link ID.
Conclusion
By following the above steps, you can use VIGI app to complete the creation of Organization, Site and User Account.
QA
Q1: Do I need a TP-Link ID before I can create an Organization or Site?
A1: Yes. A TP-Link ID is required to sign into the VIGI App and create Organizations and Sites.
Q2: Can I create multiple Sites under the same Organization?
A2: Yes. After creating an Organization, you can add multiple Sites under it. Each Site can be managed separately, with its own devices and configurations.
Q3: What should I do if I do not receive the TP-Link ID verification email?
A3: First, check your email spam or junk folder. If the email is not there, wait a few more minutes and then try to resend it. If the issue persists, use a different email account or contact TP-Link support.
Q4: Can I change the Organization or Site details after creating them?
A4: Yes. You can update details such as Site Name, Time Zone, and Device Credentials later in the VIGI App or VIGI Cloud Platform.
Q5: What happens if I enter the wrong Time Zone during setup?
A5: The Site will use the incorrect time zone for scheduling and logs. You can correct this later by editing the Site settings in the VIGI App.
Q6: Do I need internet access to create an Organization, Site, or User Account?
A6: Yes. An active internet connection is required because the VIGI App communicates with cloud services during setup.
Q7: How can I verify that the Organization and Site were created successfully?
A7: After setup, the Organization name will be displayed in the top left corner of the app, and the Site will be listed under that Organization.
¿Es útil esta pregunta frecuente?
Sus comentarios nos ayudan a mejorar este sitio.


