How to Change DNS Settings on Your TP-Link Deco
You can change DNS server settings on your TP-Link Deco system through the Deco app. You may need to do this to use a preferred DNS provider or to resolve network issues in a specific environment. This guide walks you through both the WAN and LAN DNS change options. If you have a TP-Link wireless router instead of a Deco system, see How to Change DNS Servers on a TP-Link Wireless Router.
Before You Begin
Complete these steps before making any changes:
- Make sure the latest version of the Deco app is installed on your phone.
- Connect your phone to the Deco's Wi-Fi network.
- Close the Deco app if it is already running in the background.
- Relaunch the Deco app.
Note: DNS settings can only be changed through the Deco app when your phone is connected to the Deco's Wi-Fi network and you are signed in with the owner account. The Deco app must be running in Router mode to access these settings. For more on how Router mode and Access Point mode differ on Deco, refer to that FAQ. Closing and relaunching the app clears the app cache before configuration.
Key Takeaways
- You can change DNS settings on your Deco system through the Deco app. Your phone must be connected to the Deco's Wi-Fi network, and you must be signed in with the owner account.
- To change DNS on the WAN: open the Deco app, go to More > Internet Connection > IPv4 Connection, tap DNS Address, select Manual, enter your preferred Primary and Secondary DNS addresses, and tap Save.
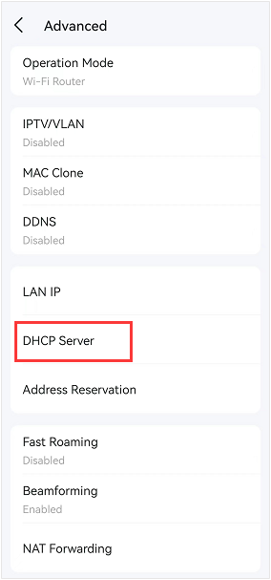
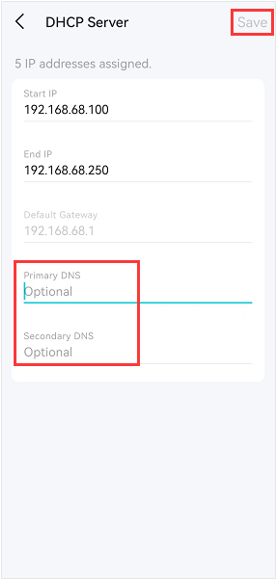
- If your Deco model does not support DNS changes on the WAN, you can set DNS on the LAN instead. Go to Deco app > More > Advanced > DHCP Server, enter your DNS addresses, and tap Save.
- After saving, DNS changes take effect automatically. No reboot is required. If you are experiencing slow speeds after changing DNS settings, see Troubleshooting Slow Internet Speed with Deco Devices for help. For more on optimizing your home network, see 10 Ways to Boost Your Home Wi-Fi for a Faster Internet.
Change the DNS Server Settings
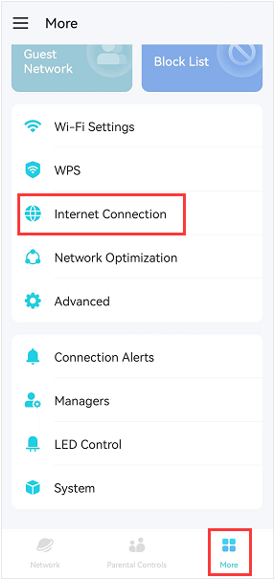
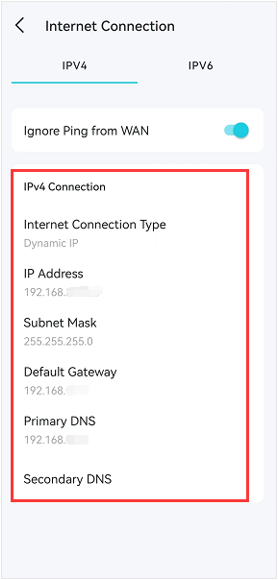
Step 1. Tap More on the Deco app, then tap Internet Connection, then tap IPv4 Connection.
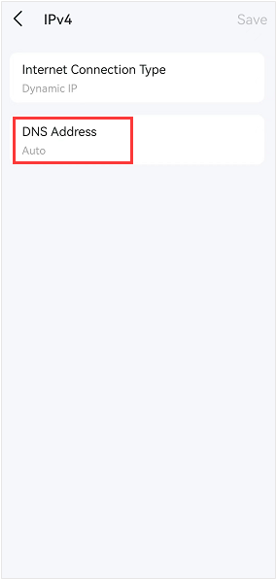
Step 2. Tap DNS Address, select Manual, type in your preferred DNS server settings, then tap Save.
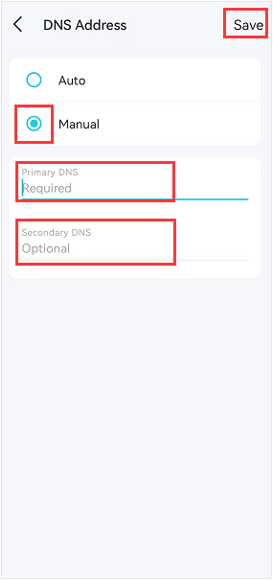
Step 3. Tap Save again, and the new DNS settings will take effect automatically.
Note: No reboot is needed. The new DNS settings take effect automatically.

Step 4. If your Deco doesn't allow you to change the DNS on the WAN, you may try to change the DNS on the LAN instead.
Go to Deco app > More > Advanced > DHCP Server to change the DNS server, then tap Save to save the settings. For more advanced DNS configurations such as setting up a Pi-Hole DNS server on your TP-Link network, refer to that guide.
Полезен ли беше този ЧЗВ?
Вашите отзиви помагат за подобряване на този сайт.
_EU_V1.0_01_normal_20220817025337r.jpg)

_normal_20230201014412u.png)