How to Fix a Bricked TP-Link Deco Using Firmware Recovery
If your TP-Link Deco is unresponsive or won't connect after a failed firmware update, firmware recovery can restore it. There are two Deco firmware recovery methods available, depending on your model: the HTTP Uboot method and the TFTP tool method. Both require a wired Ethernet connection from your computer to the Deco unit, as well as a static IP address configured on your computer. A solid red light on your Deco indicates firmware recovery may be needed. A solid green light after the process confirms a successful recovery.
Key Takeaways
- Use firmware recovery when your Deco has a solid red LED, is unresponsive, or has experienced a failed firmware update.
- There are two supported Deco firmware recovery methods: the HTTP Uboot method (supported on all Deco models except the Deco M5 and Deco P7) and the TFTP tool method (for the Deco M5 and Deco P7).
- A wired Ethernet connection between your computer and the Deco unit is required for both methods.
- You must configure a static IP address on your computer before starting either recovery process.
- You will need to manually download and upload the correct firmware file to restore the device. Visit the TP-Link Download Center to get the latest firmware for your model.
Deco Firmware Recovery Method by Supported Model
|
Deco Firmware Recovery Method |
Supported Deco Models |
|
HTTP Uboot Method |
All Deco models except Deco M5 and Deco P7 |
|
TFTP Tool Method |
Deco M5, Deco P7 |
Method 1: TFTP Tool Firmware Recovery (Deco M5 and Deco P7)
What You Need for TFTP Firmware Recovery
- The Deco unit that needs firmware recovery
- One Ethernet cable
- One Windows PC with an Ethernet port
- A pin to press the reset button
Step 1: Download Firmware and Connect Your Computer
Go to the TP-Link Download Center to download the latest firmware for your Deco model. Extract the firmware zip file to your desktop.
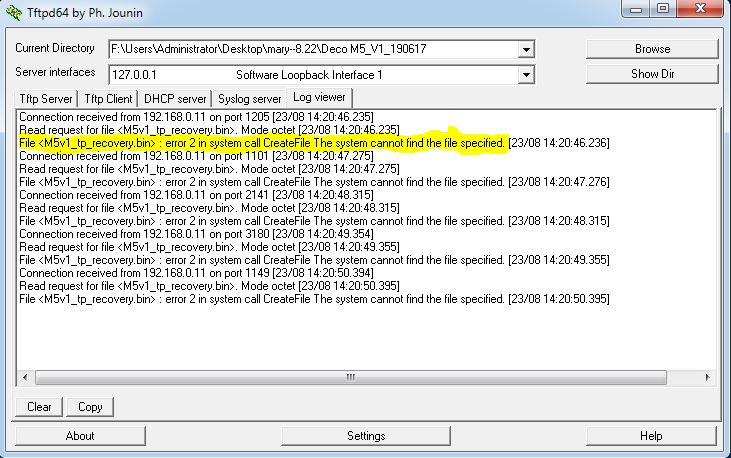
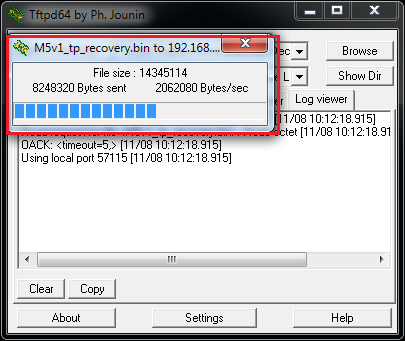
Connect your Windows computer to the LAN port of the Deco unit using an Ethernet cable. Use a new, good-quality cable. A poor-quality cable may result in no information appearing in the TFTP log viewer.
Note: Rename the firmware bin file before proceeding. Use the format below for your model:
- Deco M5: M5v1_tp_recovery.bin
- Deco P7: P7v1_tp_recovery.bin
If the file name is incorrect, the TFTP tool will display an error in the log viewer.
Step 2: Set a Static IP Address on Your Windows Computer
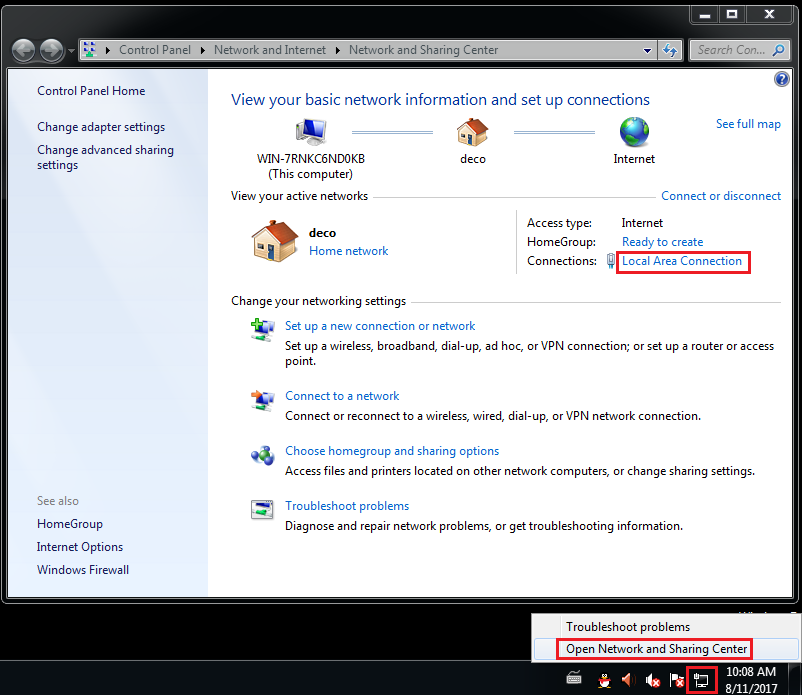
Open Network and Sharing Center by right-clicking the PC icon in the bottom-right corner of the desktop taskbar and selecting Open Network and Sharing Center. Then select Local Area Connection (or Ethernet).
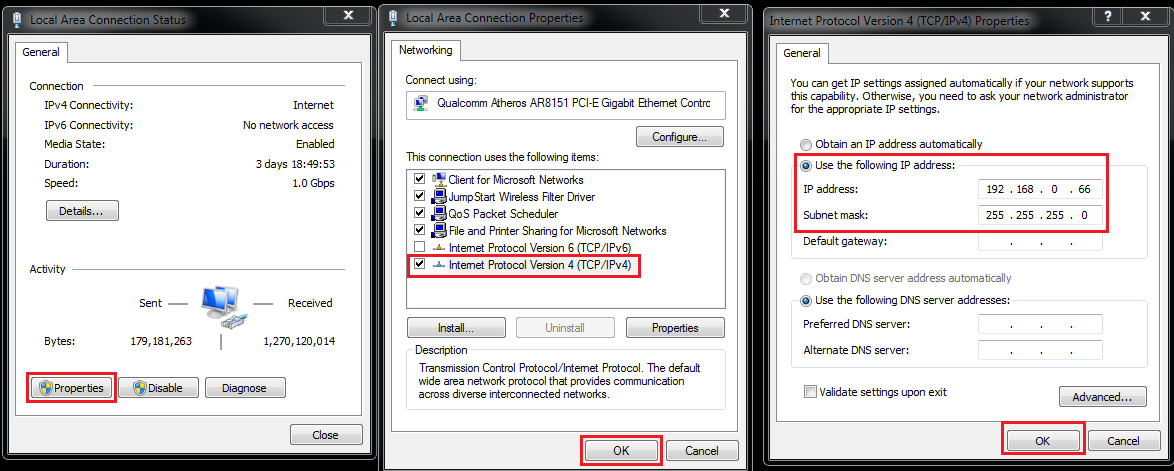
Click Properties, then double-click Internet Protocol Version 4 (TCP/IPv4). Select Use the following IP address and enter the following values:
- IP address: 192.168.0.66
- Subnet mask: 255.255.255.0
Click OK (two OK options) to save your settings.
Step 3: Install and Configure the TFTP Tool
Download the TFTP software for your Windows PC from http://tftpd32.jounin.net/tftpd32_download.html. If your PC is 64-bit, install the tftpd64 application.
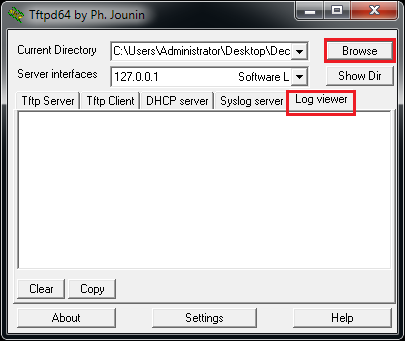
Launch the application, click Browse, and select the folder containing your Deco M5 or Deco P7 firmware file. Then click the Log Viewer tab.
Step 4: Trigger Firmware Recovery Mode
Keep your PC connected to the Deco unit via Ethernet cable. Power off the Deco unit. Press and hold the Reset button on the back of the unit, then power the unit back on while continuing to hold the Reset button. Wait approximately 10 seconds until a file transfer appears in the Log Viewer window. Then release the Reset button.
Note: If the TFTP upgrade fails, disable the Windows firewall on your computer and try again.
Step 5: Wait for Recovery to Complete
The Deco LED will blink green and blue during the recovery process. Wait approximately two minutes. When the LED turns solid green, the firmware has been successfully updated.
Step 6: Repeat for Additional Deco Units
Connect your computer to the next Deco unit using the Ethernet cable and repeat Steps 1 through 5 for each unit.
Note: Firmware recovery will not require you to set up your Deco system again. You can recover units in any order, but it is recommended to start with the main Deco unit, then the second, and then any additional units.
Method 2: HTTP Uboot Firmware Recovery (All Other Deco Models except Deco M5 and Deco P7)
What You Need for Deco Firmware Recovery
- The Deco unit that needs firmware recovery
- One Ethernet cable
- One PC with an Ethernet port
- A pin to press the reset button
Step 1: Download the Latest Firmware
Go to the TP-Link Download Center and download the latest firmware for your Deco model. Extract the zip file before proceeding.
Note:
- For Deco X50 and X55 V1, you must first recover to this specific firmware version before installing any other firmware: https://static.tp-link.com/upload/firmware/2023/202303/20230331/Deco_X55_V1.0_1.2.2_Build_230301.zip
- For Deco X50 and X55 V1.2, you must first recover to this specific firmware version: https://static.tp-link.com/upload/firmware/2023/202302/20230217/Deco_X50_V1.2_1.0.1_221103.zip
Step 2: Connect Your Computer to the Deco Unit
Do not power on the Deco unit yet. Connect your PC directly to one of the Ethernet ports on the Deco unit using an Ethernet cable.
Step 3: Set a Static IP Address on Your Computer
Configure a static IP address on your PC's Ethernet adapter using these values:
- IP address: 192.168.0.2
- Subnet mask: 255.255.255.0
No default gateway or DNS settings are required.
For Windows: Open Control Panel, go to Network and Internet, then Network and Sharing Center, and click Change adapter settings. Right-click your Ethernet adapter and select Properties. Double-click Internet Protocol Version 4 (TCP/IPv4), select Use the following IP address, enter the values above, and click OK.
For macOS: Go to System Preferences, select Network, find your LAN connection, set Configure IPv4 to Manually, enter the values above, and click Apply.
Step 4: Enter Firmware Recovery Mode
Using a pin, press and hold the Reset button on the Deco unit. While holding the button, plug the power cable into the Deco unit. Watch the LED. Refer to the table below to confirm your model has entered firmware recovery mode.
Step 5: Upload the Firmware
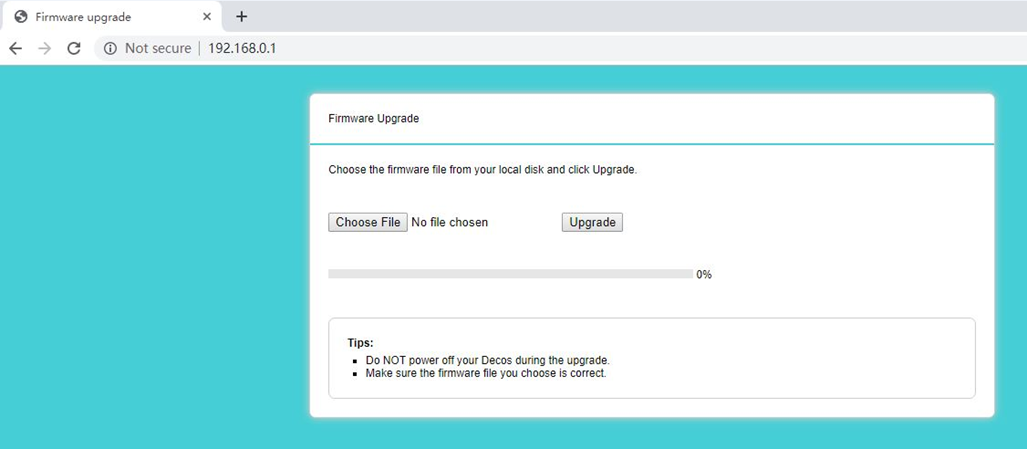
On your PC, open a browser and go to http://192.168.0.1. The firmware recovery page will load. Click Choose File, select the firmware file you downloaded in Step 1, and click Upgrade. The page will notify you when the upgrade is complete.
Step 6: Reboot if Required
Some Deco models require a manual reboot after firmware recovery. Disconnect and reconnect the power cable to reboot. Refer to the LED reference table below to confirm whether your model requires a manual reboot.
Deco Firmware Recovery LED Reference
Use this table to identify the LED behavior for your Deco model during the HTTP Uboot firmware recovery process. For a full guide to Deco LED meanings, see What do the different LED colors mean for Deco?
|
Model |
Hardware Version |
LED Status When Entering Firmware Recovery Mode |
LED Status When Upgrading Firmware |
LED Status When Upgrade Is Finished |
Manual Reboot After Firmware Recovery |
|
Deco M4/E4/S4 |
V1/V2 |
Solid green |
Solid green |
Solid green |
Yes |
|
Deco M9 Plus |
V1 |
Flashing green |
Flashing green |
Flashing green |
Yes |
|
Deco M9 Plus |
V2 |
Solid yellow |
Solid yellow |
Solid yellow |
No |
|
Deco X20 |
V1/V1.2 |
Flashing green to solid green |
Solid green |
Solid green |
Yes |
|
Deco X20 |
V2 |
Flashing green |
Flashing green |
Solid yellow |
No |
|
Deco X60 |
V1/V2/V3 |
Solid green |
Solid green |
Solid green |
Yes |
|
Deco X90 |
V1 |
Flashing green |
Flashing green |
Solid yellow |
No |
Полезен ли беше този ЧЗВ?
Вашите отзиви помагат за подобряване на този сайт.
_EU_V1.0_01_normal_20220817025337r.jpg)

_normal_20230201014412u.png)