How to Get the Diagnostic Log from a Tapo Camera Using a microSD Card
This page explains how to enable the Diagnose feature in the Tapo app and extract the diagnostic log file from a Tapo camera via a microSD card (sold separately). The log file can be shared with TP-Link technical support to help resolve persistent camera issues, such as notifications not working or connectivity problems.
Key Takeaways
- A microSD card (sold separately) must be inserted into the camera before enabling Diagnose.
- The Diagnose feature is enabled in the Tapo app under Device Settings > Advanced Settings.
- After enabling Diagnose, let the camera run until the issue recurs before retrieving the log file.
- The log file is saved to the microSD card under the filename "diagnose_log".
Steps to Get the Tapo Camera Log
Step 1. Insert a microSD card into the camera.
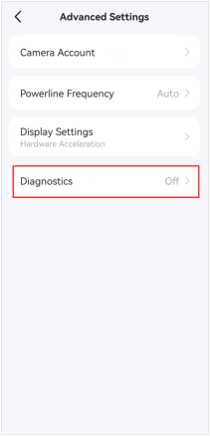
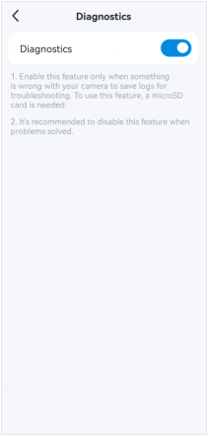
Step 2. Open the Tapo app, tap the camera’s model card to enter the camera’s Live View page > tap the gear icon in the top right corner to enter Device Settings > Advanced Settings > Diagnostics.

Step 3. Let the camera run for some time and wait for the problem to recur. The log file will be stored on the SD card.
Step 4. Take out the SD card from the camera and insert it into the computer's SD card slot or connect it via an SD card adapter.
Step 5. Get the log file named “diagnose_log” in the SD card and send it to technical support.
To learn more about each function and configuration, please visit the Download Center to download the manual for your product.
Looking For More
Полезен ли беше този ЧЗВ?
Вашите отзиви помагат за подобряване на този сайт.


TP-Link Community
Still need help? Search for answers, ask questions, and get help from TP-Link experts and other users around the world.