How to set up IPTV on the DSL Modem Router
Introduction
When your Internet Service Provider (ISP) offers IPTV service along with a set-top box, you’ll typically need to connect the set-top box to a LAN port on your router and enable the IPTV feature in your router’s settings. This allows the set-top box to properly receive TV signals from your ISP.
This article explains how to configure IPTV on TP-Link DSL modem routers. Newer models use an updated interface, while older models use the classic interface—so we’ve provided separate instructions for each.
Requirements
- One device that can open web browsers (e.g., a computer or a smartphone).
- Your ISP’s IPTV service may require a specific VLAN ID (for VDSL) or VPI/VCI settings (for ADSL). Please check with your ISP in advance.
Configuration
Compatible Models: Archer VX1800v
Here, Archer VX1800v is used as a demonstration.
Step 1. Connect the device to the TP-Link DSL Modem Router wirelessly or via Ethernet, then open a browser and visit tplinkmodem.net or 192.168.1.1 to log in to the web management page.
Step 2. Once signed in to the web management page, go to Advanced > Network > DSL-WAN (if you are using wireless router mode, click the “EWAN” below). The setup process is similar to the following.
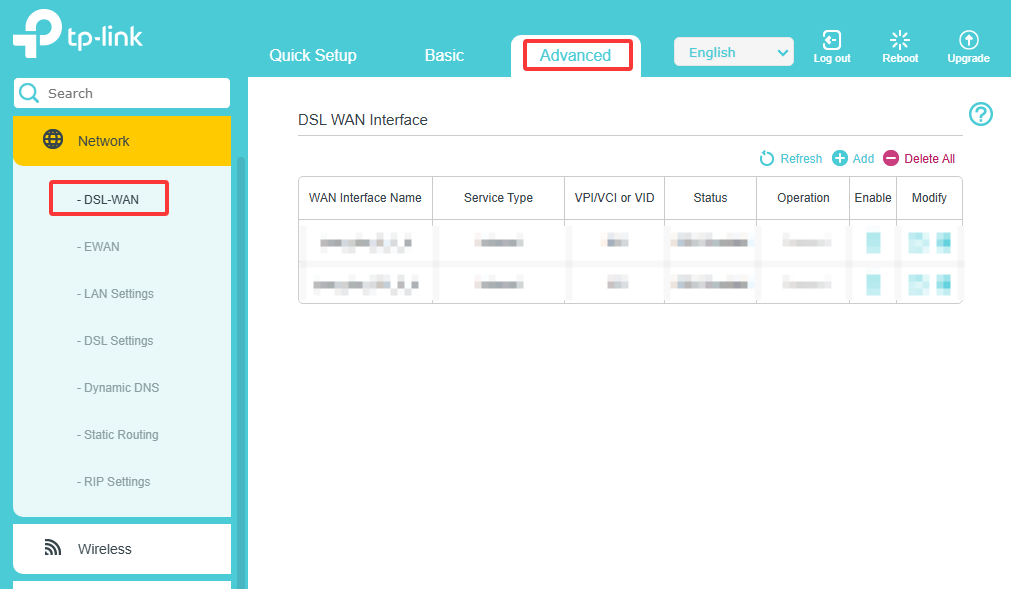
Step 3. Click “Add” to add a WAN Interface. Select the DSL Modulation Type. For Service Type, choose IPTV. Enter the IPTV VLAN ID (VDSL) or IPTV VPI/VCI (ADSL) based on your ISP's information.
Step 4. Typically, select “Bridge” for Internet Connection Type. Check the box for “Disable DHCP service for the bound LAN(s)” under Interface Binding Type. Select one LAN port to serve as the IPTV port. This port will be dedicated to IPTV only—connect your set-top box here, and do not use it for general internet access.
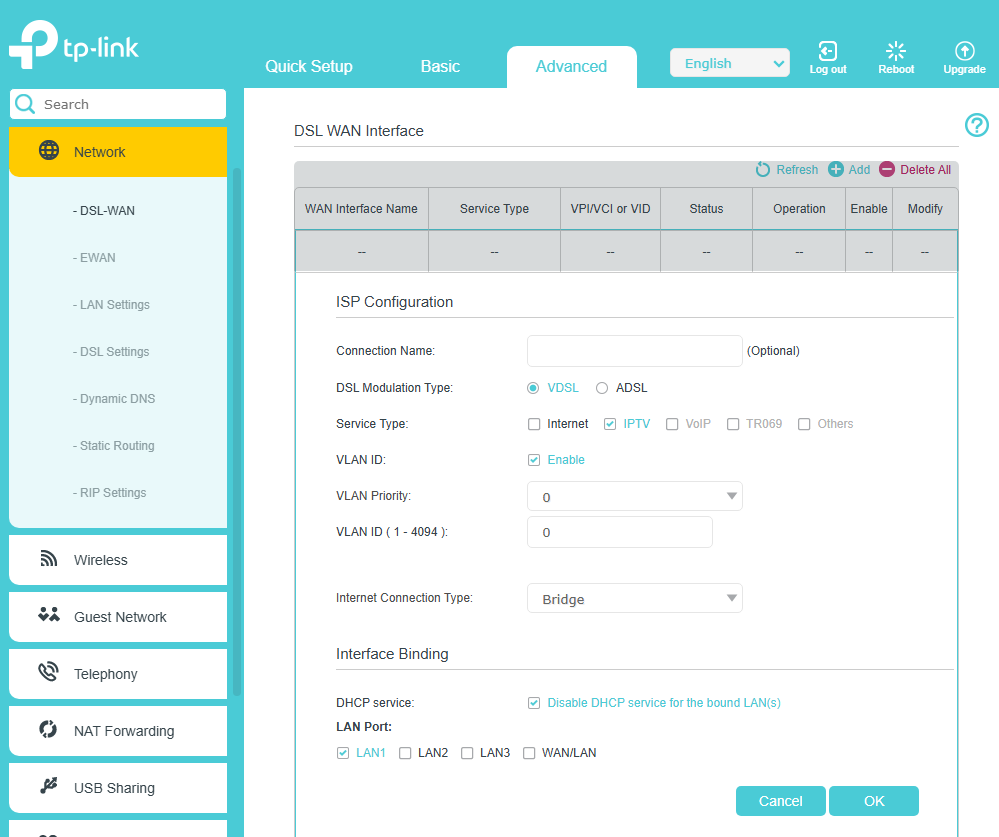
Step 4. Click Save to apply the settings.
Done! Configuration complete. You can now connect the set-top box to the configured Ethernet port to verify if IPTV can be viewed normally.
Compatible Models: Archer VR2100, Archer VR2800, Archer VR300, Archer VR400, Archer VR600
Here, Archer VR2100 is used as a demonstration.
Step 1. Connect the device to the TP-Link DSL Modem Router wirelessly or via Ethernet, then open a browser and visit tplinkmodem.net or 192.168.1.1 to log in to the web management page.
Step 2. Once signed in to the web management page, go to Advanced > IPTV to open the configuration page. Enable IPTV.
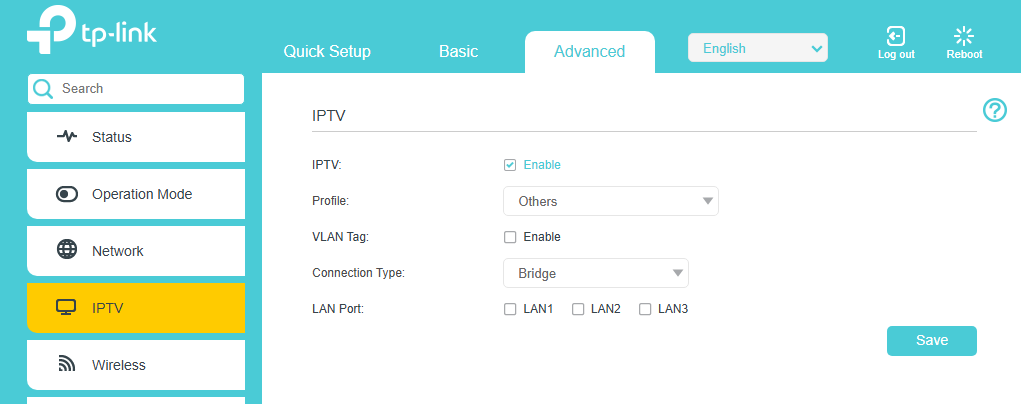
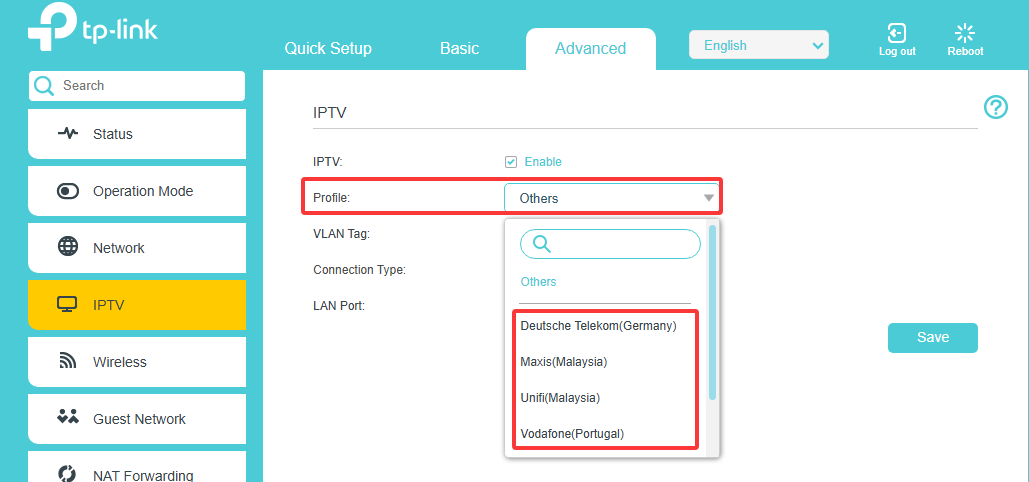
Step 3. If your ISP is listed, you can select the built-in profile. Otherwise, please choose Others.
Step 4. If your ISP’s IPTV service requires a VLAN Tag, enable it (priority is usually 0 unless specified by your ISP).
Set the Connection Type to Bridge, and select the LAN port that will be used for your set-top box. This port will be dedicated to IPTV only—connect your set-top box here, and do not use it for general internet access.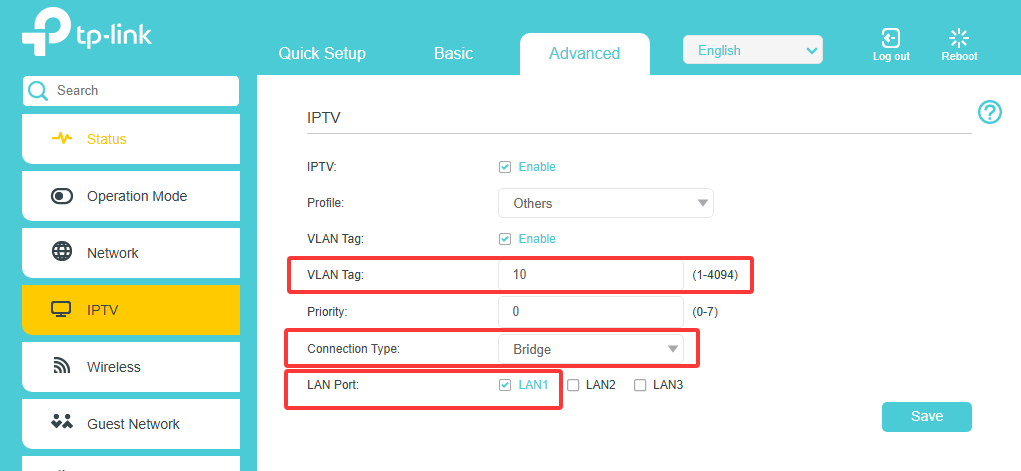
Step 5. Click Save to apply the settings.
Done! Configuration complete. You can now connect the set-top box to the configured Ethernet port to verify if IPTV can be viewed normally.
Compatible Models: Archer VR2600
Here, Archer VR2600 is used as a demonstration.
Step 1. Connect the device to the TP-Link DSL Modem Router wirelessly or via Ethernet, then open a browser and visit tplinkmodem.net or 192.168.1.1 to log in to the web management page.
Step 2. Once signed in to the web management page, go to Advanced > IPTV to open the configuration page. Enable IPTV.
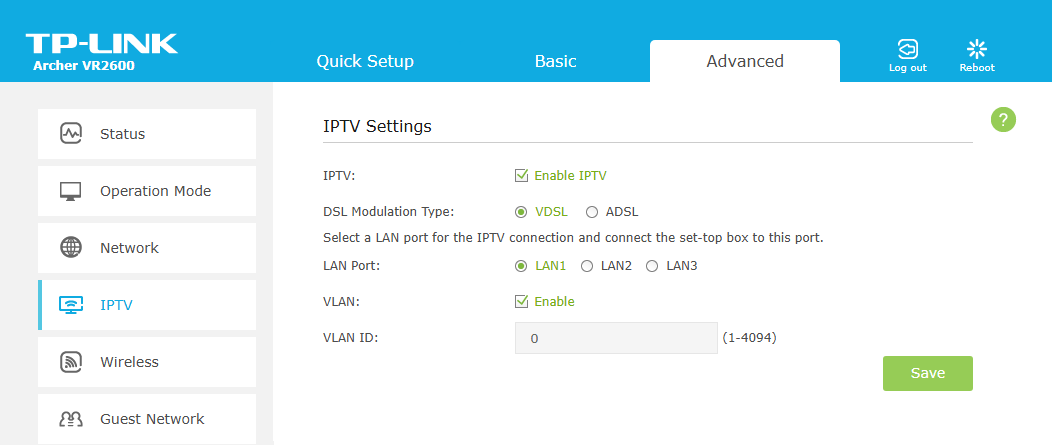
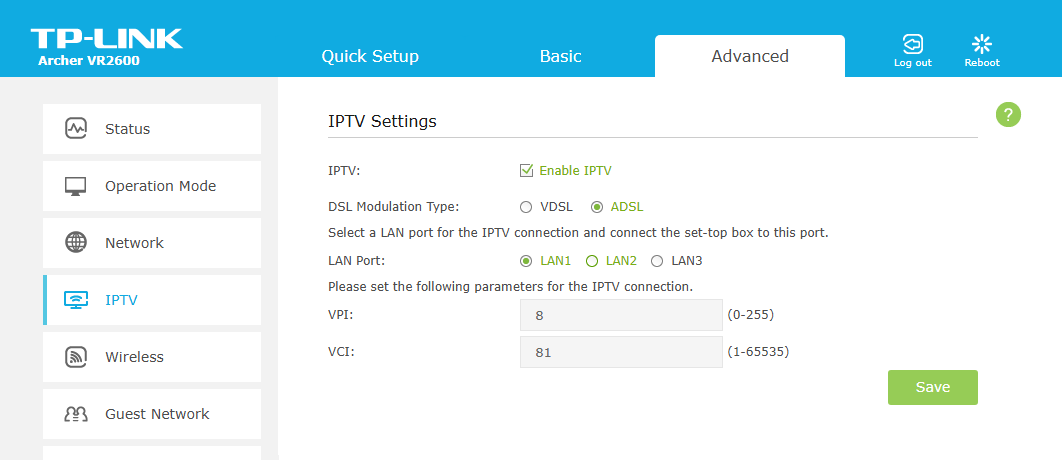
Step 3. Select your DSL Modulation Type.
Step 4. Specify a LAN port for the IPTV connection, then connect the set-top box to that port.
Step 5. If you have a VDSL connection, you may need to enable VLAN and enter the IPTV VLAN ID provided by your ISP. If you have an ADSL connection, you’ll need to enter the PVC parameters (VPI and VCI) instead. Both the VLAN ID and PVC parameters (VPI/VCI) are provided by your IPTV service provider.
Step 6. Click Save to apply the settings.
Done! Configuration complete. You can now connect the set-top box to the configured Ethernet port to verify if IPTV can be viewed normally.
Compatible Models: TD-W9980, TD-W896, Archer D2/D5/D7/D9
Here, TD-W8968 is used as a demonstration.
Here we assume the IPTV parameters are as follows:
Connection Type: Bridge
VPI/VCI: 8/32
Encapsulation Mode: LLC
ATM QoS Type: UBR
We will also configure LAN4 as an IPTV port.
Step 1. Add Bridge Interface for IPTV.
Log in to the Web Management Page of TD-W8968 at http://192.168.1.1. (Default username & password: admin, admin.)
Go to Network->WAN Settings; add a Bridge interface for IPTV.
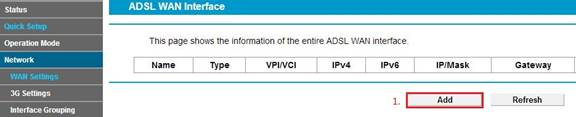
Note: Up to eight WAN Interfaces can be added. If you fail to add a new bridge, you may have to delete the unused interfaces (or delete the one that use the same VPI/VCI) then do it again.
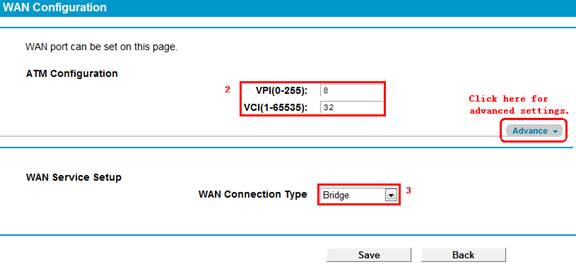
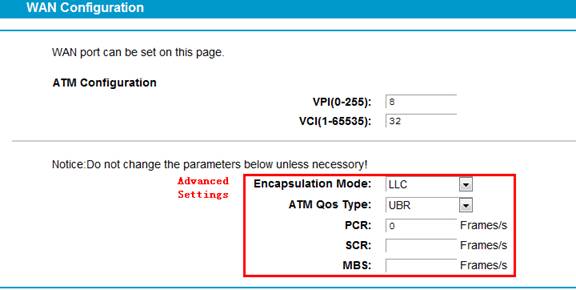
Fill in the information: VPI=8, VCI=32, Choose WAN Connection Type as “Bridge”. For advanced settings, click “Advance” on the right side. Then you can configure the Encapsulation mode and ATM QoS Type, etc.
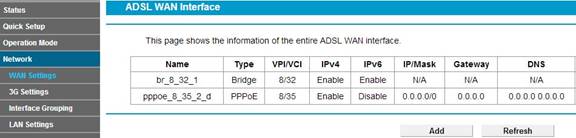
Save it and the added bridge interface will be shown as below:
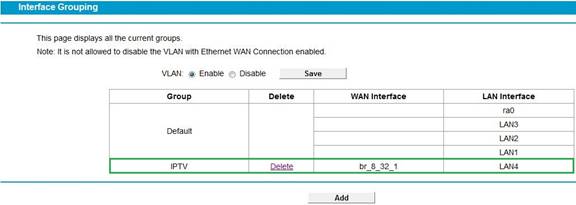
Step 2. Add a New Group for IPTV.
Go to Network->Interface Grouping. Click “Add”.
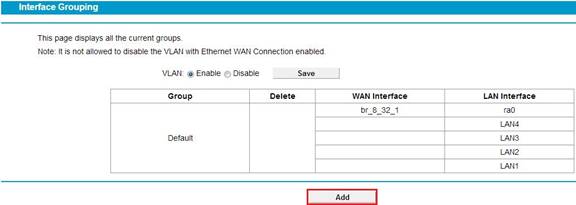
Name the Group as “IPTV”, then add LAN4 and br_8_32_1 to the same group. Save it.

After saving, you will see a new IPTV group added. It has br_8_32_1 as WAN and LAN4 as LAN.
Step 3. Disable DHCP for IPTV Group.
Go to DHCP Server->DHCP Settings, Edit the IPTV Group, and disable DHCP.
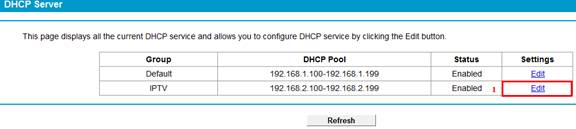
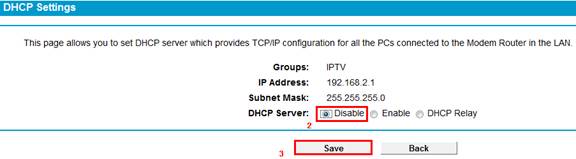
Save it, and IPTV Group’s DHCP status becomes disabled.

Till now, everything is done. Your IPTV device can be connected to LAN4, and you can start enjoying IPTV. (LAN 4 can only be used as the IPTV port after all the above settings.)
Compatible Models: TD-W9970 V2/V3/V4
Here, TD-W9970 is used as a demonstration.
Step 1. Connect the device to the TP-Link DSL Modem Router wirelessly or via Ethernet, then open a browser and visit tplinkmodem.net or 192.168.1.1 to log in to the web management page.
Step 2. Choose IPTV on the left, and you will see the screen as shown below.
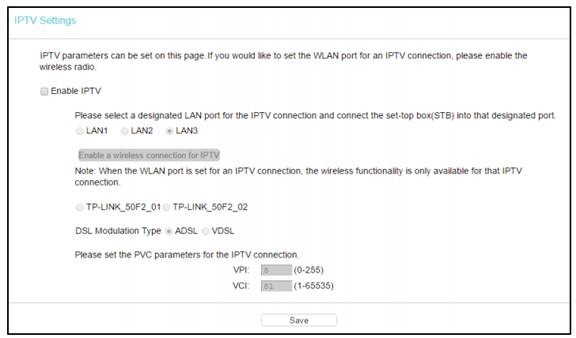
Step 3. Select Enable IPTV.
Step 4. Select Enable a wireless connection for IPTV. If enabled, the set-top box can connect wirelessly to the modem router. To use this function, follow the steps below:
Step 5. Enable SSID2 or SSID3 for the IPTV connection, then click Save. You may rename the SSID.
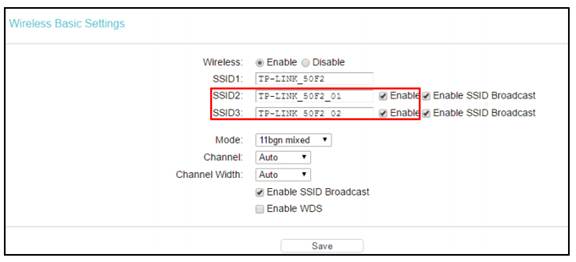
Step 6. Select your desired wireless network for IPTV connection.

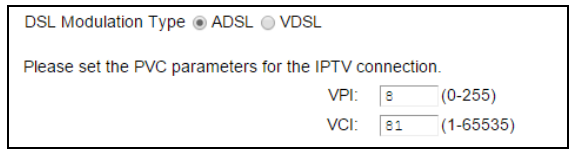
Step 7. DSL Modulation Type: The modem router supports two modulation types: ADSL and VDSL. You can select the appropriate types based on your needs.
If you choose ADSL, you will see the screen as shown in the following figure. Please input the value provided by your ISP.
If you choose VDSL, you will see the screen as shown in the following figure:

Step 8. Click Save to apply the settings.
Done! Configuration complete. You can now connect the set-top box to the configured Ethernet port or SSID to verify if IPTV can be viewed normally.
Is this faq useful?
Your feedback helps improve this site.


3.0-F1_1529482239075s.jpg)
TP-Link Community
Still need help? Search for answers, ask questions, and get help from TP-Link experts and other users around the world.