How to configure QoS on Omada Switches in Standalone Mode
Contents
Configuration for Port Priority Mode
Configuration for Trust 802.1p Mode
Configuration for Trust DSCP Mode
Introduction
QoS is short for Quality of Service, which is used to measure the quality of specific network services. Typically, the switch will treat all traffic equally on a FIFO (First In First Out) delivery basis. When congestion occurs, the switch will drop the later packets, regardless of their type. With QoS configured, the switch forwards traffic according to the priority of the packets. Critical traffic, such as VoIP and video conferences, can be preferentially treated.
On Omada switches, Diffserv QoS is supported, which allows users to configure the mapping rule between priority tags and forwarding queue. There are two kinds of priority tags supported: 802.1p tag and DSCP tag. 802.1p contains eight types of tags, numbered 0 to 7. These tags are carried within the MAC header, in the same field as the VLAN tag. Consequently, a VLAN tag is required for a packet to carry an 802.1p tag. DSCP contains 64 kinds of tags, from 0 to 63. It is taken within the IP header, so only IP packets can carry DSCP priority tags.
For the actual traffic forwarding on Omada switches, there are eight queues, named TC-0, TC-1 to TC-7. TC-0 has the lowest priority, while TC-7 has the highest. The switch will only decide the consequence of forwarding based on which TC queue the packet is in. Users could configure the mapping rule between the TC queue and priority tags carried in packets; this is how the packet forwarding priority is controlled.
On Omada switches, there are three ways to control the priority tag. The first method is port priority, which configures an 802.1p priority on the port and ignores any priority tag carried within the packet. As a result, all ingress packets are forwarded based on the port’s priority tag. The second one is trust 802.1p, which is to forward all the ingress packets on a port based on the 802.1p priority tags carried within the packets. The third one is trust DSCP, which is to forward all the ingress packets on a port based on the DSCP priority tags carried within the packets.
Finally, although the different TC queues have different priorities while forwarding, there are two kinds of configurations on the scheduler of TC queues: SP (Strict Priority) and WRR (Weight Round Robin).
SP mode strictly follows the priority of different queues. If the forwarding of packets in the high-priority queue is not finished, the forwarding of packets in the low-priority queue will not start. Using SP mode as a scheduler ensures that high-priority queues are serviced first, critical traffic such as voice and video receives minimal delay, and maximum priority is given. However, lower-priority queues may suffer from starvation if high-priority traffic is consistently present, leading to delays or dropped packets for less critical applications.
WRR mode is used to solve this issue. Users can configure different weights for different queues, with the priority of a queue typically determining its weight. WRR allocates bandwidth among queues based on assigned weights. Each queue is serviced in a round-robin fashion according to its weight, ensuring fair bandwidth distribution and preventing lower priority queues from experiencing starvation.
On Omada switches, SP mode and WRR mode can be mixed, allowing users to configure multiple queues with different priorities. Specifically, some queues can be set to SP mode to ensure strict priority, while others can be set to WRR mode.
Requirements
- Omada Access, Access Plus, Access Pro, Access Max, Aggregation, Campus Switch
- Omada S6500 and S7500 Series Switch
Configuration
The following section introduces the configuration for port priority mode, trust 802.1p mode, trust DSCP mode, and the scheduler.
Configuration for Port Priority Mode
Port Priority Mode configures an 802.1p priority on a port, forwarding all ingress traffic based on this priority. We need to map 802.1p tags to TC queues and set port trust mode to untrust.
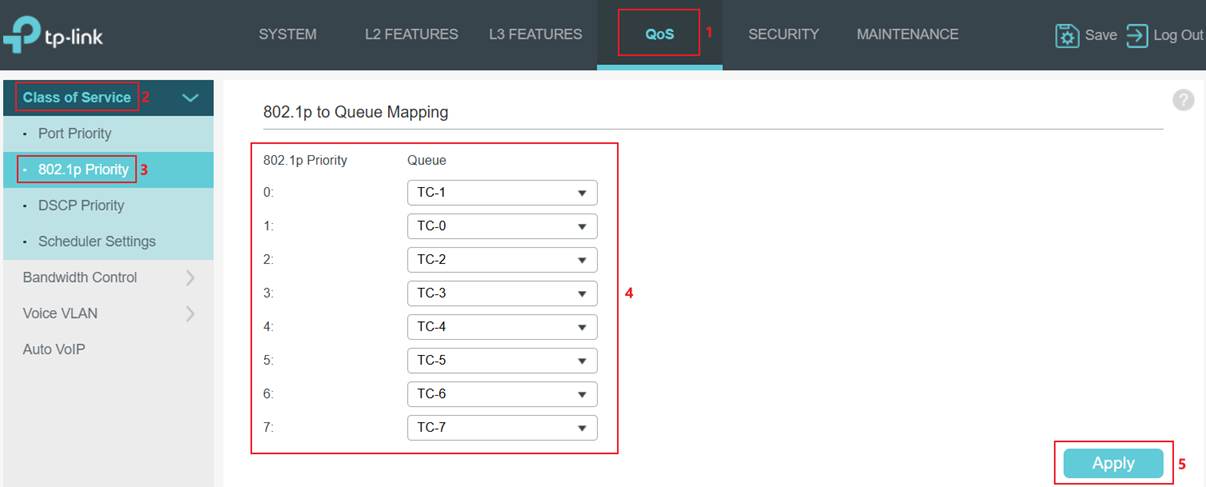
Step 1. Map 802.1p tags to TC queues. Go to QoS > Class of Service > 802.1p Priority. Select the 802.1p Priority and choose the Queue mapping to it. Click Apply to save.

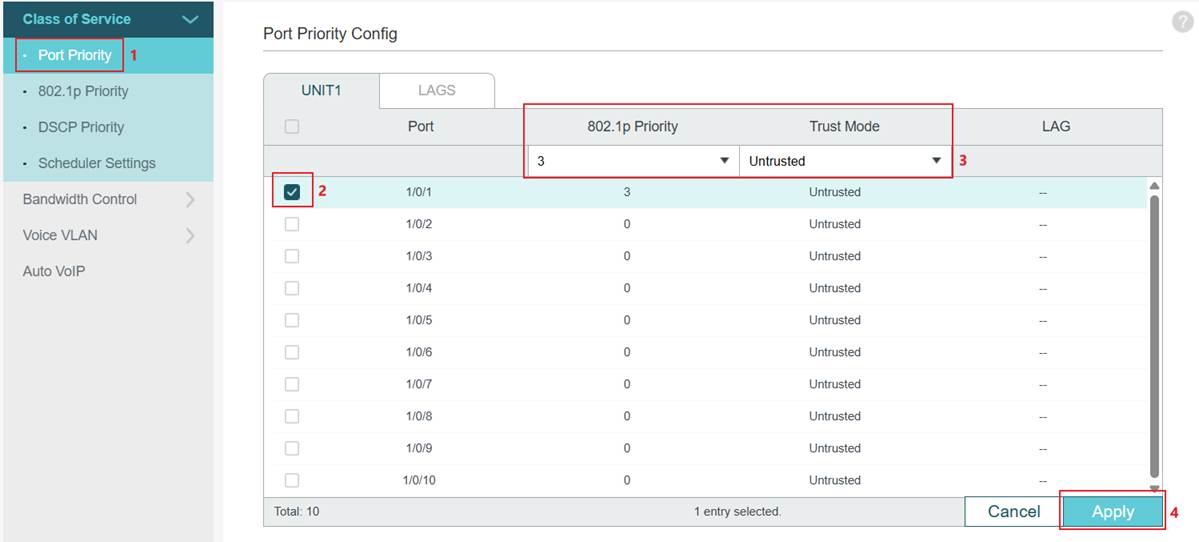
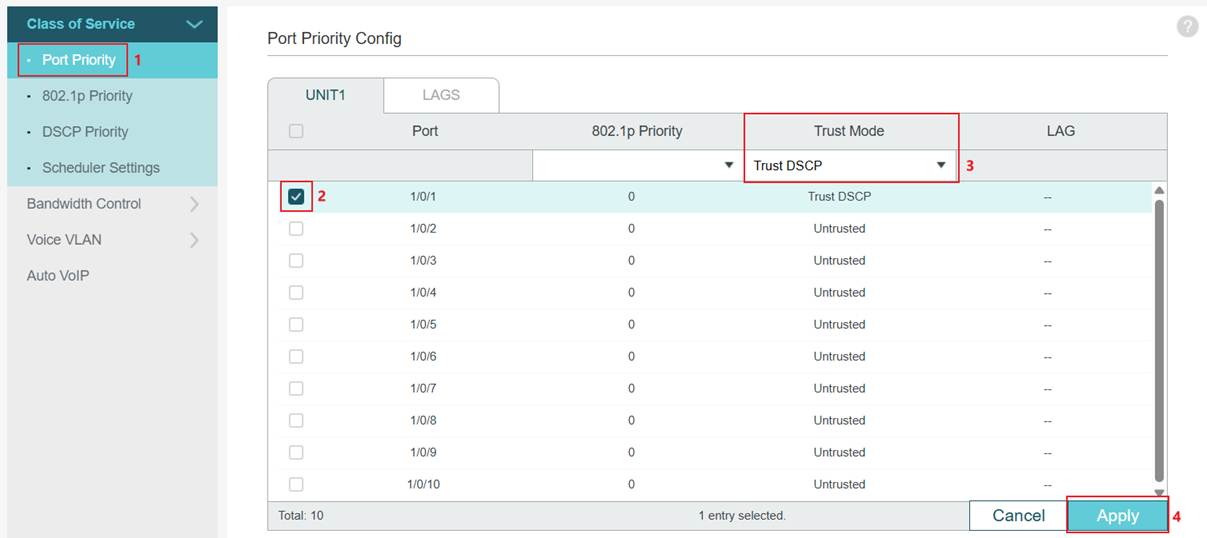
Step 2. Set the port Trust Mode to Untrust. Go to Port Priority. Select a port, change the Trust Mode to Untrust, set an 802.1p Priority for this port, and then click Apply to save.
Configuration for Trust 802.1p Mode
Trust 802.1p mode means to forward the ingress packets according to the 802.1p priority tag carried by the packets. We need to map 802.1p tags to TC queues and configure port trust mode to trust 802.1p.
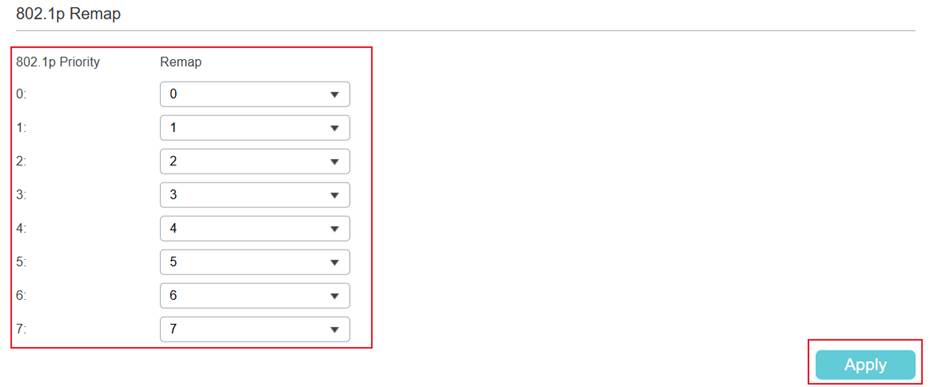
Step 1. Map 802.1p tags to TC queues. Go to QoS > Class of Service > 802.1p Priority. Select the 802.1p Priority and choose the Queue mapping to it. The 802.1p Remap is also configurable. For instance, when remapping 802.1p tag 1 to tag 2, ingress packets with 802.1p tag 1 are remapped and treated as if they carry 802.1p tag 2.
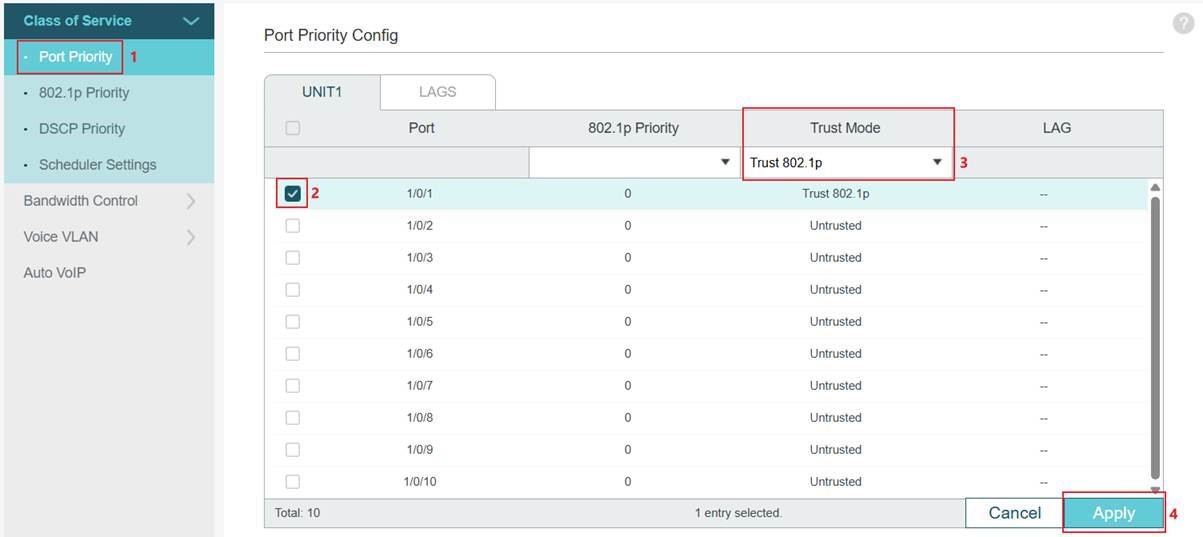
Step 2. Set port Trust Mode as Trust 802.1p. Go to Port Priority. Select a port, change the Trust Mode to Trust 802.1p, and then click Apply to save.
Configuration for Trust DSCP Mode
Trust DSCP mode means to forward the ingress packets according to the DSCP priority tag carried by the packets. There are 64 kinds of DSCP tags; they need to be first mapped to 802.1p tags, and then the 802.1p tags will be mapped to TC queues. We need to map DSCP tags to 802.1p tags, then map 802.1p tags to TC queues, and set port trust mode to trust DSCP.
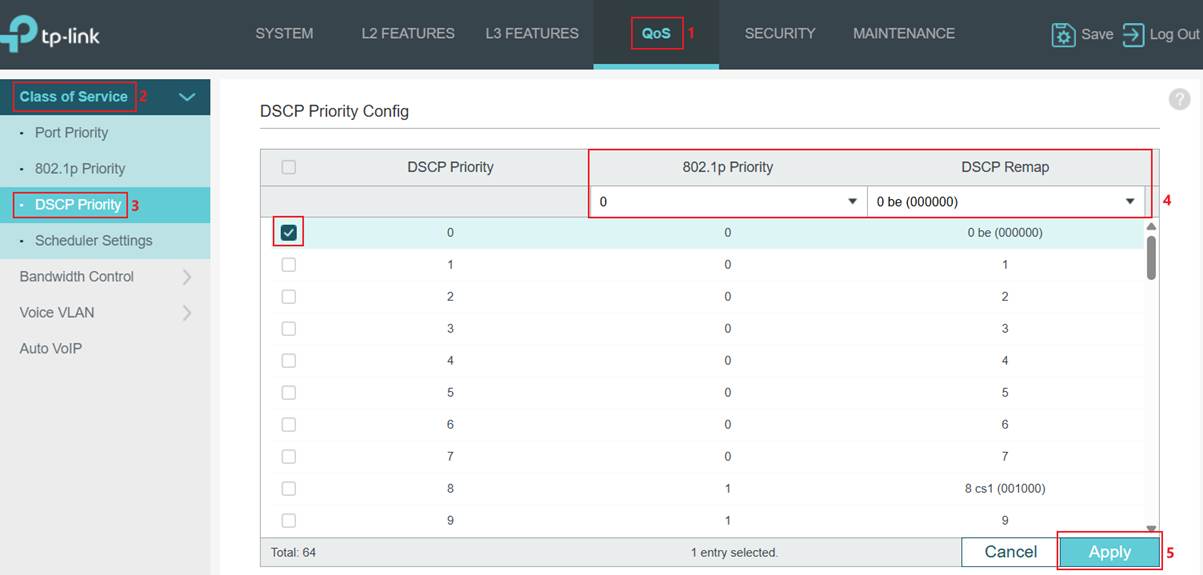
Step 1. Map DSCP tags to 802.1p tags. Go to QoS > Class of Service > DSCP Priority. Select the DSCP Priority and choose the 802.1p Priority mapping to it. The DSCP Remap is also configurable. For instance, when remapping DSCP tag 1 to tag 2, ingress packets with DSCP tag 1 are remapped and treated as if they carry DSCP tag 2.
Step 2. Map 802.1p tags to TC queues. Go to 802.1p Priority. Select the 802.1p Priority and choose the Queue mapping to it.

Step 3. Set port Trust Mode as Trust DSCP. Go to Port Priority. Select a port, change the Trust Mode to Trust DSCP, and then click Apply to save.
Configuration for Scheduler
As introduced above, Omada switches support SP mode, WRR mode, or a combination of both, and can be configured as needed.
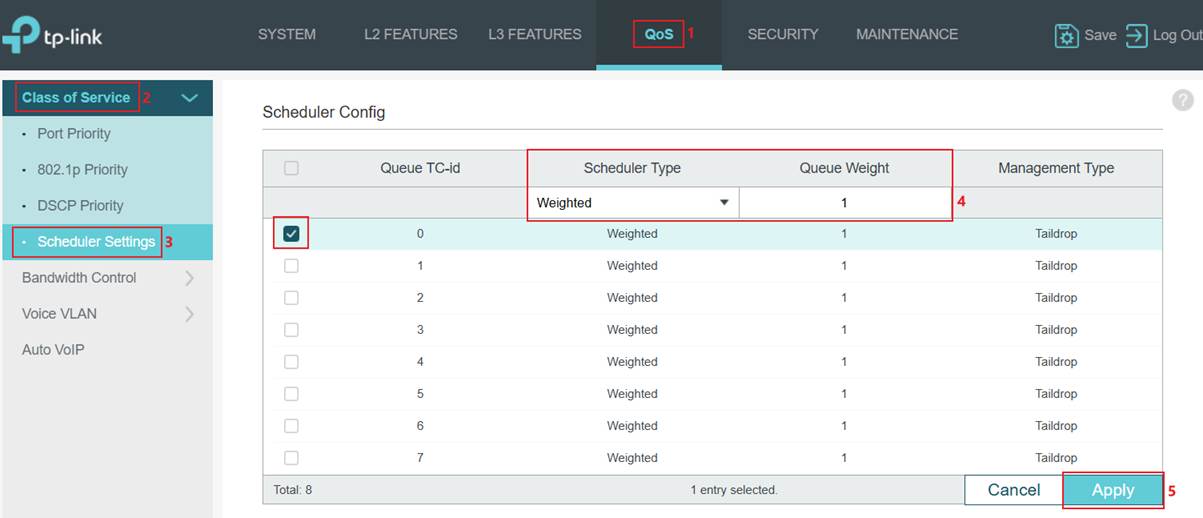
Note: For Omada Access Plus, Omada Access Max, Omada Aggregation, Omada Campus, Omada S6500 Series Switches, Omada S7500 Series Switches, TL-SG2428P V3, TL-SG3428 V2, SG3428 V2.30, TL-SG3210XHP-M2 V1 and V2, the scheduler is configured globally, which means the same scheduler configuration will be applied to all ports.
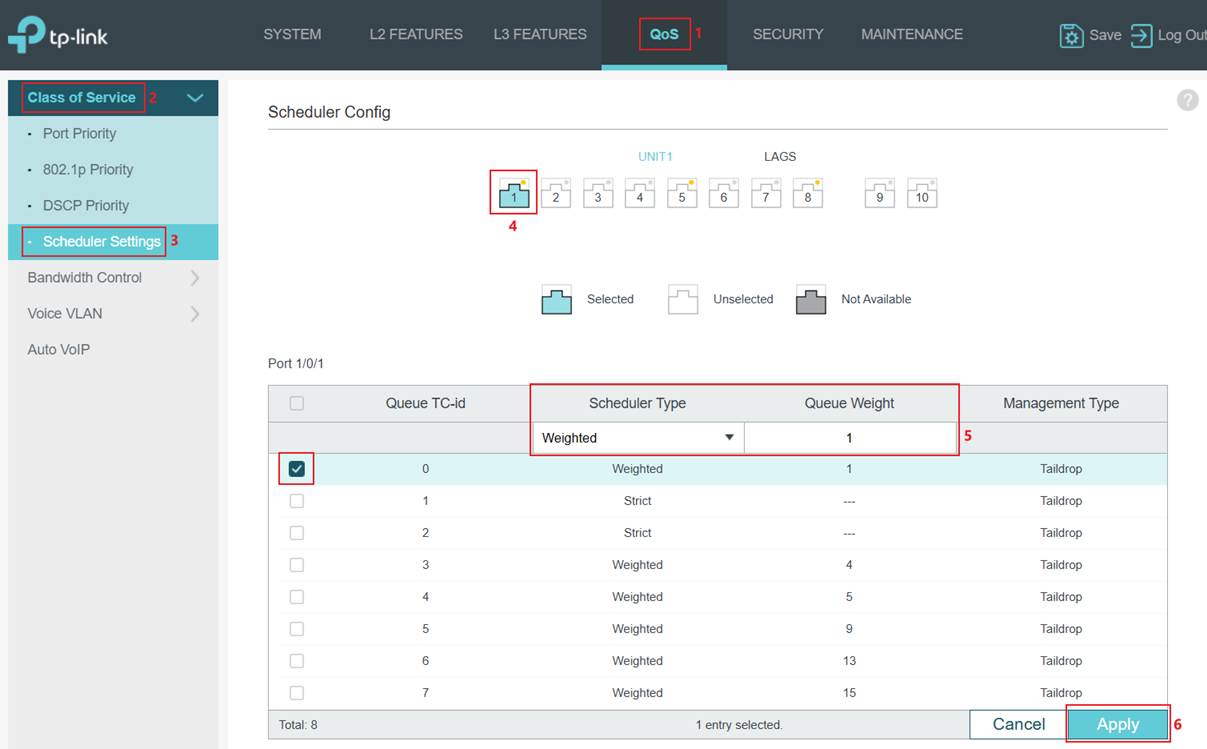
For Omada Access (excluding TL-SG2428P V3, TL-SG3428 V2, SG3428 V2.30) and Omada Access Pro (excluding TL-SG3210XHP-M2 V1 and V2) switches, the scheduler is configured per port, which means a different scheduler configuration could be applied to other ports.
Step 1. Set different scheduler methods for different TC queues and ports. Go to QoS -> Class of Service > Scheduler Settings. Configure globally or select the port first. Then, select the TC queue and the scheduler mode to apply. Next, choose the Queue TC-id and Scheduler Type to use. Finally, enter the Queue Weight if applying WRR to this queue. Determined by model number.
Conclusion
This article introduces QoS and explains how it is supported or configured on Omada switches.
Get to know more details of each function and configuration please go to Download Center to download the manual of your product.
Este guia foi útil?
A sua resposta ajuda-nos a melhorar o nosso site.


