How to Change Wi-Fi Settings on a TP-Link Wireless Router
This guide explains how to customize your TP-Link router's wireless settings, including the Wi-Fi name (SSID), password, security mode, and advanced options. You can make changes using either the web management page or the Tether app.
Note: Most settings are pre-configured for optimal performance and security. We recommend only changing the Wi-Fi name and password unless you have a specific reason to adjust other options.
Key Takeaways
- You can change Wi-Fi settings via the web page (https://tplinkwifi.net/ ) or the Tether app.
- Enable Smart Connect to let your router automatically choose the best band for your device.
- Hide SSID to make your network invisible, but you'll need to enter the name manually to connect.
- For advanced settings like Channel and Channel Width, keep default values unless you face interference.
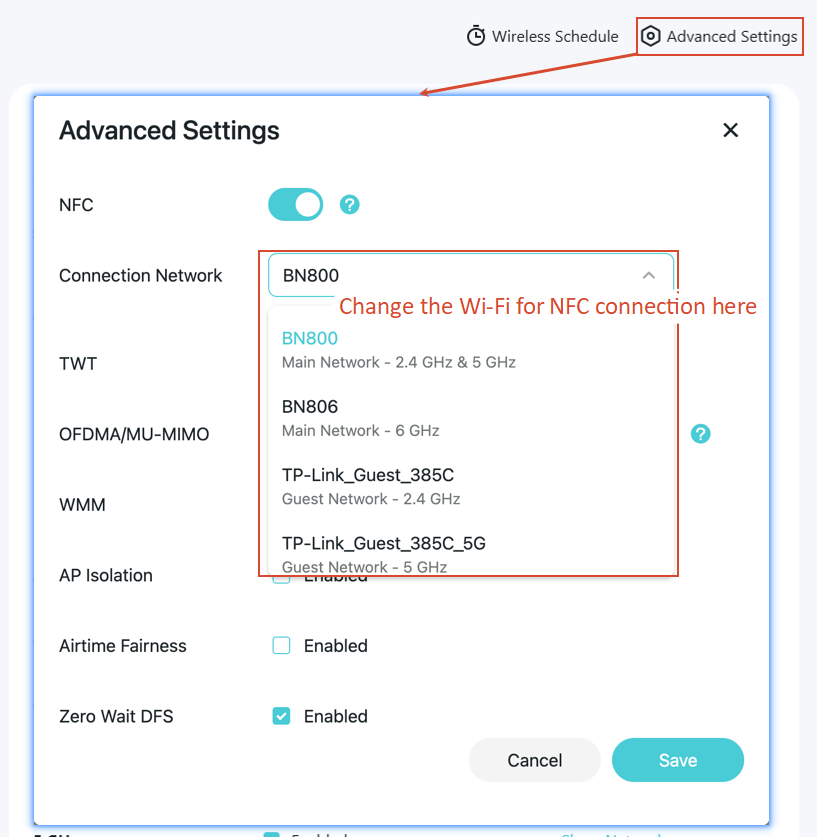
- For supported models, NFC connection to the main 2.4/5G Wi-Fi is enabled by default.
Understanding Key Wi-Fi Settings
Here are the most common Wi-Fi settings you may encounter:
Smart Connect: When enabled, your router uses the same Wi-Fi name (SSID) for both the 2.4GHz and 5GHz bands. The router automatically assigns your device to the best band, balancing speed and range. You don’t need to switch between networks manually.
2.4GHz / 5GHz / 6GHz: These bands are enabled by default. Uncheck Enable (or Enable Wireless Radio on some models) to turn off a specific band.
Hide SSID: When enabled, the network name is hidden from Wi-Fi scans. To connect, you must manually enter the SSID and password on your device.
Network Name (SSID) & Password: You can customize these. Note that the password is case-sensitive. If you’re connected via Wi-Fi, you’ll be disconnected after saving changes—just reconnect using the new credentials.
Security: Choose an encryption method. We recommend WPA2-PSK [AES] or WPA2-PSK [AES] / WPA3-Personal if your router supports it.
Channel & Channel Width: The channel determines the frequency the router uses. Leave it on Auto unless you experience interference from nearby networks.
AP Isolation: When enabled, devices connected to the Wi-Fi cannot communicate with each other.
NFC (if supported): Enabled on the main 2.4/5GHz network by default, allowing devices to connect by tapping them against the router. You can select another network to enable NFC connection, or disable it completely.
Note: The available settings vary by model. Please refer to your router’s web interface for the exact options.
Step-by-Step Guide
Scenario 1: Using the Web Management Page
Step 1: Access the Web Management Page
Connect your phone or computer to the router via Wi-Fi or an Ethernet cable.
Open a web browser and enter https://tplinkwifi.net/ in the address bar.
Log in with your admin password. (For first login, you’ll be asked to create an admin password)
Step 2: Change Wi-Fi Settings
For Wi-Fi 8 Routers:
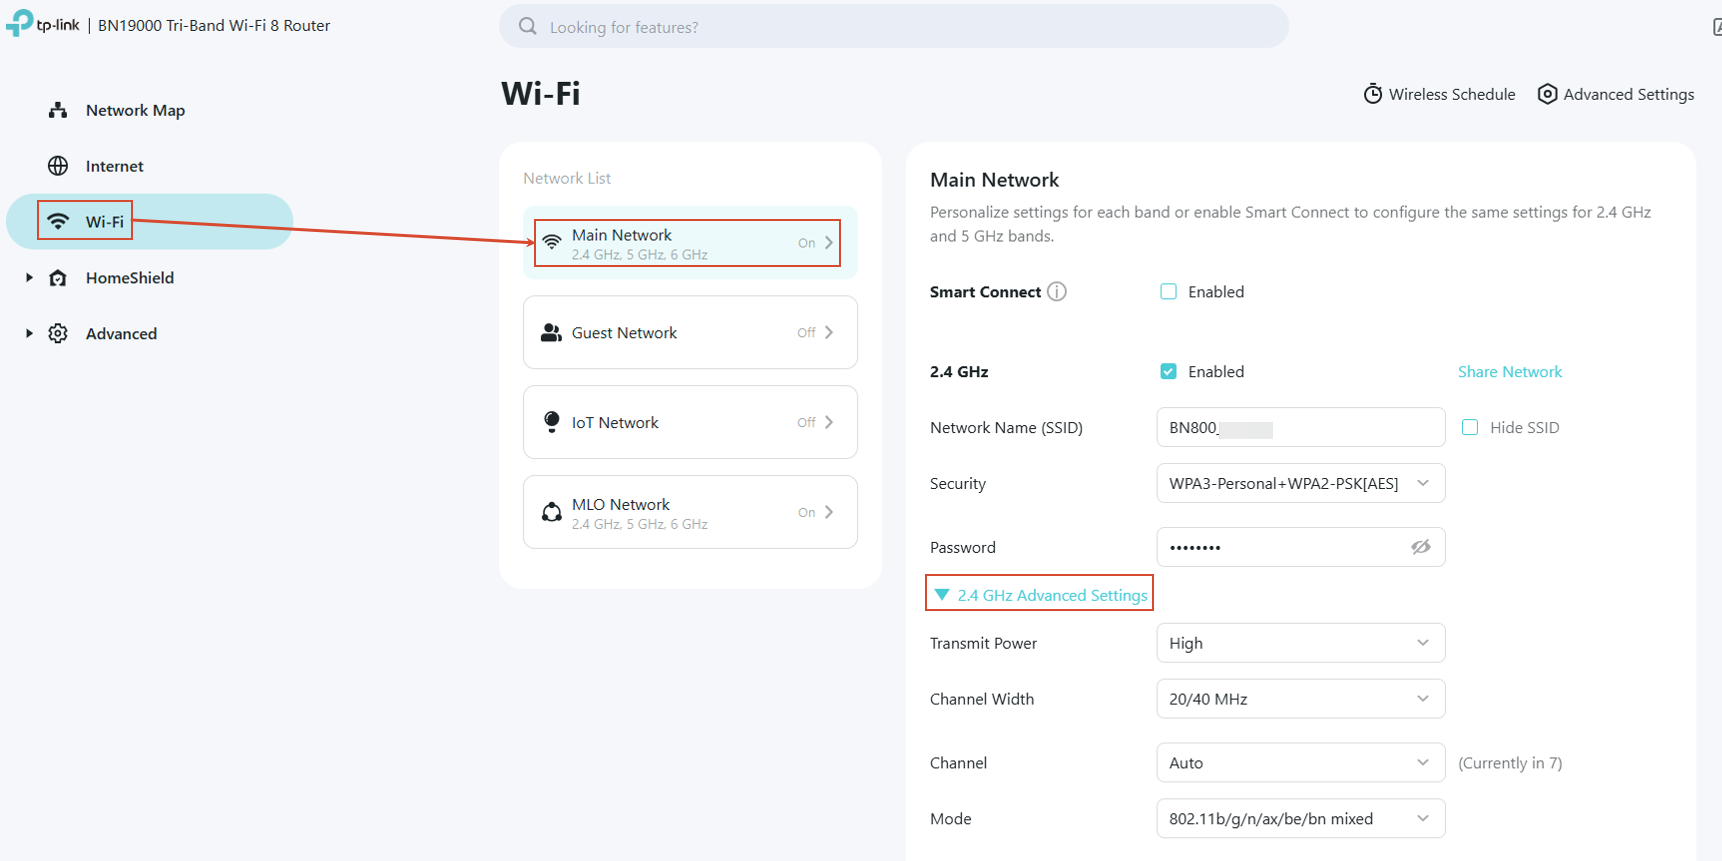
Go to Wi-Fi > Main Network. There you may change basic wireless settings like Smart Connect, SSID, Password, and more.
Click 2.4/5/6GHz Advanced Settings to adjust advanced settings (Channel, Channel Width, and Mode) for a specific band.
Tap Advanced Settings on the top right to access more advanced features (like NFC, MU-MIMO, AP Isolation…).
Click Save to apply your changes.
For Other TP-Link Routers:
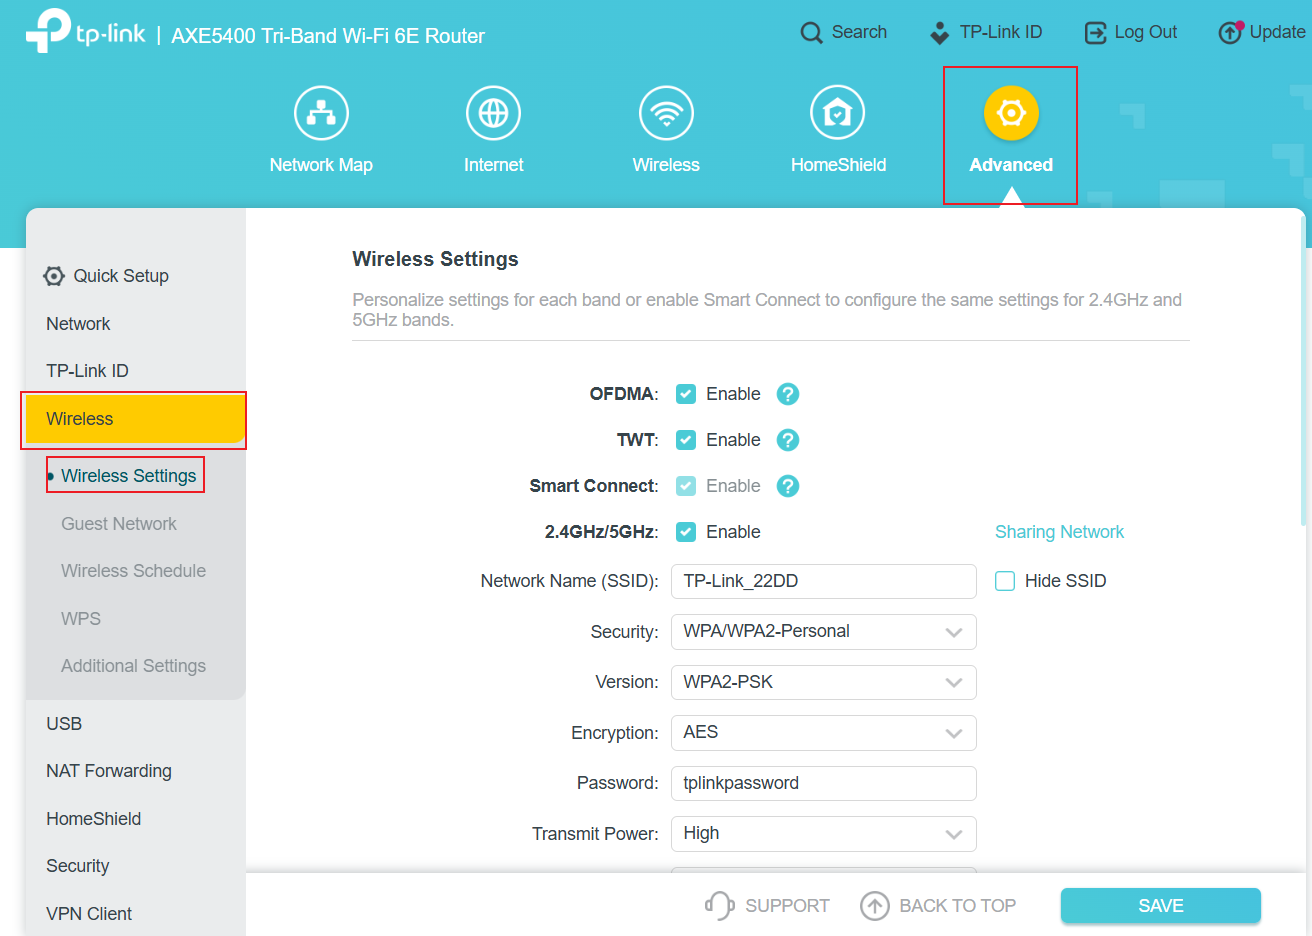
Go to Advanced > Wireless > Wireless Settings, make your changes, and Save.
Scenario 2. Using the Tether App (For Tether-compatible models)
Step 1. Access the router
Connect your phone to the router’s Wi-Fi. (Skip this step if your router is already bound to your TP-Link ID for remote access)
Open the Tether app.
Tap your router under Devices.
Log in with your admin password.
Step 2. Modify Wi-Fi Settings
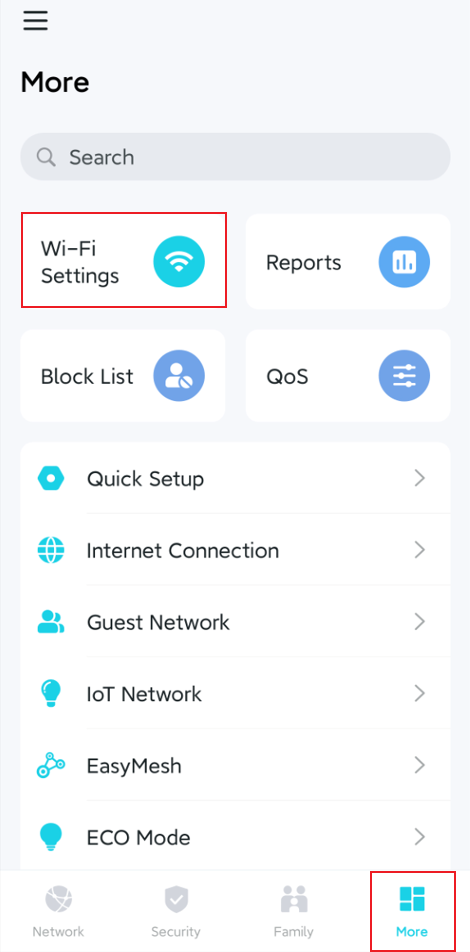
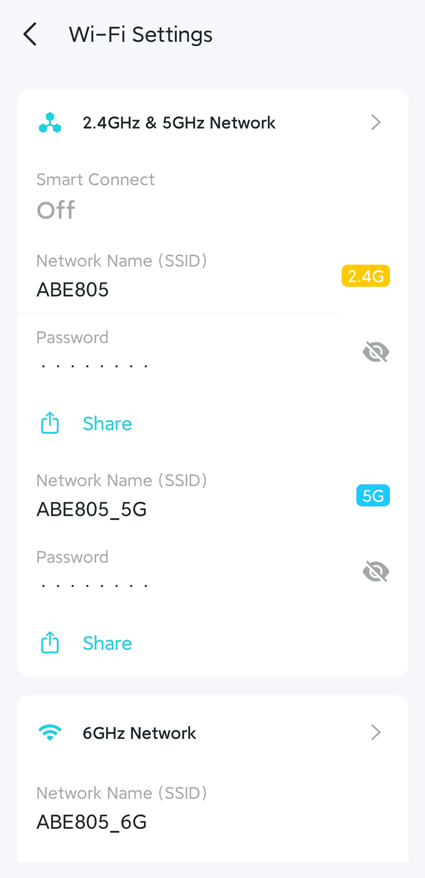
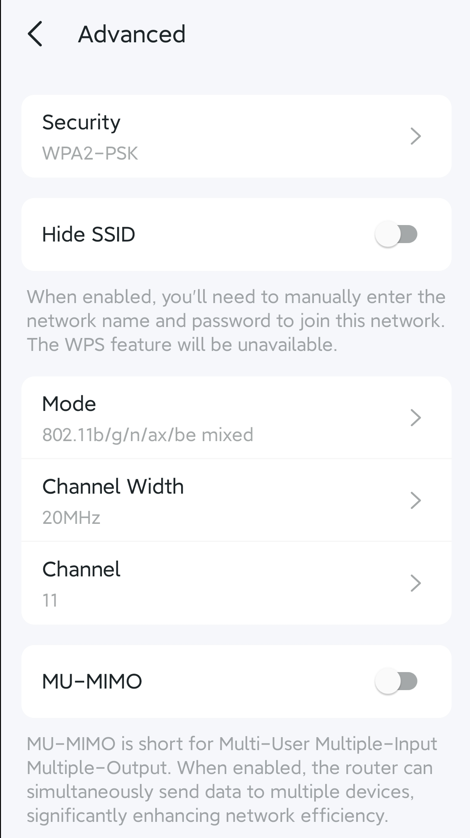
Tap More > Wi-Fi Settings, then select the network you want to modify (2.4 GHz, 5 GHz, 6 GHz, or MLO Network).
Make your changes and tap Save.
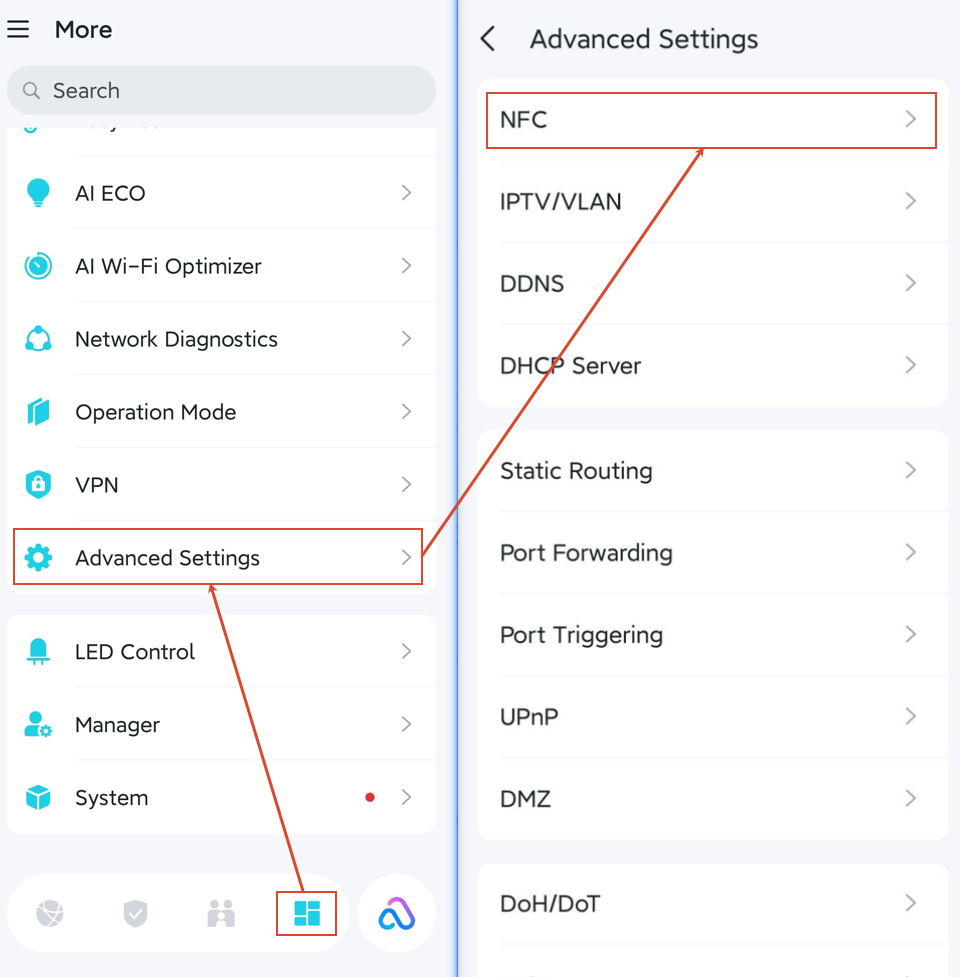
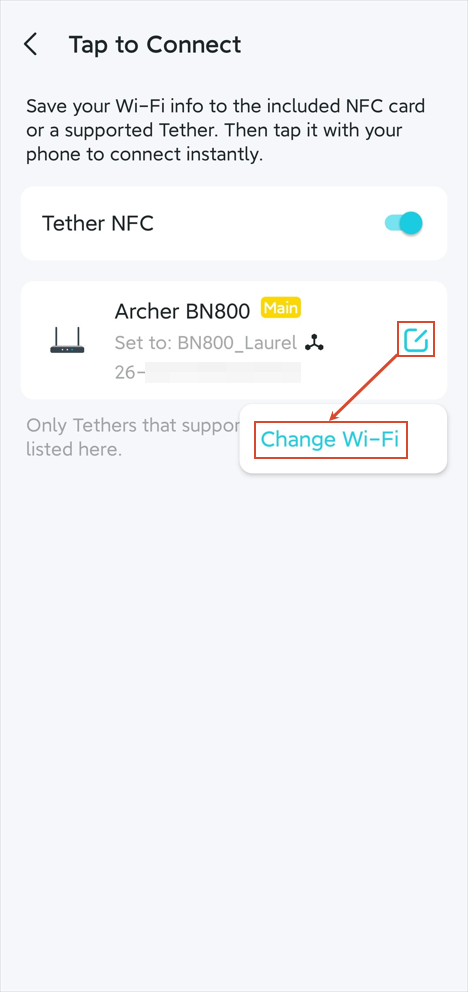
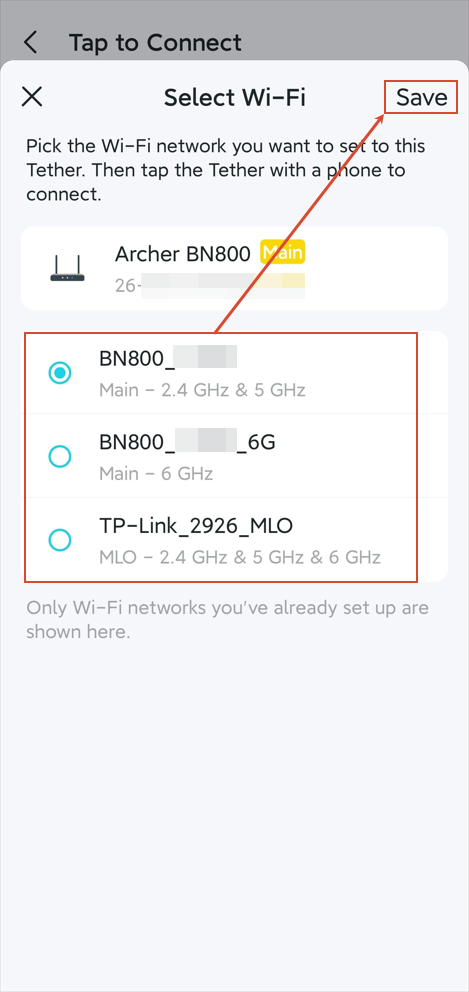
To enable NFC connection on a different Wi-Fi:
Go to More > Advanced Settings > NFC
Click the Edit button, and then Change Wi-Fi.
Select your desired network, and Save.
Q&A
Q1: My phone only sees one Wi-Fi name. Why can’t I configure the 2.4 GHz and 5 GHz bands separately?
This usually happens when Smart Connect is enabled. Go to your wireless settings and disable Smart Connect. Then manually change one of the Wi-Fi names (SSID) to something different so your device can see them as two separate networks.
Q2: I can’t find my Wi-Fi network. What should I do?
Disabling Smart Connect doesn’t automatically change the SSID. The 2.4 GHz and 5 GHz bands still share the same name unless you.
Q3: What should I do if I cannot find the Wi-Fi network?
Please refer to Wi-Fi Network Not Showing Up? How to Fix It for detailed troubleshooting guidance.
Get to know more details of each function and configuration. Please go to the Download Center to download the manual for your product.
Looking For More
Finden Sie diese FAQ hilfreich?
Mit Ihrer Rückmeldung tragen Sie dazu bei, dass wir unsere Webpräsenz verbessern.



TP-Link Community
Still need help? Search for answers, ask questions, and get help from TP-Link experts and other users around the world.
Von United States?
Erhalten Sie Produkte, Events und Leistungen speziell für Ihre Region