Tapo Camera Not Connecting to Wi-Fi: Troubleshooting Guide
If your Tapo camera won't connect to Wi-Fi, the Tapo app guides you through setup step by step — but interference, incorrect network settings, or missing app permissions can stop the process at different points. This guide covers four common scenarios so you can skip directly to the one that matches your error.
Note: If your Sub-G camera or doorbell (Tapo C400 V1, Tapo C420, Tapo D230S1) fails to pair with Tapo H200, refer to What can I do if the battery-powered cameras fail to pair with the Tapo H200?
Key Takeaways
- If your Tapo camera's Wi-Fi network ("Tapo_Cam_XXXX") is not visible, reset the camera by pressing and holding the RESET button for over five seconds until the LED blinks red and green (or red and blue for HomeKit models).
- Tapo cameras cannot connect to unencrypted networks. Do not connect them to open or portal-based Wi‑Fi networks.
- Active VPNs or VPN-related apps (such as AdGuard, DuckDuckGo, or NordVPN) on your phone will prevent the Tapo app from completing setup and must be disabled before configuring.
- iPhone and iPad users must enable Local Network permission for the Tapo app under Settings before the app can detect the camera.
- If setup fails with a "Pairing failed" or "Failed to receive an IP address" error after trying all steps, contact TP-Link technical support with your TP-Link ID, camera model, and MAC address.
Before You Begin: Setup Requirements for Tapo Cameras
- Install the latest Tapo App from the App Store or Google Play.
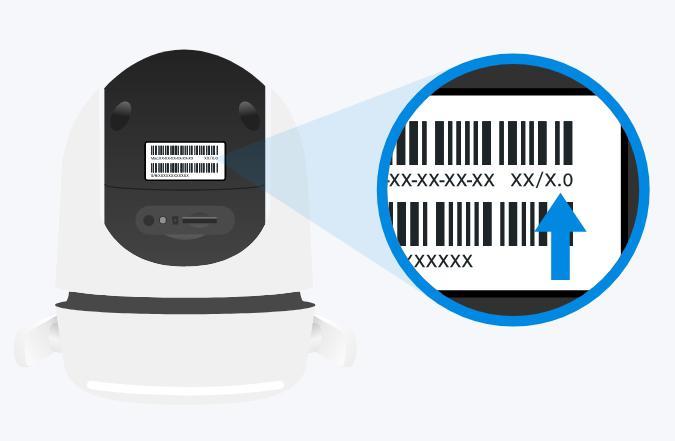
- Choose the correct camera model and device version during the configuration process. Identify your device’s version on the device label.
- Please ensure the System LED is blinking red and green (or red and blue for HomeKit models, such as the Tapo C125 or Tapo C225). If not, reset the camera by pressing and holding the RESET button for over 5 seconds until the LED blinks red.
How to Fix Tapo Camera Wi-Fi Connection Issues
Scenario 1: Cannot see the smart home device's Wi-Fi network “Tapo_Cam_XXXX” on the phone
Step 1. Ensure the Tapo Cam is powered on with the rated voltage using the original power adapter, and avoid powering it through any extension cords.
Step 2. Reset the Tapo Cam by pressing and holding the RESET button for over 5 seconds until the LED starts blinking red and green (or red and blue for HomeKit models such as Tapo C125 or C225), indicating the reset is successful.
Step 3.
- iOS: Go to the Settings page, then tap Wi-Fi to connect to the Tapo Cam’s Wi-Fi manually.
- Android: Go to the Settings page to connect to the Tapo Cam’s Wi-Fi network. Once it’s connected, the phone will automatically search for the camera.
Step 4. Try scanning for the camera’s default Wi‑Fi network on another phone to see if the SSID “Tapo_Cam_XXXX” is detected.
Step 5. Change the location where you set up the smart device to reduce possible interference in the same frequency band at the original location (to avoid interference from devices such as Bluetooth, USB 3.0, microwave ovens, ZigBee devices, etc.).
Step 6. Reboot the phone to try again, use a different phone, or check if a PC can detect the device's Wi-Fi network “Tapo_Cam_XXXX”.
Scenario 2: App displays the error message "unable to connect to your Tapo camera Wi-Fi."
Step 1. Place the smartphone close to the device to ensure the Wi-Fi signal is strong enough (full bars).
Step 2. Ensure there are no active VPN or VPN-related apps (such as AdGuard, DuckDuckGo, NordVPN, etc.) running on the phone. If a VPN is running on the phone, turn it off.
Step 3. (Only for iPhone/iPad) Go to Settings on your phone, find the Tapo app on the list, and enable the Local Network option. Reopen the APP and try again. If you can't find "Local Network" permission, please go back to the APP and click "I’ve already given Local Network Permission".
Step 4. Choose the right wireless network to connect to, whose SSID should be “Tapo_Cam _XXXX”. (XXXX is usually the last 4 bits of the device's MAC Address).
Note:
1. iOS: After connecting to the device’s Wi-Fi, it will show “No Internet Connection.” Don't worry about it; just return to the app to continue.
2. Android: If the phone pops up a message “this Wi-Fi network is unsecured/unprotected, your privacy and data may be at risk”. With 2 options: "Disconnect” or “connect anyway / keep using this Wi-Fi / stay connected”, select "connect anyway/keep using this Wi-Fi/stay connected", and continue.
Step 5. Make sure you choose the Correct Model when adding a device in the Tapo App.
Step 6. Make sure the smartphone is always connected to the device’s Wi-Fi when the app shows it connecting.
Note: Some phones automatically reconnect to a saved network instead of an unsecured one. If this happens, forget the saved network profile first.
Step 7. Use another smartphone to set up the device again.
Scenario 3: Can’t find the Wi-Fi name of the router
Step 1. Ensure your Wi-Fi network is encrypted and operating on the 2.4 GHz band (most Tapo Cams require 2.4 GHz, though some models support 5 GHz—please check your specific model's specifications). Tapo Cams cannot connect to unencrypted networks. Additionally, verify that the Wi-Fi signal strength is adequate; if not, move the camera closer to your router.
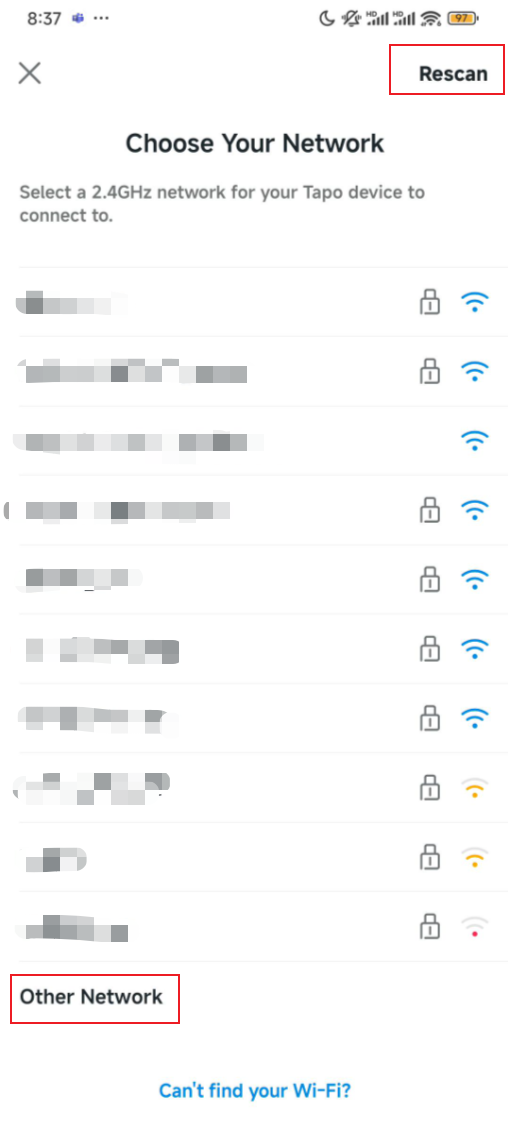
Step 2. If it doesn’t display your router's Wi-Fi name automatically, please click Rescan to refresh the Wi-Fi list several times to see if you can find it.
Step 3. If the router's SSID is hidden, please select 'Other Network' and enter the SSID and password manually.
Step 4. Try configuring the Tapo Cam on a different phone.
Step 5. Reset the camera by pressing and holding the RESET button for over 5 seconds until the LED blinks red, then repeat the process.
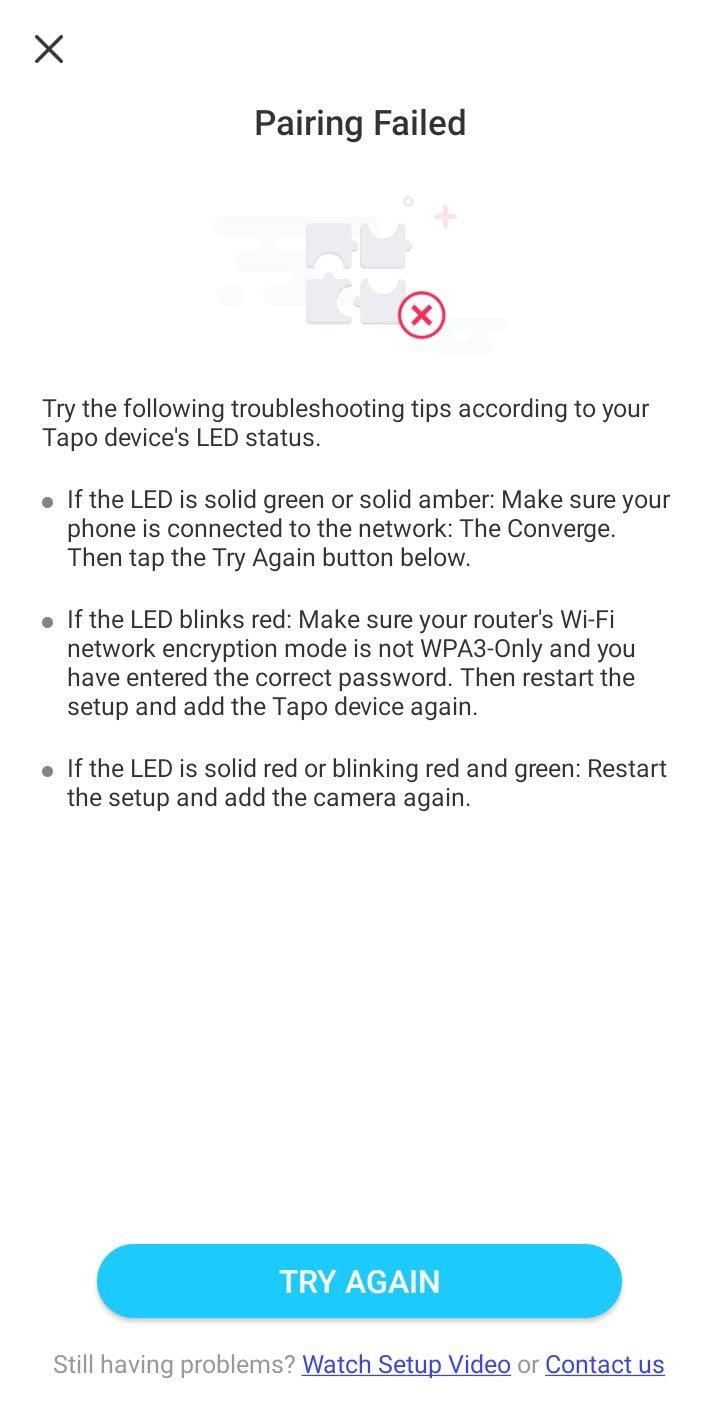
Scenario 4: Tapo Camera Won't Connect — App Shows "Unable to Join Your Network", "Pairing Failed" or "Failed to receive an IP address"
Step 1. Ensure the smart device is close to the router to get a strong Wi-Fi signal, and enter the correct Wi-Fi password in the app. We suggest disconnecting from your home Wi-Fi network, then reconnecting with the same password to refresh the connection.
Step 2. Ensure VPN (such as AdGuard, DuckDuckGo, NordVPN, etc.) is Disabled on the phone and router.
Step 3. Make sure your smartphone is connected to the router's 2.4 GHz Wi-Fi network, and that both your phone and the Tapo Cam are on the same network (same SSID) when pairing.
Step 4. If the camera is connected to a range extender, try setting it up and connecting to the main Wi-Fi network.
Step 5. Try using a different phone and router. You may also try connecting the Tapo Cam—and the smartphone—to the same independent 2.4 GHz guest Wi‑Fi or mobile hotspot for testing.
Step 6. Check whether your router has a maximum number of connected devices (maximum clients) limit enabled. If the limit has been reached, new devices may fail to connect. Try disconnecting unused devices or increasing the limit in the router settings. Routers such as AT&T models commonly include this type of restriction, particularly on guest networks.
Step 7. Try resetting the camera by pressing and holding the RESET button for over 5 seconds until the LED blinks red, then start the setup process again.
If your Tapo camera is still not connecting to Wi-Fi after working through all four scenarios above, contact TP-Link technical support with the following information.
- Your TP-Link ID (Email Address).
- The model number of your Tapo Cam and its MAC address.
- Whether you have tried all the suggestions listed above or not. What were the results?
Get to know more details of each function and configuration. Please go to the Download Center to download the manual for your product.
Looking For More
Is this faq useful?
Your feedback helps improve this site.


TP-Link Community
Still need help? Search for answers, ask questions, and get help from TP-Link experts and other users around the world.