How to Use the TP-Link Deco WPS Button to Connect Devices
WPS (Wi-Fi Protected Setup) is a fast, secure way to connect a wireless device to your Deco network without entering a Wi-Fi password. This guide covers how to use the TP-Link Deco WPS button and the in-app WPS feature to add a device in two simple steps. Note that WPS is only available on select Deco models; other models may gain support through future firmware updates.
Key Takeaways
- WPS (Wi-Fi Protected Setup) lets you connect a wireless device to your Deco network quickly and securely without manually entering a Wi-Fi password.
- To start WPS on your Deco, open the Deco app, tap More, then tap WPS.
- After initiating WPS in the app, press the physical blue WPS button on the side of the Deco unit closest to the device you want to connect.
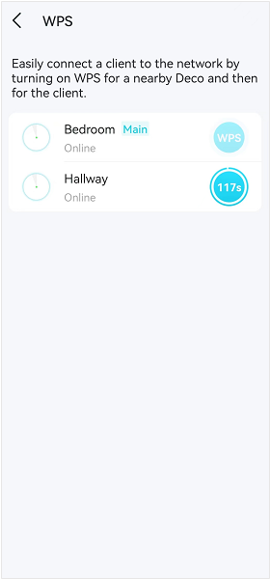
- The WPS scanning window lasts two minutes. You must press the WPS button on your wireless device within that time for it to connect.
- WPS is only available on select Deco models; other models may gain support through future firmware updates.
What Is WPS?
WPS stands for Wi-Fi Protected Setup. It is a standard that allows devices to join a Wi-Fi network quickly without requiring the user to enter a password. When you press the Deco WPS button, it opens a two-minute window during which compatible devices can connect to your network automatically.
WPS (Wi-Fi Protected Setup) can help you quickly and securely connect to a network with a tap. This article will guide you to add a new wireless device to your Deco’s network quickly via WPS.
Note: The WPS feature is only available on some Deco models, and other Deco models will support this feature in the future via firmware updates.
How to Use the Deco WPS Button
Here we take Deco M5 as an example.
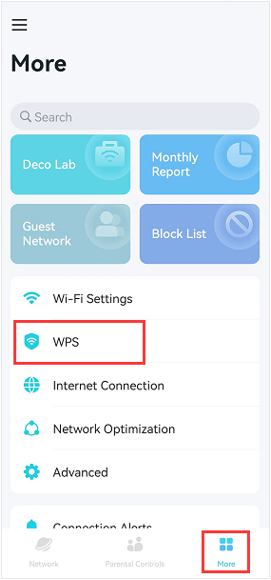
Step 1: Open WPS in the Deco App
In the Deco app, tap More, then tap WPS.
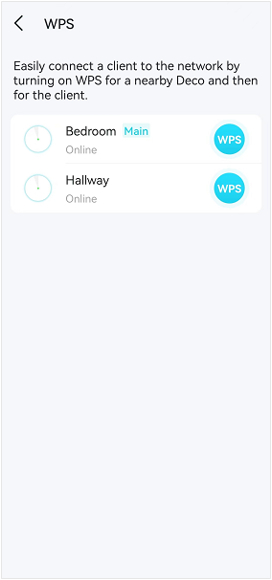
Step 2: Press the Deco WPS Button
On the Deco unit closest to your wireless device, tap the blue WPS button on the side of the Deco to begin the scanning process.
Note: Within the two-minute window, press the WPS button on your wireless device and wait for it to connect to your Deco network.
Tips for a Successful WPS Connection
- Use the Deco unit closest to the device you are connecting — sourced from the existing page.
- Act within the two-minute scanning window — sourced from the existing page.
- Make sure your wireless device supports WPS before attempting this method.
Get to know more details of each function and configuration. Please go to the Download Center to download the manual of your product.
Looking For More
Is this faq useful?
Your feedback helps improve this site.

_Overview_normal_20211130005706l.png)
_EU_1.0_Overview_1_normal_20220411032339n.png)
TP-Link Community
Still need help? Search for answers, ask questions, and get help from TP-Link experts and other users around the world.