How to use the Preset, Patrol and Pattern Scan
Contents
Introduction
The Speed Dome PTZ camera (InSight PTZ5425) supports three PTZ task modes: Preset, Patrol, and Pattern Scan, enabling highly flexible unattended surveillance operations. This article describes how to configure and use different PTZ task modes.
Requirements
- InSight PTZ5425
- PC
Configuration
Preset
Concept
Preset is a fundamental feature of a PTZ camera. It is used to save the camera’s fixed position status at a specific moment in advance. This status typically includes the PTZ parameters: Pan angle, Tilt angle, and Zoom level.
Purpose
The core purpose of presets is to enable the camera to quickly and accurately switch between different key monitoring areas, eliminating the need to manually adjust the camera angle and zoom each time.
Common Use Scenarios
- Multiple fixed areas of interest
When a monitoring point needs to cover several defined areas, a preset can be configured for each area to allow fast switching between views.
- Frequent monitoring of the same location
For critical locations that require repeated checks, presets help avoid repetitive manual PTZ operations and significantly improve efficiency.
- Consistent viewing angles required
During event review, comparison analysis, or routine inspections, presets ensure that the viewing angle, orientation, and zoom level remain consistent each time they are recalled, reducing human error.
- Integration with other PTZ functions
Presets often serve as the basic building blocks when used in conjunction with other PTZ features, such as:
Patrol: Automatically switching between multiple presets in sequence
Event linkage: Automatically moving the PTZ camera to a designated preset when an alarm is triggered
Scheduled tasks: Automatically moving the camera to a preset at a specified time
Configure Presets
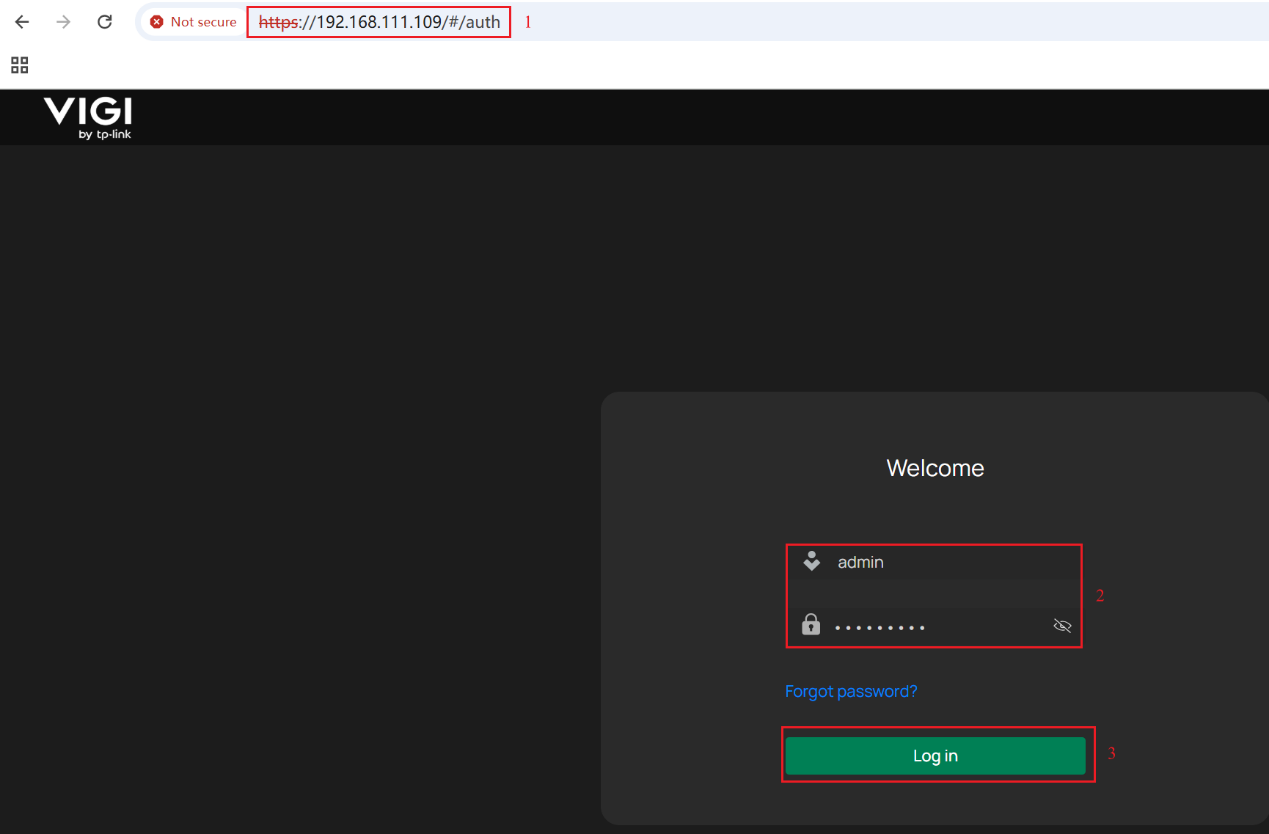
Step 1. Enter the InSight PTZ5425‘s IP in browser’s address bar. Enter the username and password, then click Log in.
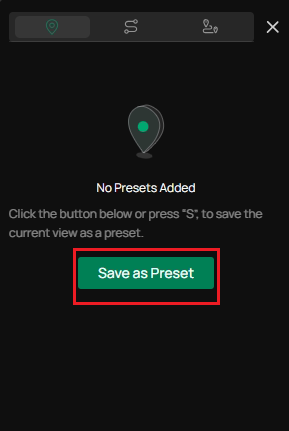
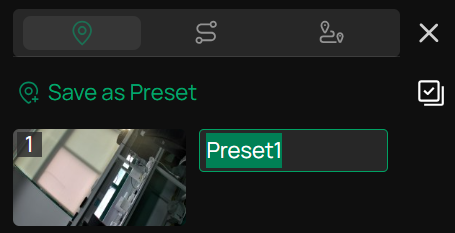
Step 2. On the right side of the Live View interface, within the PTZ configuration panel, you can sequentially adjust the Pan angel and Tilt angle and use the slider to change the Zoom level from 1× to 25×. Finally, click Save as Preset at the bottom right corner. In addition to quickly creating a preset by clicking the Save as Preset button, you can also click the icon next to the Save as Preset button to enter the preset page, and then click Save as Preset to create a preset.
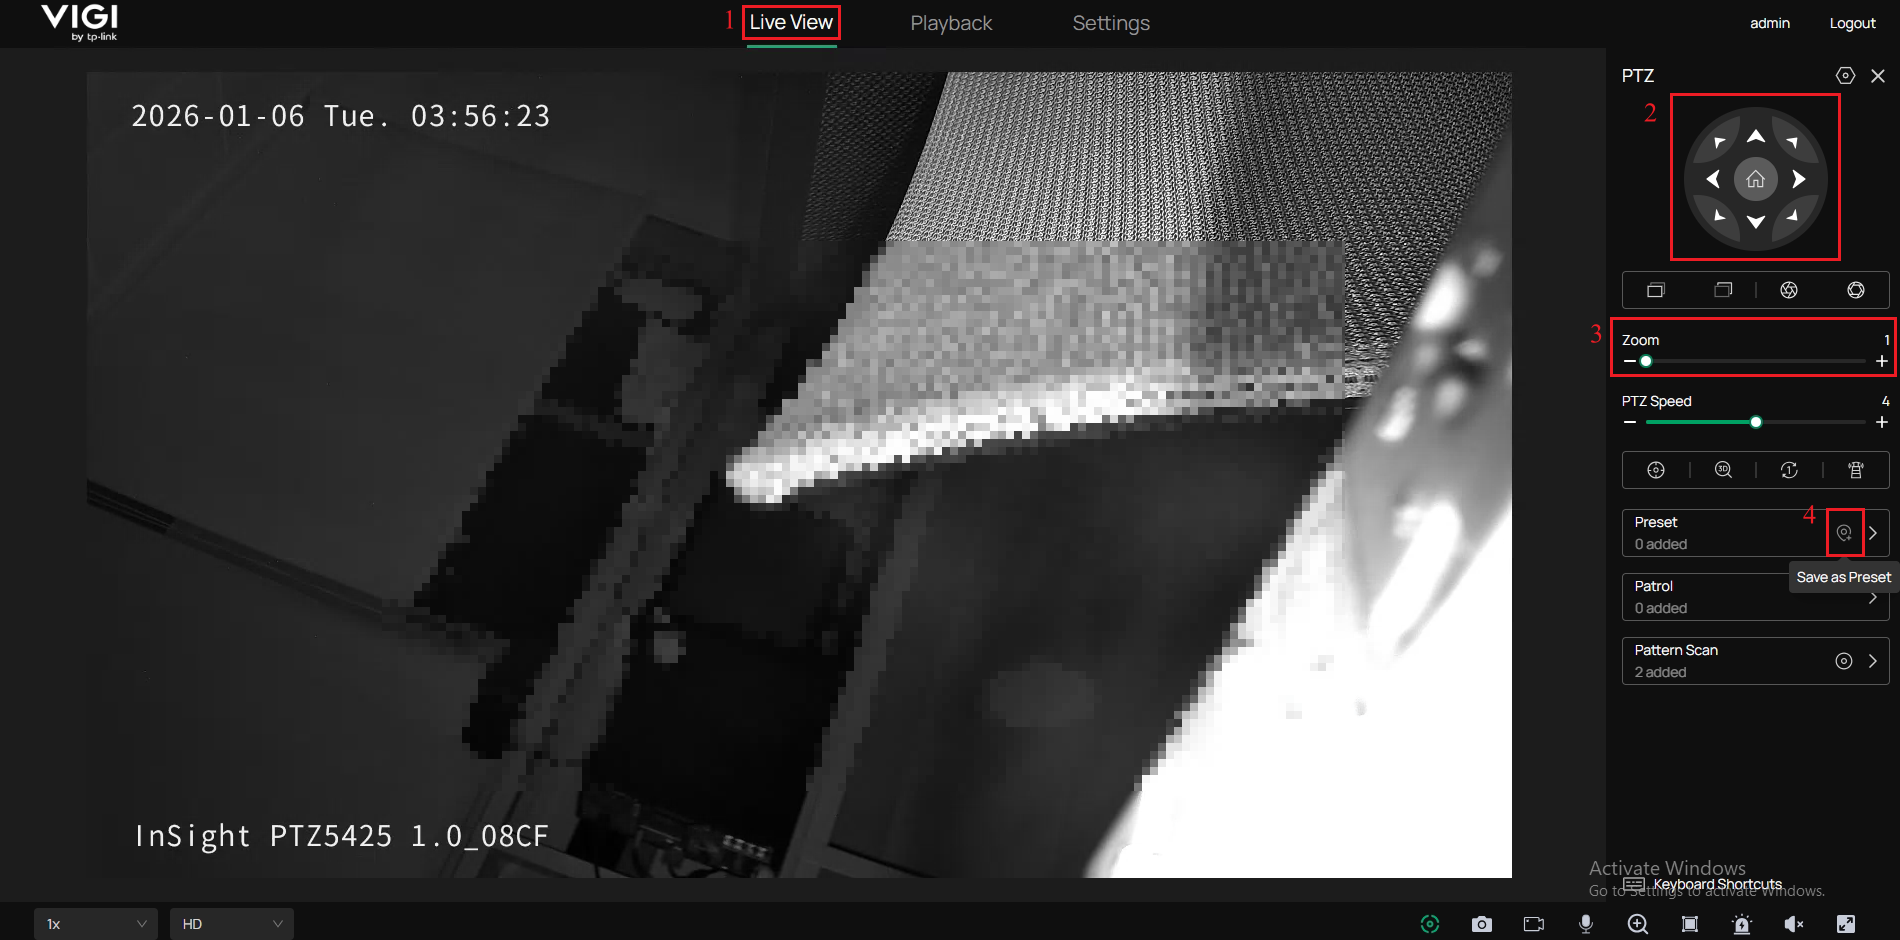
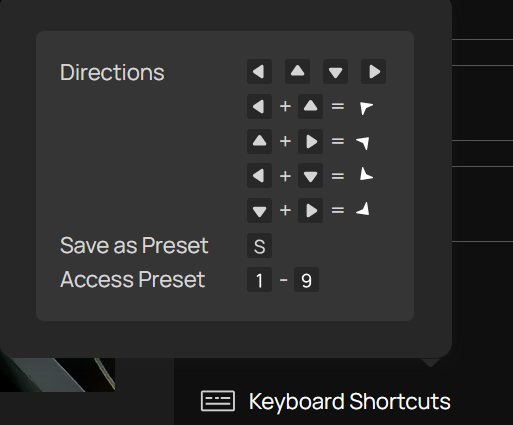
Note: In addition to using mouse clicks to modify position information and save the preset, keyboard shortcuts can also be used to adjust preset positions. Hovering the mouse over the keyboard shortcut icon in the lower right corner will display the functions of various shortcut keys.
Step 3. You can rename this preset.
Call Positions
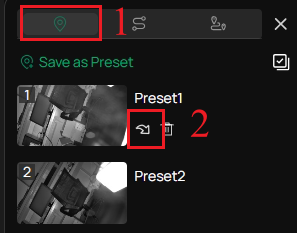
In the preset page, you can select a preset number and click the Call button. Then, the camera will adjust to the position.
Manage Presets
Single Delete
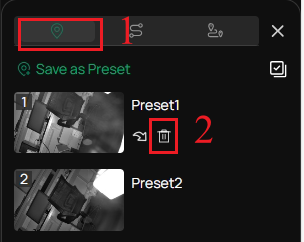
In preset page, you can select a preset number and click the Delete button to delete it.
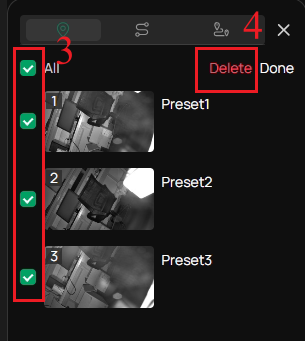
Batch Delete
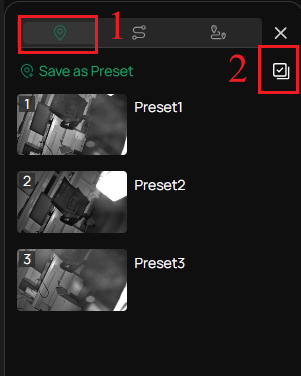
In the preset page, click the Batch button in the upper-right corner, select the preset you want to delete, and then click the Delete button to delete the preset in batches.
Patrol
Concept
Patrol is a commonly used automation feature of PTZ cameras. It operates based on a predefined sequence and configured presets. During patrol, the camera automatically pans, tilts, and adjusts the zoom level, stays at each preset for a specified dwell time, and then switches to the next preset.
Purpose
The core purpose of patrol is to enable automatic patrol-based monitoring of multiple areas in unattended or minimally staffed environments.
Common Use Scenarios
- Periodic monitoring of multiple areas
When a monitoring point involves several fixed areas that need to be checked in rotation at regular intervals, the patrol function can automatically handle the switching between areas.
- Unattended or manpower-limited scenarios
During nighttime, off-hours, or in environments with limited personnel, patrols can replace manual PTZ operations to achieve continuous monitoring and reduce labor costs.
- Large-area surveillance
For scenarios where the field of view is extensive and a single view cannot cover all areas, configure multiple presets and enable patrol helps extend the effective coverage of a single camera.
- Basic automated surveillance mode
When complex logic or event-based triggers are not required, patrol can serve as a stable and basic automation method for long-term operation, supporting routine security inspections.
Configure Patrol
Note: Before configuring patrol scan, you need to present the positions that the path involves.
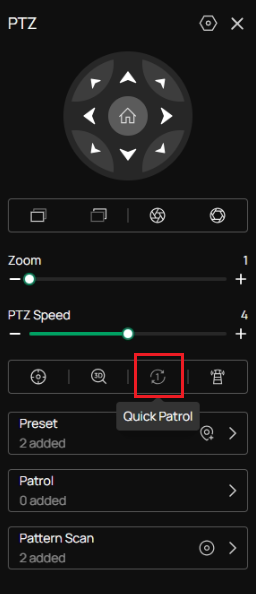
Quick Patrol
You can click the Quick Patrol button, the camera will generate a Patrol Route based on the order in which the presets were created, using the default settings of Speed 7 and interval Time of 15 seconds.
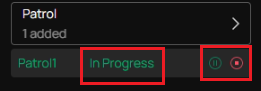
Note: Once the route is generated, the camera will enter patrol mode. You can click the pause button to temporarily suspend the patrol. After being paused for 300 seconds, the current patrol will resume execution. You can also click the close button to exit patrol mode.
Configure Patrol step by step
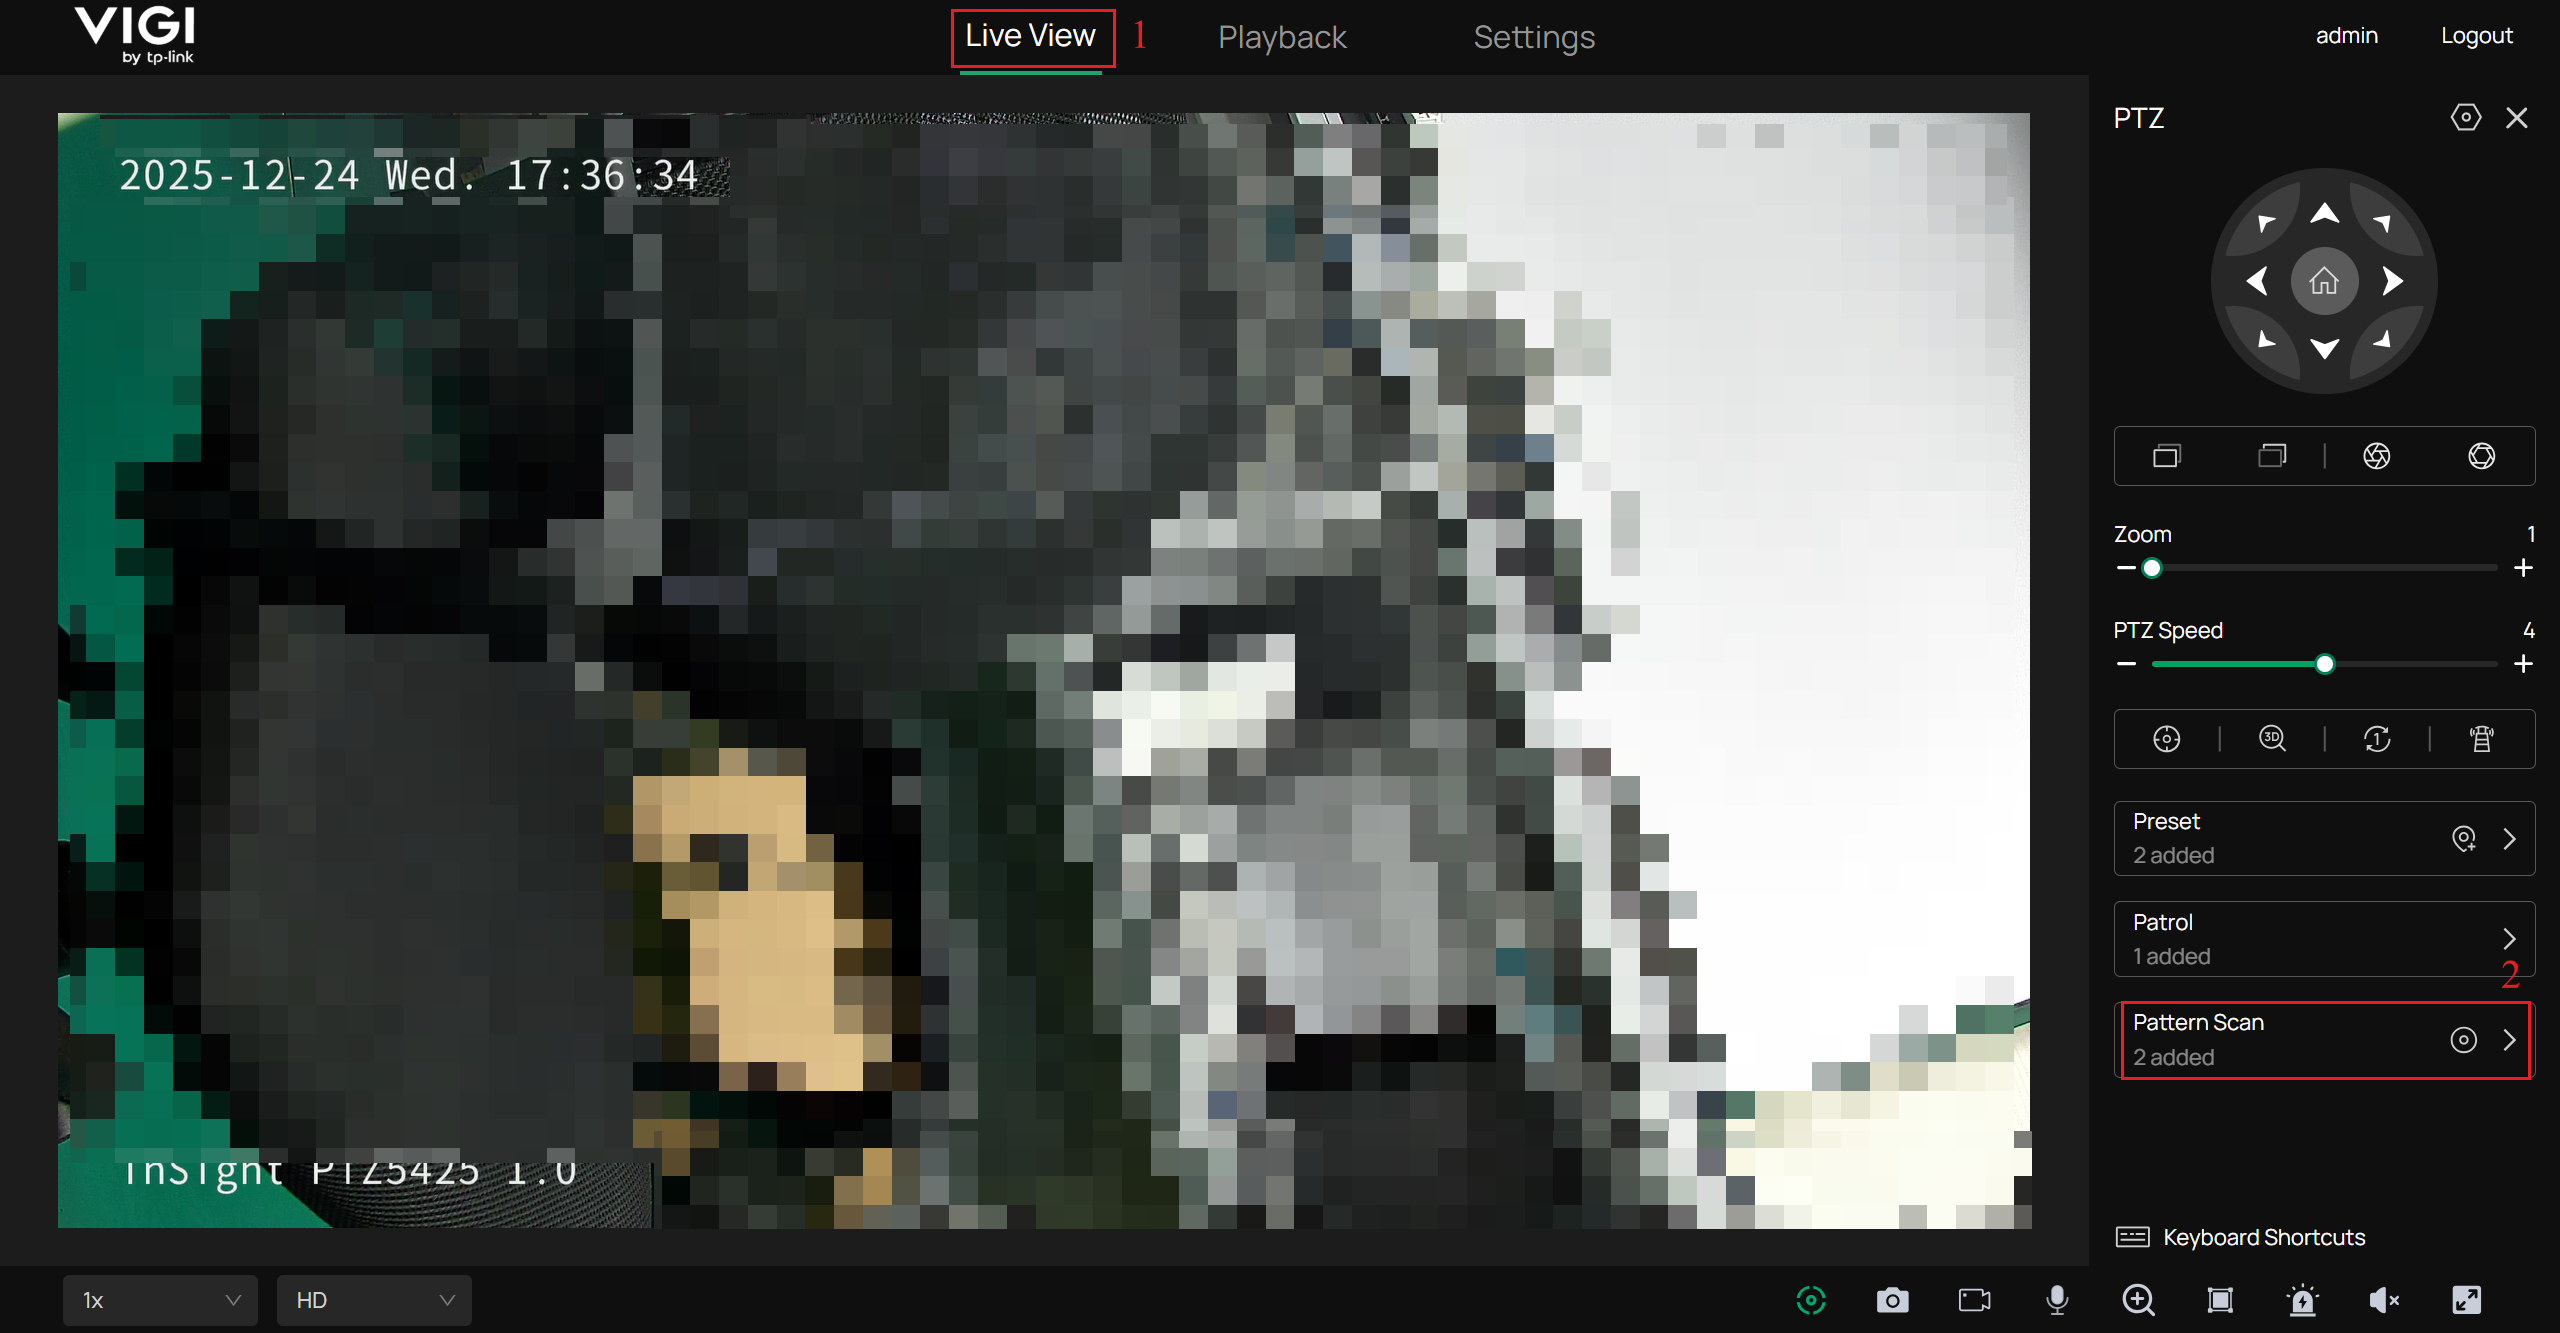
Step 1. On the right side of the Live View interface, click the Patrol configuration button at the bottom right corner.
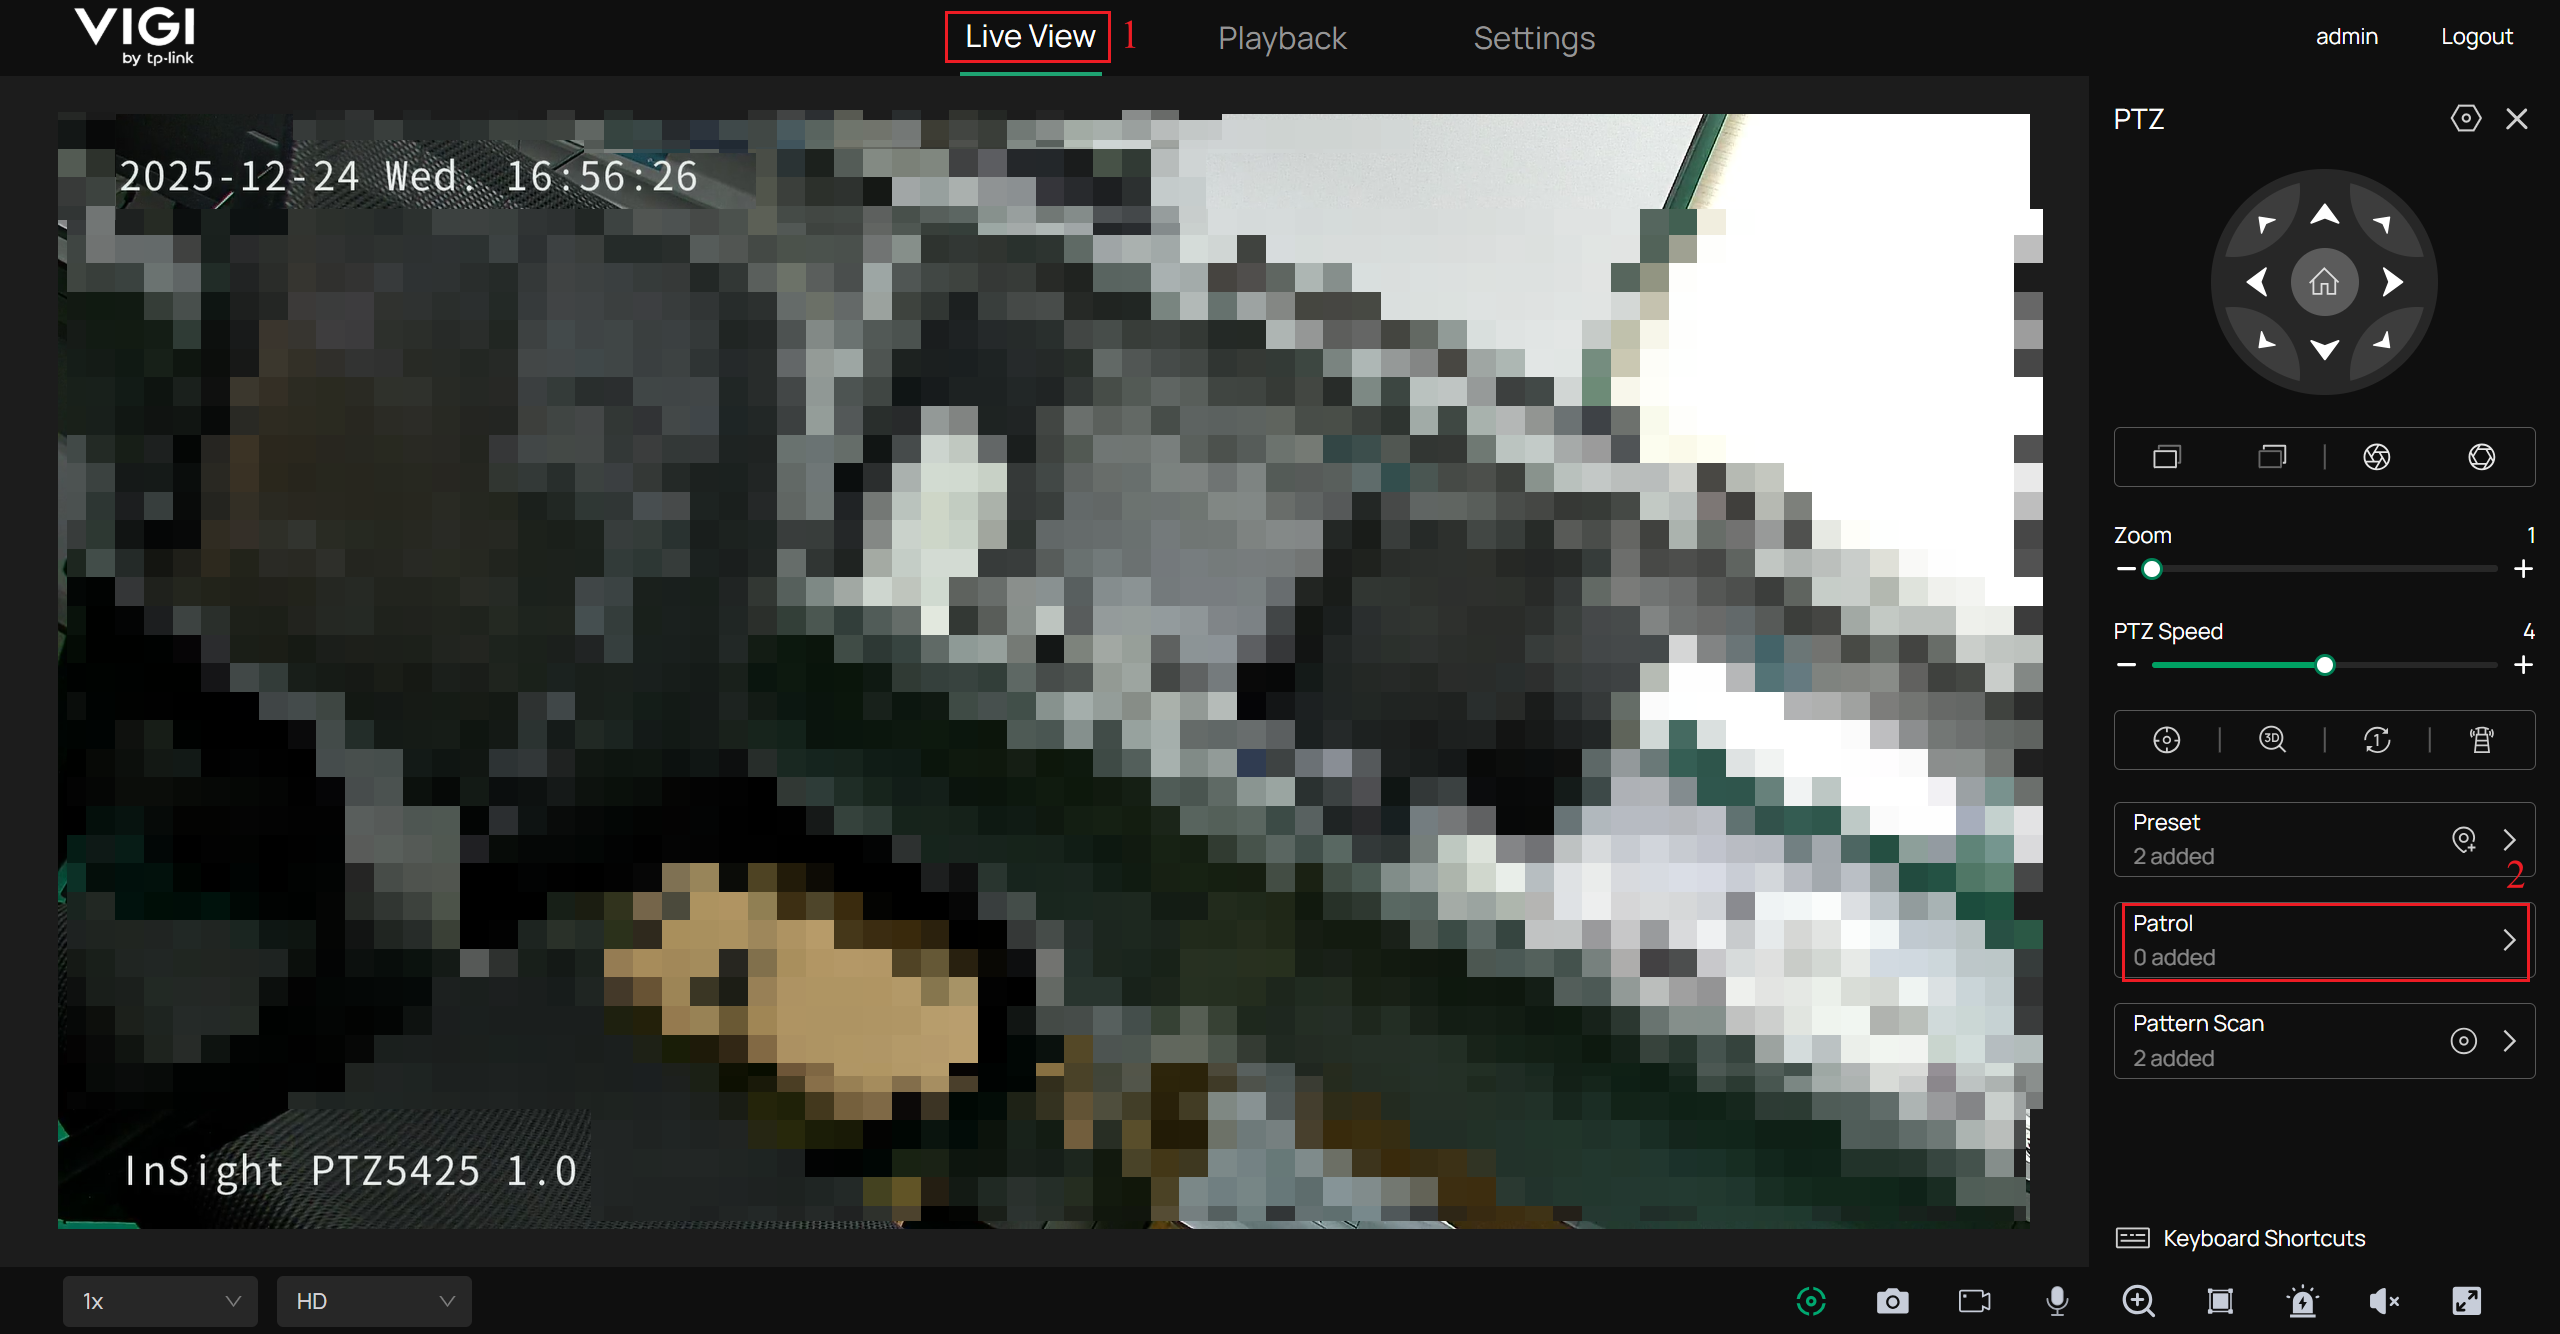
Step 2. Click Add Patrol.
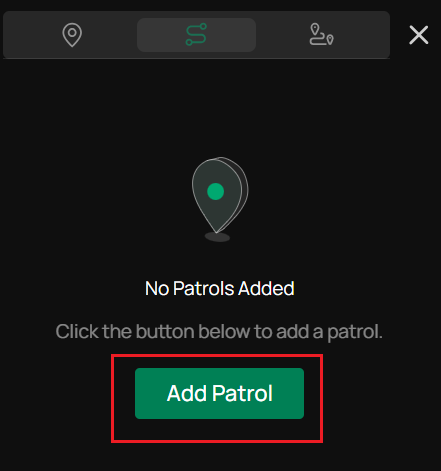
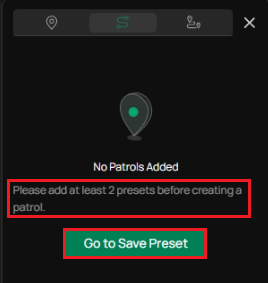
Note: Configuring the patrol requires at least two presets to be created in advance. Otherwise, the Add Patrol page will display the message “Please add at least two presets before creating a patrol". You can click “Go to Save Preset” to continue creating a preset.
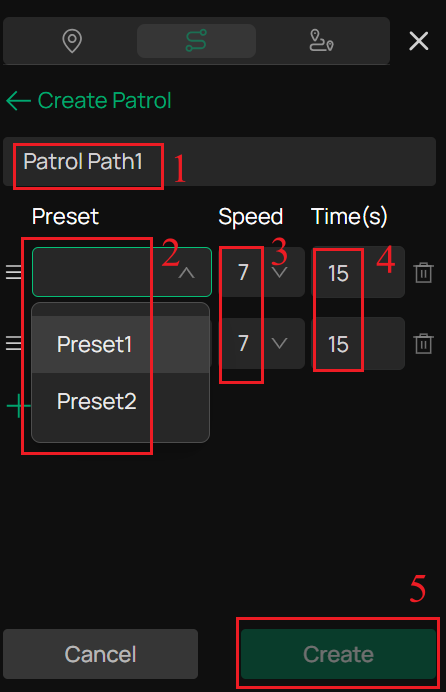
Step 3. You can modify the Name of the Patrol. Then add the configured preset to the patrol sequence. Set the Speed from 1 to 7 and the interval Time from 15 to 3600 seconds. Then click Create.
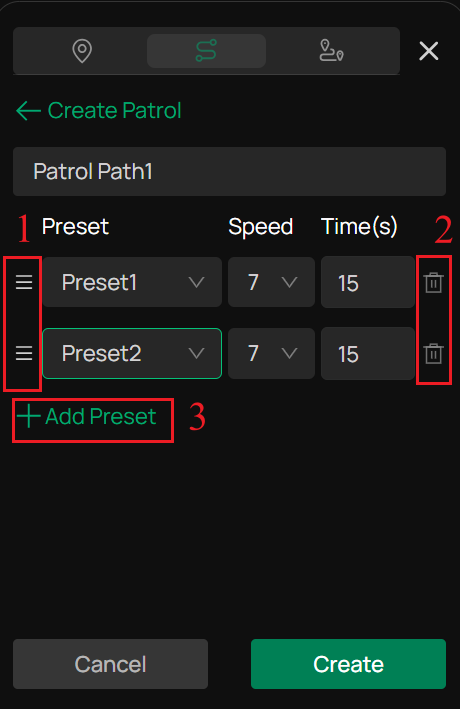
Note: You can use the drag control on the left to adjust the patrol sequence by dragging preset or clicking the delete button on the right to remove preset that should not be included in the patrol. The number of presets participating in the patrol is at least two. You can also click “+Add Preset” to continue adding preset to the patrol route.
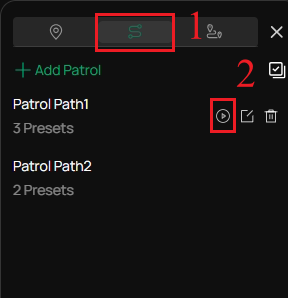
Call Paths in Patrol
In patrol page, you can select a patrol path number and click the Call button. Then, the camera patrols following the configured path.
Manage Patrol
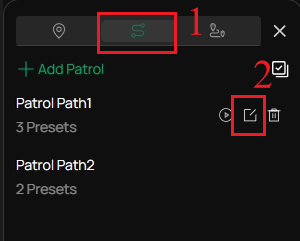
Edit Patrol Settings
In patrol page, you can click Edit button to enter the patrol settings page and modify the patrol configuration for each preset.
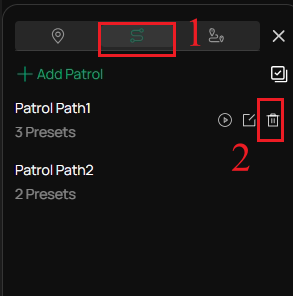
Single Delete
In patrol page, you can select a patrol path number and click Delete button to delete it.
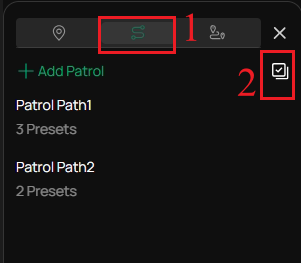
Batch Delete
In patrol page, click the Batch button in the upper-right corner, select the patrol you want to delete, and then click Delete button to delete the patrol in batches.
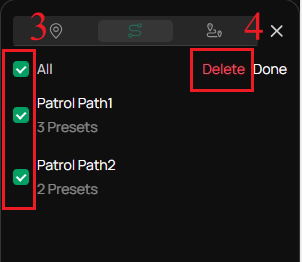
Pattern Scan
Concept
Pattern Scan is an automated scanning feature of PTZ cameras that is used to record and replay a continuous PTZ movement sequence. When recording a pattern scan, all PTZ operations performed by the user are captured and saved, including Pan movements, Tilt movements, Zoom operations, Operation sequence and Duration of each movement. Once a pattern scan is recalled, the camera automatically and continuously repeats the entire recorded PTZ movement sequence based on the saved trajectory.
Purpose
The core purpose of pattern scan is to allow the PTZ camera to perform continuous and precise area scanning along a predefined movement path, without manual intervention.
Common Use Scenarios
- Continuous monitoring of large areas
When the monitoring area is large and requires smooth, continuous scanning, pattern scan enables automatic patrol without abrupt view switching.
- Irregularly shaped monitoring areas
For areas that cannot be effectively covered by simple left-right scanning or preset-based patrols (such as curved roads, fence boundaries, or complex terrain), pattern scan allows the scanning path to be customized based on actual requirements.
- Detailed observation of key areas
During the scan, the camera can slow down, zoom in, or dwell longer in specific areas, making it suitable for more detailed monitoring of critical locations.
- Reduced manual operation and automated surveillance
In unattended scenarios or applications requiring long-term operation, pattern scan allows the PTZ camera to continuously execute predefined inspection movements, reducing the need for manual intervention.
Configure Pattern Scan
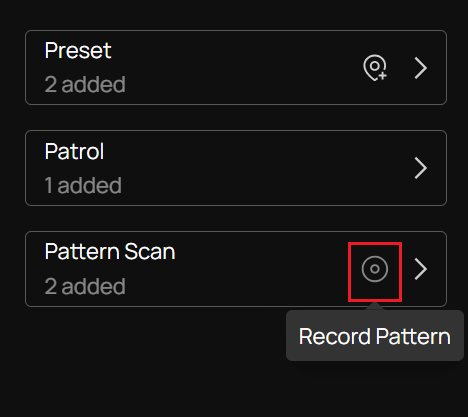
Step 1. On the right side of the Live View interface, click the Pattern Scan configuration button at the bottom right corner.
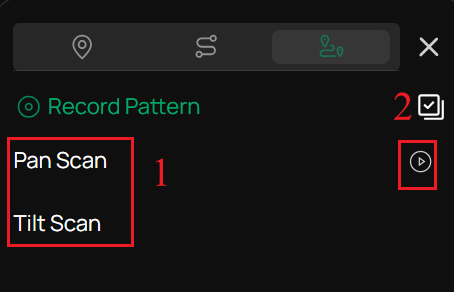
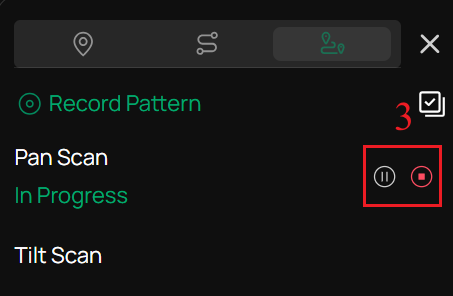
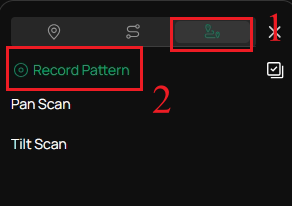
Step 2. By default, Pan Scan and Tilt Scan are available for quick configurations. You can click Play to execute the task or click Pause or End to terminate it. If manually paused for more than 300 seconds, the pattern will automatically restart from the beginning.
Step 3. Click the Record Pattern button to generate the pattern scan.
Note: In addition to quickly generating pattern scan by clicking the Record Pattern button, you can also click the icon next to the Record Pattern button to enter the pattern page, and then click Save as Preset to create a preset.
Step 5. A Three-Second Countdown will appear in the center of the page. After the countdown ends, you can begin recording the pattern.
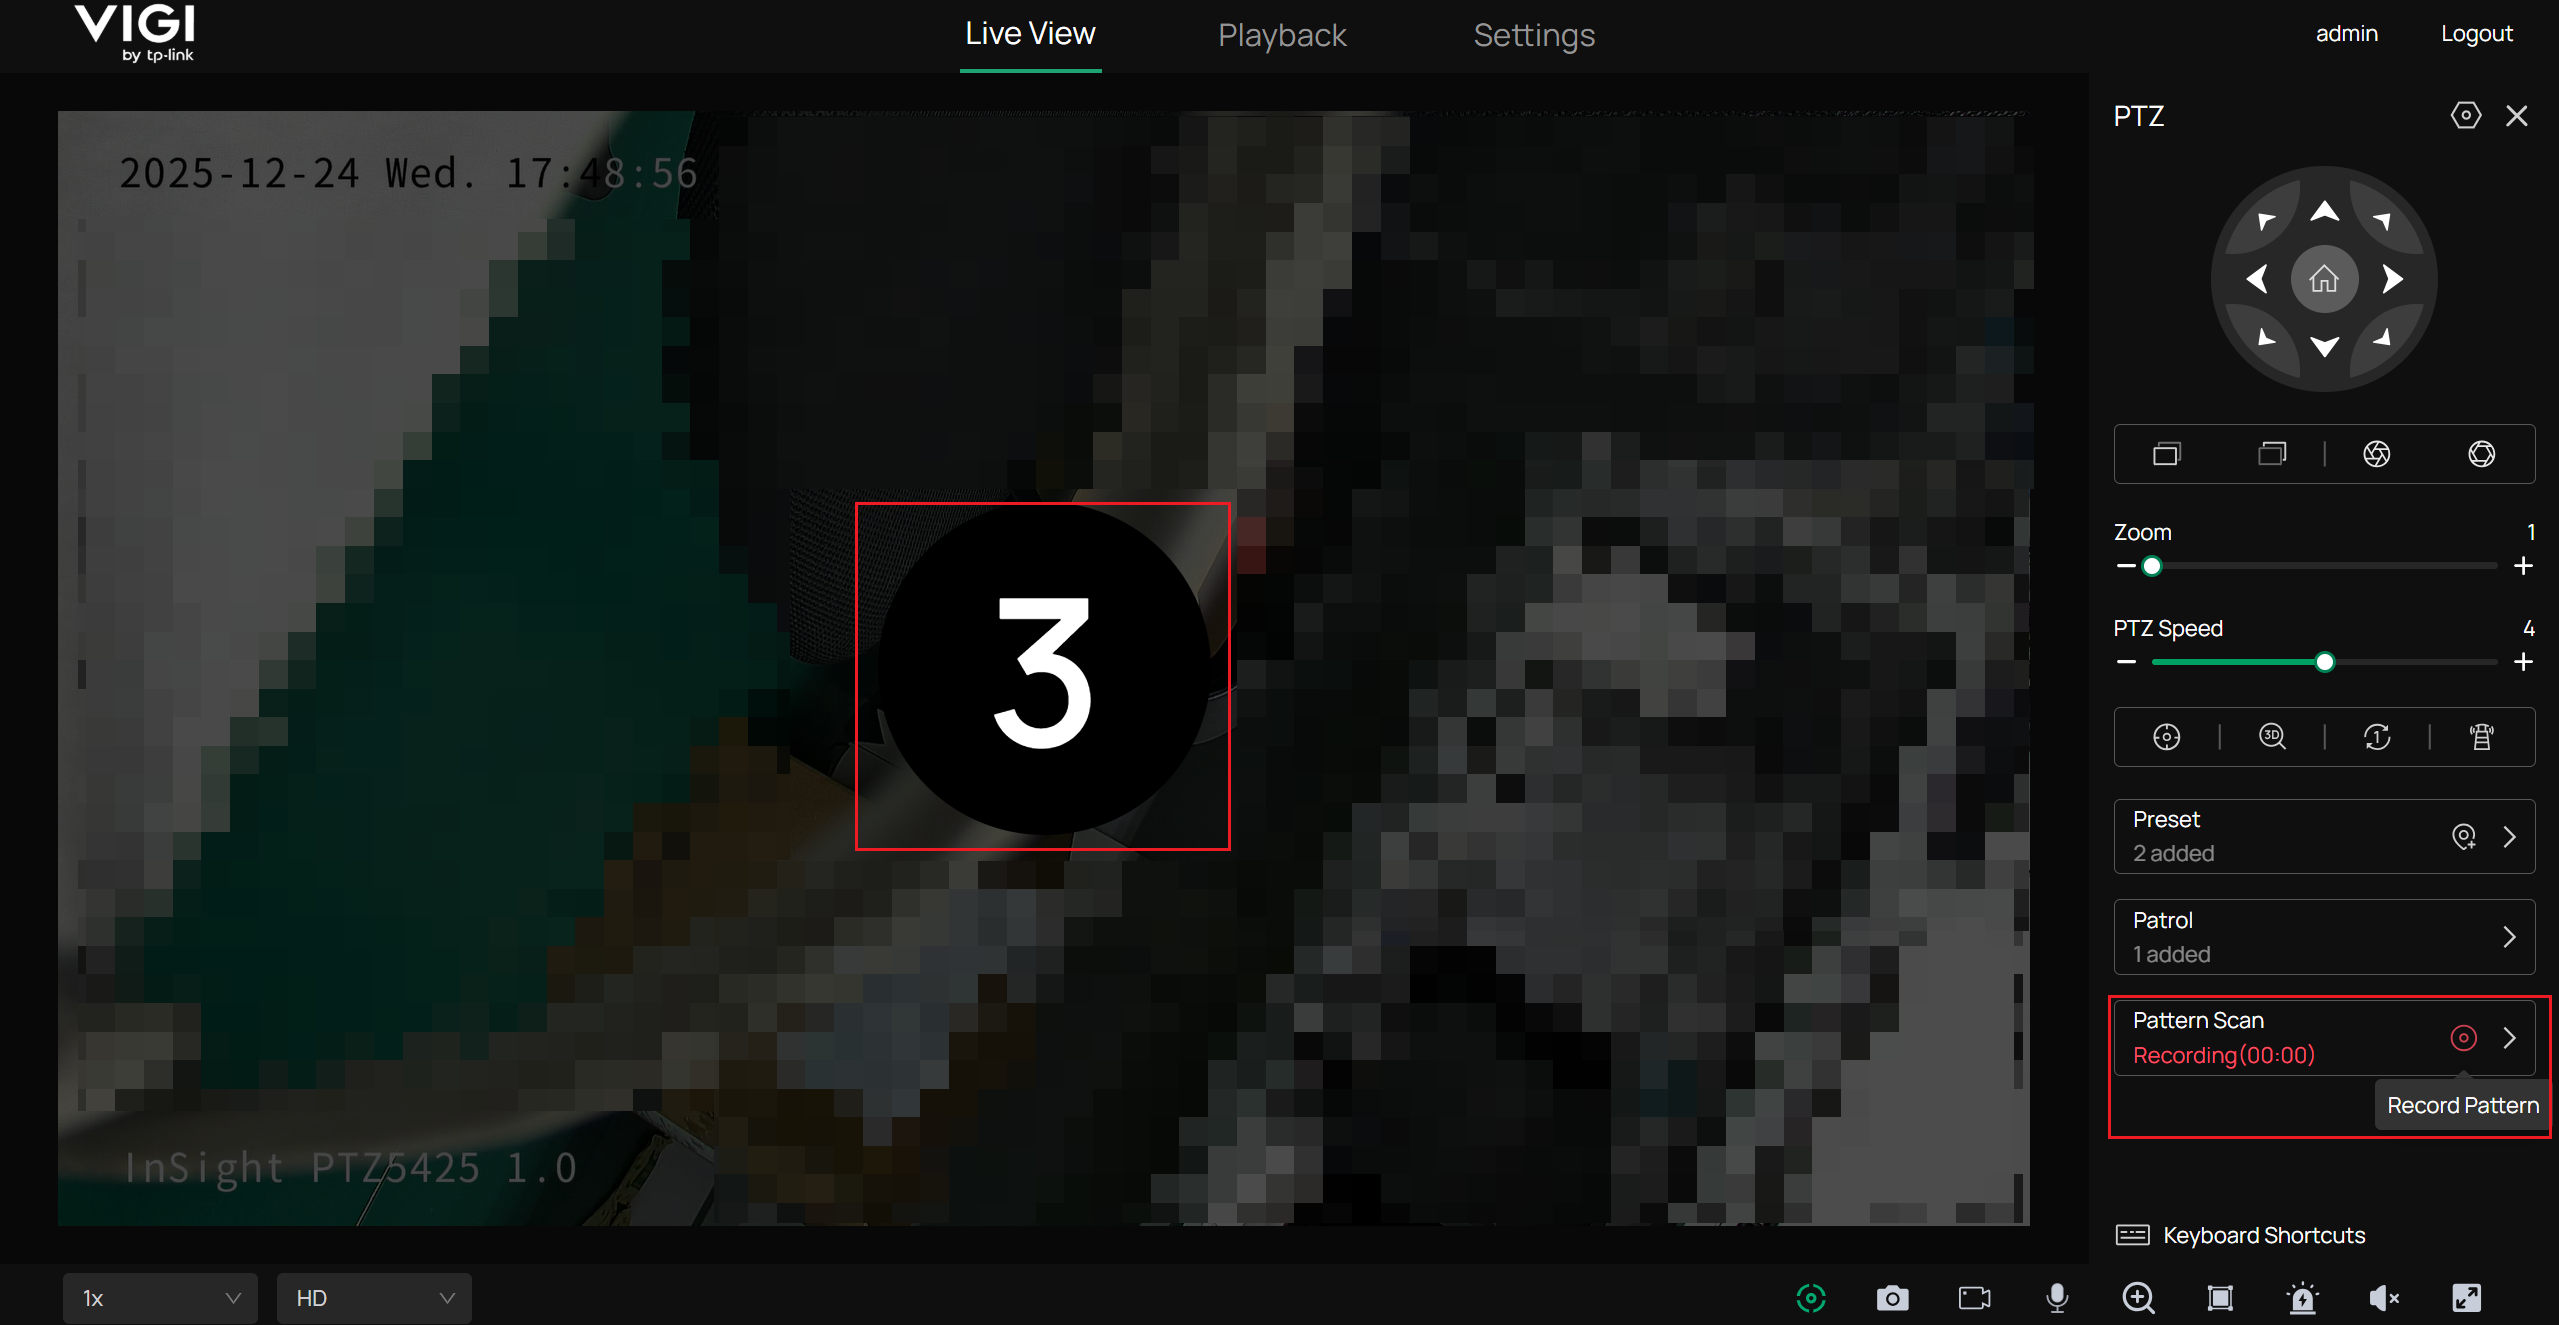
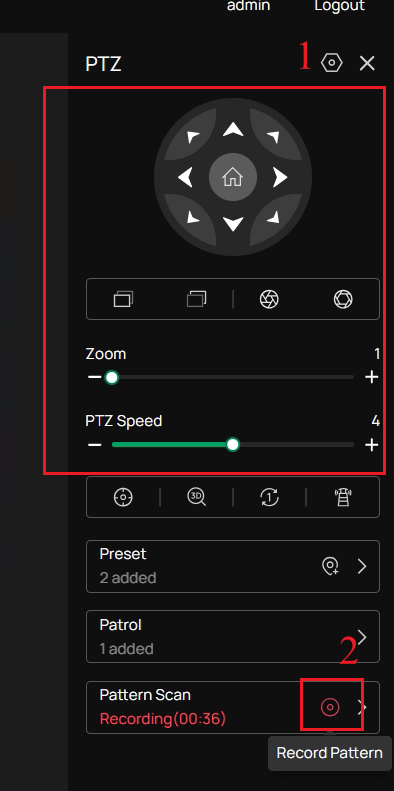
Step 6. You can freely adjust the Pan angel, Tilt angle, and Zoom level to draw up a scanning path that meets your requirements. You can also record the calling of presets. Click Record Pattern to end the recording.
Note: The maximum duration for drawing a pattern is 300 seconds.
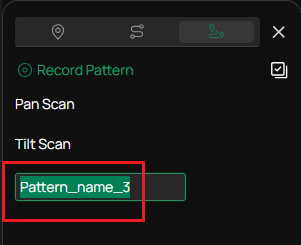
Step 7. You can rename the recorded pattern.
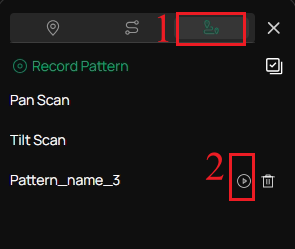
Call Patterns in Pattern Scan
In the pattern scan page, you can select a recorded pattern scan and click the Call button. Then, the camera moves following the recorded pattern scan
Manage Pattern Scan
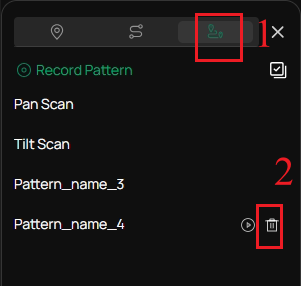
Single Delete
In the pattern scan page, you can select a recorded pattern scan and click the Delete button to delete it.
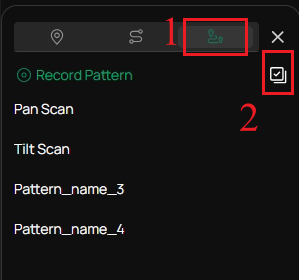
Batch Delete
In pattern scan page, click the Batch button in the upper-right corner, select the recorded pattern you want to delete, and then click Delete button to delete the patrol in batches.
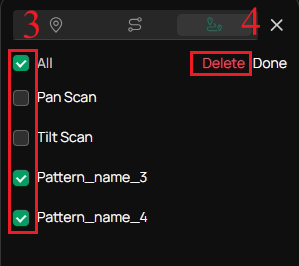
Note: The default pan scan and tilt scan cannot be deleted.
You have successfully configured the preset, patrol, and pattern scan.
Get to know more details of each function and configuration, please go to Download Center to download the manual of your product.
Is this faq useful?
Your feedback helps improve this site.
TP-Link Community
Still need help? Search for answers, ask questions, and get help from TP-Link experts and other users around the world.