Table of Contents
Powerline Adapters_User Guide
About This Guide
This guide introduces each function of your Powerline Wi-Fi Extender and demonstrates how to configure them.
When using this guide, please notice that features of the Powerline Wi-Fi Extender may vary slightly depending on the model and software version you have, and on your location, language, and internet service provider. All screenshots, images, parameters and descriptions documented in this guide are used for demonstration only.
Conventions
In this guide, the following conventions are used:
|
Convention |
Description |
|---|---|
|
Underline |
Underlined words or phrases are hyperlinks. You can click to redirect to a website or a specific section. |
|
Bold |
Contents to be emphasized and texts on the web page are in bold, including the menus, items, buttons and so on. |
|
> |
The menu structures to show the path to load the corresponding page. For example, Wireless > MAC Filter means the MAC Filter function page is under the Wireless menu. |
|
Note: |
Ignoring this type of note might result in a malfunction or damage to the device. |
|
Tip: |
Indicates important information that helps you make better use of your device. |
1. Log In
You can log in to your Powerline Wi-Fi Extender's management page and manage your powerline device with any of the following methods.
1.1 Log In via tpPLC App
1. Get the tpPLC app from the App Store or Google Play, or simply scan the QR code.

2. Connect your device to the powerline extender wirelessly.
3. Launch the tpPLC app and find the model of your device.
1.2 Log in via the Web Management Page
1. Connect your device to the powerline extender wirelessly.
2. Launch a web browser and type in http://tplinkplc.net to open the management interface.

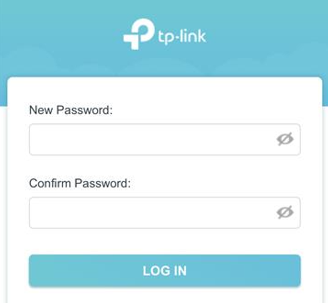
3. Create a password for future login attempts.
1.3 Log in via the tpPLC Utility
1. Visit https://www.tp-link.com/support and enter the model number in the search bar.
2. Go to its Support page and download the latest utility package in the Utility tab.
3. Extract the downloaded file and run the PowerLineUtility.exe, then follow the setup wizard to complete the installation.
4. Connect your computer to the powerline extender via an Ethernet cable or wirelessly. Double-click the tpPLC.exe to open the utility. Then you can configure your network settings on it.
2. Manage Powerline Network
2.1 Add a New Device to the Powerline Network
1. Connect to the powerline extender wirelessly. Visit http://tplinkplc.net, and log in with the password you set for the extender.
2. Go to the Status page and click the Powerline Network icon to open the Powerline Device List.
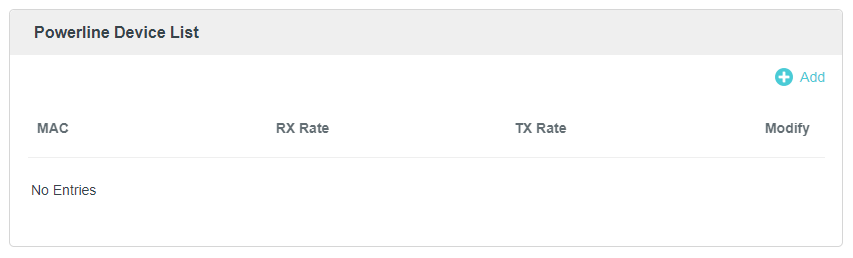
3. Click the Add icon  and enter the Powerline Key of the device you want to add. The Powerline Key contains 16 capital letters, formed like XXXX-XXXX-XXXX-XXXX. It is printed on the back of the powerline device.
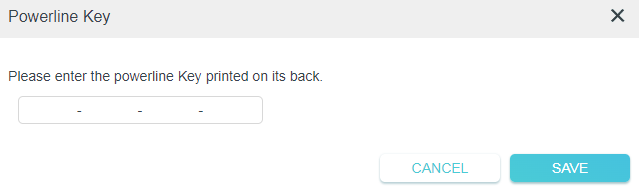
4. Click ADD to add the device.
2.2 Change Powerline Network Name
You can change the extender’s powerline network name to add it to or remove it from a powerline network.
Follow the steps below to change the name.
1. Connect to the powerline extender wirelessly. Visit http://tplinkplc.net, and log in with the password you set for the extender.
2. Go to Powerline > Powerline Settings.
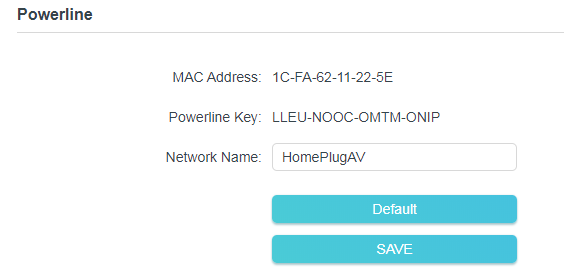
3. Change the Powerline Network Name. You can also click Default to use the default network name, e.g. HomePlugAV. However, if the default name is used, the Wi-Fi Movefunction will be automatically disabled.
4. Click SAVE to make the settings effective.
2.3 Customize Wireless Settings
The powerline extender’s wireless network name (SSID) and password, and security option are preset in the factory. The preset SSID and password can be found on the product label and Wi-Fi Info Card. You can customize the wireless settings according to your needs.
1. Connect to the powerline extender wirelessly. Visit http://tplinkplc.net, and log in with the password you set for the extender.
2. Go to Wi-Fi > Wireless Settings page.
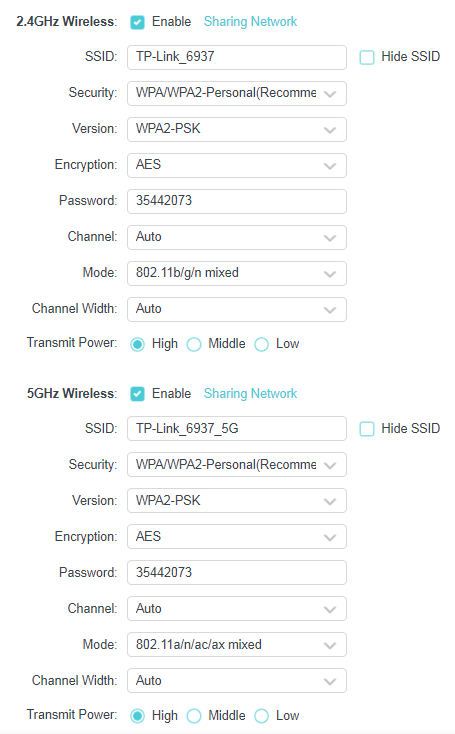
To enable or disable the wireless function:
Select the box to enable the wireless function. Deselect the box to disable wireless function. If disabled, all wireless settings will be ineffective.
To change the wireless network name (SSID) or hide SSID :
The default SSID is TP-Link_XXXX for 2.4GHz network and TP-Link_XXXX_5G for 5GHz network, and the default password is printed on the label at the side panel of the extender. You can change the default ones by directly entering new ones in the field. SSID is up to 32 characters, and the value in both SSID and password is case-sensitive.
Note: Remember to write down the new SSID and password, for you may be disconnected when new settings are effective.
To customize more advanced settings:
• Security and Version: Select an option from the Security and Version drop-down list. We recommend you don’t change the default settings unless necessary. If you select No Security, no password is required.
• Ecryption: You can select either Auto(Recommended), TKIP or AES.
• Password: Set the password of the Wi-Fi network.
• Channel: Select the channel you want to use from the drop-down list. This field determines which operating frequency will be used. It is not necessary to change thewireless channel unless you notice interference problems with another nearby access point.
• Mode: Select the desired mode for 2.4GHz Wi-Fi and 5GHz Wi-Fi.
2.4GHz Wi-Fi:
• 802.11n only: Select only if all of your wireless clients are 802.11n devices.
• 802.11g/n mixed: Select if you are using both 802.11g and 802.11n wireless clients.
• 802.11b/g/n mixed: Select if you are using a mix of 802.11b, 11g, and 11n wireless clients.
Note: When 802.11n only mode is selected, only 802.11n wireless clients can connect to the extender. It is strongly recommended that you select 802.11b/g/n mixed, so that all of 802.11b, 802.11g, and 802.11n wireless clients can connect to the extender.
5GHz Wi-Fi:
• 802.11ac only: Select only if all of your wireless clients are 802.11ac devices.
• 802.11n/ac mixed: Select if you are using both 802.11n and 802.11ac wireless clients.
• 802.11a/n/ac mixed: Select if you are using a mix of 802.11a, 11ng, and 11ac wireless clients.
• 802.11a/n/ac/ax mixed: Select if you are using a mix of 802.11a, 11ng, 11ac , and 11ax wireless clients.
• Channel Width: Select the channel width. The default setting is Auto, which can adjust the channel width for your clients automatically.
• Transmit Power: Select the level of transmit power. We recommend you choose High to have the best signal strength.
2.4 MAC Filter
This function exploits the uniqueness of the MAC (Medium Access Control) address, a unique 12-digit hexadecimal address (for example, D8-5D-4C-B4-46-EA) of every network device, to determine if the device can or cannot access your wireless network.
I want to:
Prevent unauthorized users from accessing my wireless network by utilizing the network device’s MAC address.
For example, I have a computer that is connected to my wireless network. Now, an unknown device (an intruder) is also using my wireless network, which affects my internet speed. I would like to control my wireless network with the following capabilities:
• My computer is always allowed to access the wireless network.
• The unknown device is not allowed to access the wireless network.
• I don’t have to keep changing my wireless password as often.
How can I do that?
1. Connect to the powerline extender wirelessly. Visit http://tplinkplc.net, and log in with the password you set for the extender.
2. Go to Wi-Fi > MAC Filter.
4. Select either of the filtering rules.

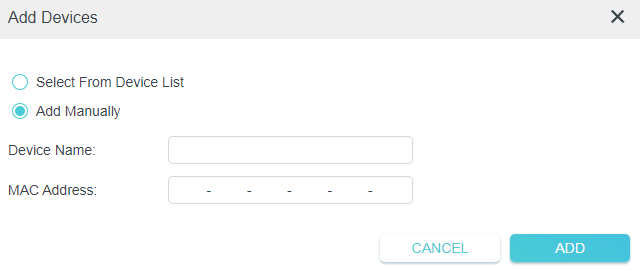
5. Click +Add to add devices to the list.
6. Select Select From Device List to see how many devices are now connected to the network. Select a device and click ADD to finish the settings.

7. You can also add devices manually. Select Add Manually, enter device name and the MAC address and click ADD to finish the settings.
Done!
Now MAC Filter is implemented to protect your wireless network.
2.5 Wi-Fi Move
Wi-Fi Move is enabled by default. With the feature enabled, any changes made to the Wi-Fi settings and LED schedules of one powerline extender will be automatically synchronized to other powerline extenders whose Wi-Fi Move feature is also enabled on the same powerline network .
1. Connect to the powerline extender wirelessly. Visit http://tplinkplc.net, and log in with the password you set for the extender.
2. Go to Wi-Fi > Wi-Fi Move.
3. Toggle on WiFi Move to enable the feature.
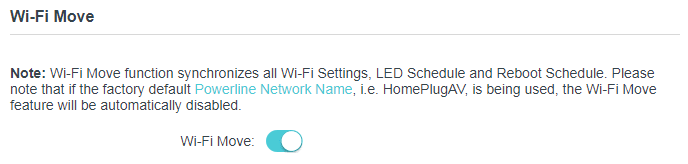
Note:
When Wi-Fi Move is enabled, the following features will be synced: Wireless SSID & Password, Wireless Security, Wireless Mode, Wireless Radio Status, Wi-Fi Schedules, LED Schedules, Wi-Fi Clone Settings, MAC Filter Settings, Parental Controls, and Guest Network.
2.6 Wi-Fi Clone
I want to:
Copy wireless settings from my router to my extender, so I can use the same SSID and password to access the internet in my house.
How can I do that?
1. Connect to the powerline extender wirelessly. Visit http://tplinkplc.net, and log in with the password you set for the extender.
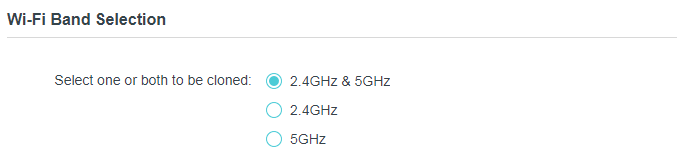
2. Go to Wi-Fi > Wi-Fi Clone.
3. Select a Wi-Fi band or both to be cloned. 2.4GHz & 5GHz is selected by default.
4. Before cloning, make sure your router supports the same band as your extender. If you do not know how to check this, go to your router’s User Guide for more information.
5. Plug your extender near your router.
6. Press the WPS button on your router.
7. Within two minutes, press the Wi-Fi button on the side panel of the extender.
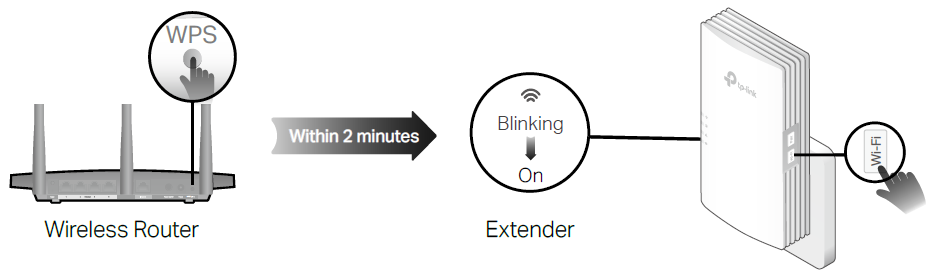
Done!
When the corresponding Wi-Fi LED blinks quickly for 3 seconds and then stays on. It’s done!
2.7 Wireless Client
Follow the steps below to view detailed information of all wireless clients connected to the extender.
1. Connect to the powerline extender wirelessly. Visit http://tplinkplc.net, and log in with the password you set for the extender.
2. Go to Wi-Fi > Clients page.
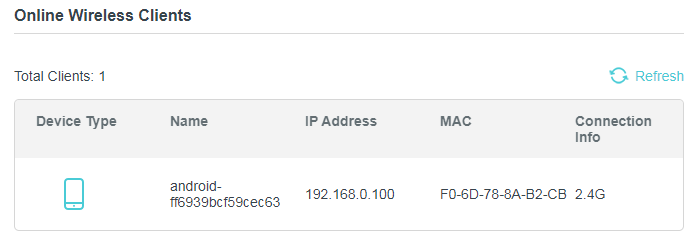
3. Now you can view the detailed information, including device name, MAC address, connected wireless band, and IP address.
Tips: You can also see the wireless details by clicking the wireless clients icon on the Status > Wireless Clients page.
2.8 Wi-Fi Schedule
I want to:
Automatically turn off my wireless network at times when I do not need the wireless connection.
For example, I want to turn them off from 00:00am to 7:00am. Yet if I have my wireless devices connected to the extender at that time, I want the wireless on till all devices are disconnected from the internet.
How can I do that?
1. Connect to the powerline extender wirelessly. Visit http://tplinkplc.net and log in with the password you set.
2. Go to WiFi > WiFi Schedule.
3. Toggle on the WiFi Schedule.
Note: If you check the box of Do not turn off Wi-Fi while clients are connected to it, the WiFI schedule are not enabled when any clients are connected to your extender.
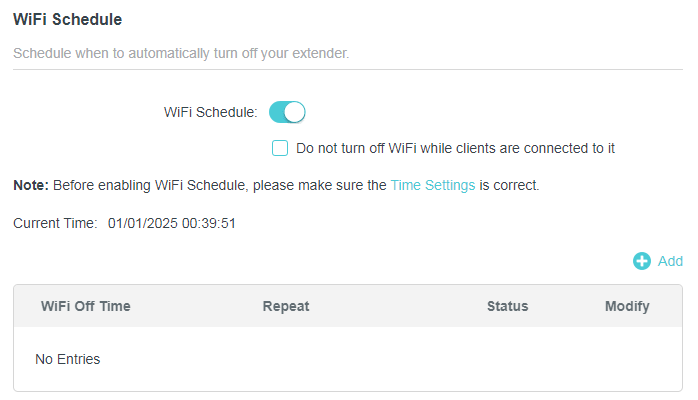
4. Click Add to add an entry.
5. Choose WiFi Off Time from 21:00 to 09:00, and then check all boxes from Monday to Friday.
Note: Please make sure that the system time is correct before using this function.
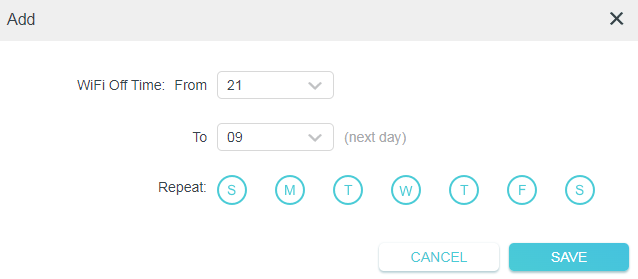
6. Click SAVE to save the settings.
Done!
Now your Wi-Fi will be automatically turned off at 00:00 and turned on at 7:00am the next morning.
Note: The Wi-Fi LED will turn off if the wireless network is disabled.
2.9 Parental Controls
I want to:
Control when my children’s wireless devices can access the internet.
For example, I want to allow my children’s wireless devices to access only from 9:00 (9AM) to 21:00 (9PM) on weekdays and not other times.
How can I do that?
1. Connect to the powerline extender wirelessly. Visit http://tplinkplc.net, and log in with the password you set for the extender.
2. Go to Wi-Fi > Parental Controls.
3. Toggle on Parental Controls.
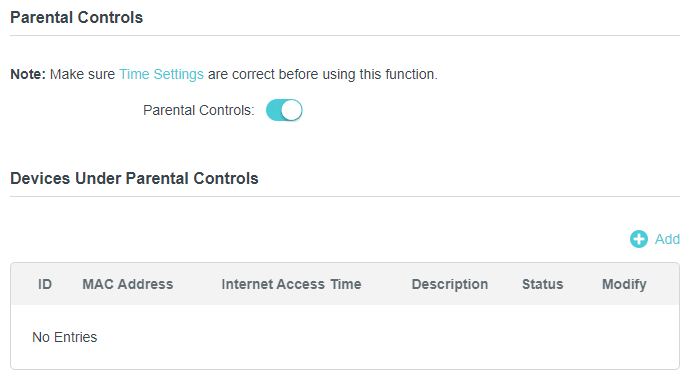
4. Click Add.
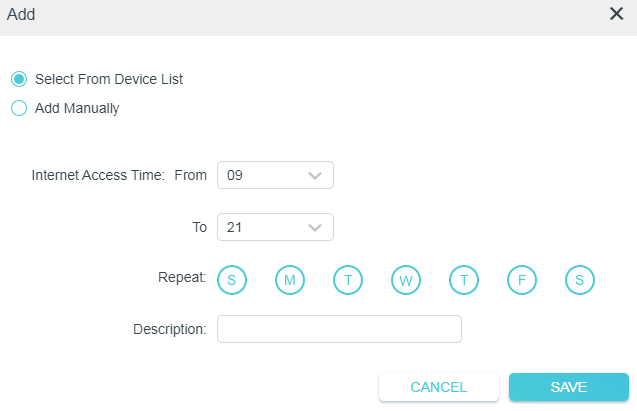
5. Click Select from Device List and select the device to be controlled. Or select Add Manually and enter the MAC address manually.

6. Choose Internet Access Time from 9:00 to 21:00, and then check all boxes from Sunday to Saturday.
7. Give a Description to the device to be controlled.
8. Click SAVE to save the settings.
Note: Please make sure that the system time is correct before using this function.
Done!
Now the controlled device can access only from 9:00 (9AM) to 21:00 (9PM) on weekdays and not other times.
2.10 Guest Network
I want to:
Create a network for my guests, providing internet access for them while at the same time limit the network authorities for guests to ensure network security and privacy.
How can I do that?
1. Connect to the powerline extender wirelessly. Visit http://tplinkplc.net, and log in with the password you set.
2. Go to Wi-Fi > Guest Network.
3. Check the box of relative entry to limit network authorities.
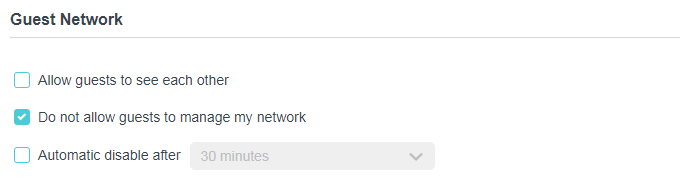
4. Select 2.4GHz or 5GHz and configure the following settings.
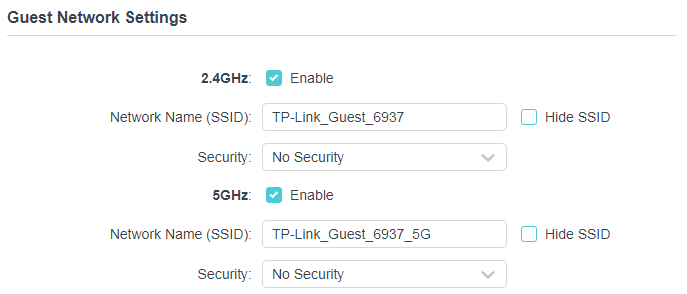
To enable or disable the guest network function:
Select the box 2.4GHz or 5GHz to enable the guest network function. Deselect the box to disable guest network function. If disabled, all guest network settings of the corresponding band will be ineffective.
To change the guest network name (SSID) and password:
The default SSIDs are TP-Link_Guest_XXXX and TP-Link_Guest_XXXX_5G, and the default password is printed on the product label. You can change the default ones by directly entering new ones in the field. SSID is up to 32 characters, and the value in both SSID and password is case-sensitive.
Done!
Now you can tell your guests to connect to the guest network you created.
3. Administration
3.1 LAN IP Address
Follow the steps below to configure LAN settings of the extender.
1. Connect to the powerline extender wirelessly. Visit http://tplinkplc.net, and log in with the password you set for the extender.
2. Go to Network > LAN Settings.
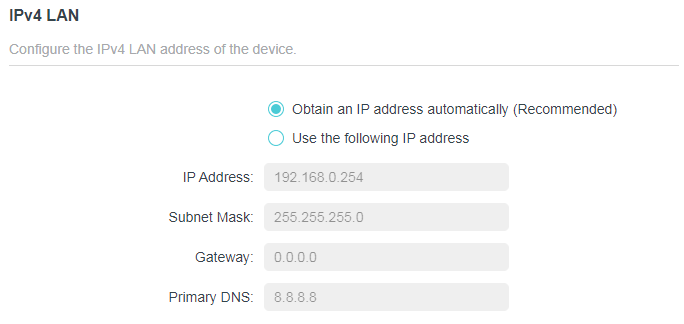
• LAN Type: Select Obtain an IP address automatically to have your extender automatically obtain IP Address from the main router. Select Use the following IP address to manually configure the LAN parameters.
• IP Address: The IP address of the powerline extender.
• Subnet Mask: The subnet mask associated with IP address.
• Gateway: The IP address of the gateway device.
• Primary DNS: Input the DNS IP address provided by your ISP.
3.2 DHCP Server
When DHCP (Dynamic Host Configuration Protocol) Server is enabled, the extender acts as a DHCP server. It dynamically assigns TCP/IP parameters to client devices from the IP Address Pool. You can change the settings of the DHCP Server if necessary, and you can reserve LAN IP addresses for specified client devices.
1. Connect to the powerline extender wirelessly. Visit http://tplinkplc.net, and log in with the password you set for the extender.
2. Go to Network > DHCP Server.
3. Choose On and fill in the parameters.
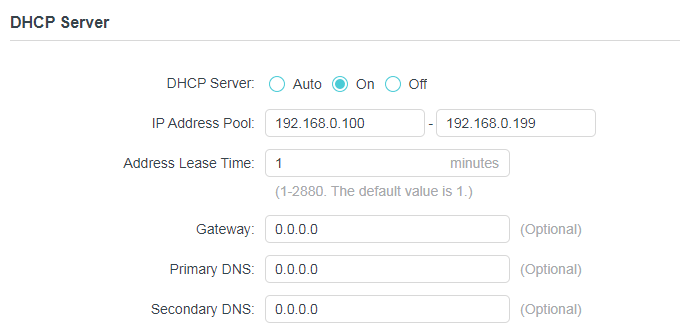
4. Enter the starting and ending IP addresses in the IP Address Pool.
5. Enter other parameters if the ISP offers. The Default Gateway is automatically filled in and is the same as the LAN IP address of the extender.
6. Click SAVE.
3.3 QoS
QoS (Quality of Service) allows you to prioritize connection of specific devices for a set duration. Devices set as high priority will be allocated more bandwidth and so continue to run smoothly even when there is heavy traffic on the network.
1. Connect to the powerline extender wirelessly. Visit http://tplinkplc.net, and log in with the password you set for the extender.
2. Go to Network > QoS.
3. Choose the activity you want to prioritize.
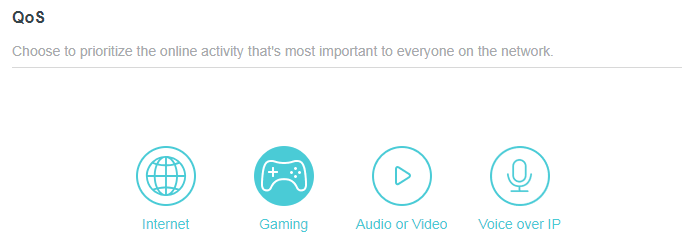
4. Click SAVE.
3.4 LED Schedules
I want to:
Automatically turn off LEDs at times when I do not want light in my room. For example, I want to turn LEDs off everyday from 00:00am to 7:00am.
How can I do that?
1. Connect to the powerline extender wirelessly. Visit http://tplinkplc.net and log in with the password you set for the extender.
2. Go to System > LED Control.
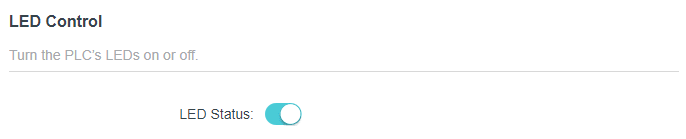
3. Enable Night Mode and choose the LED Off times.
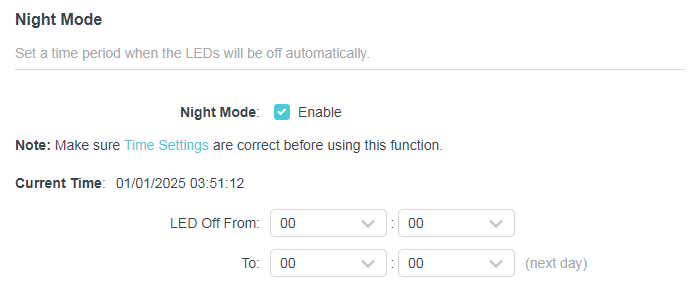
4. Click SAVE.
Done!
Now your LEDs will be turned off automatically during the set time.
3.5 Set Up System Time
System time is the time displayed while the extender is running. The system time you configure here will be used for other time-based functions like Parental Controls and Wi-Fi Schedules. You can manually set how to get the system time.
1. Connect to the powerline extender wirelessly. Visit http://tplinkplc.net, and log in with the password you set for the extender.
2. Go to System > Time Settings.
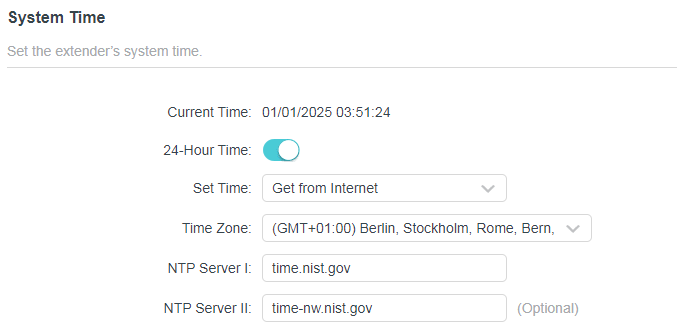
To automatically synchronize the time:
1. Select your local Time Zone from the drop-down menu.
2. In the NTP Server I field, enter the IP address or domain name of your desired NTP Server. (Optional)
3. In the NTP Server II field, enter the IP address or domain name of the second NTP Server. (Optional)
4. Click SAVE.
To manually set the date and time:
1. Select Manually.
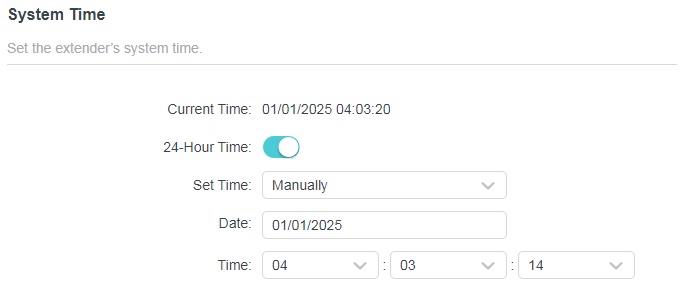
2. Enter the current Date.
3. Set the current Time (In 24-hour clock format, e.g. 16:00:00 is 04:00PM).
4. Click SAVE.
To set up Daylight Saving time:
1. Check the box of Daylight Saving Time.
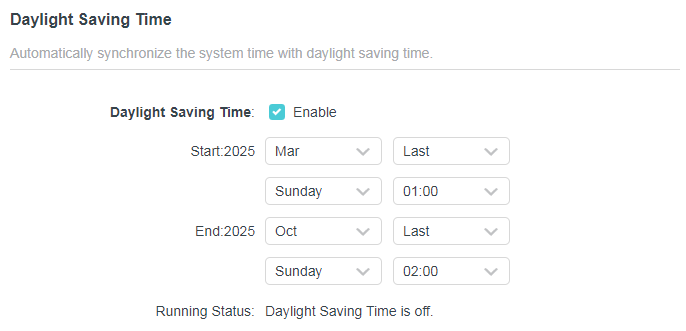
2. Select the correct Start date and time when daylight saving time starts at your local time zone.
3. Select the correct End date and time when daylight saving time ends at your local time zone.
4. Click SAVE.
3.6 Upgrade the Firmware
TP-Link is dedicated to improving and richening the product features, giving you a better network experience. We will release the latest firmware at our official website, you can download the latest firmware file from our website: www.tp-link.com and upgrade the firmware to the latest version.
Auto Update
1. Connect to the powerline extender wirelessly. Visit http://tplinkplc.net, and log in with the password you set for the extender.
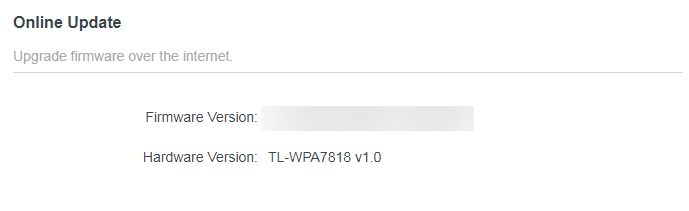
2. Go to System > Firmware Upgrade.
3. Focus on the Online Update section. Click CHECK FOR UPDATES to see whether the latest firmware is released.
4. Click UPDATE if there is new firmware.
5. Wait a few minutes for the upgrading and rebooting.
Tips: If there’s a new and important firmware update for your extender, you will see the prompt notification on your computer as long as a web browser is opened. Click to update, and log in to the web management page with the password you set for the extender. You will see the Firmware Update page.
Local Update
1. Download the latest firmware file for the router from www.tp-link.com.
Note: The upgraded firmware version must correspond to the hardware.
2. Connect to the powerline extender wirelessly. Visit http://tplinkplc.net, and log in with the password you set for the extender.
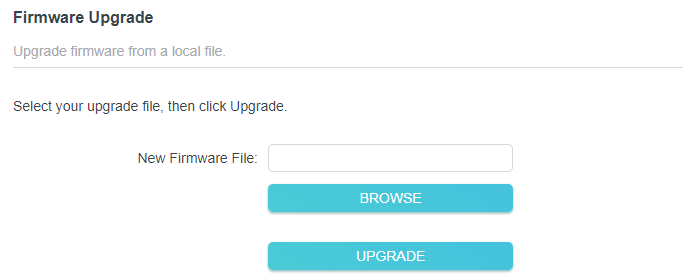
3. Go to System > Firmware Upgrade.
4. Focus on the Firmware Upgrade section. Click BROWSE to locate the downloaded new firmware file, and click UPGRADE.
5. Wait a few minutes for the upgrading and rebooting.
Note:
1. Before upgrading the firmware, it’s better to back up your current settings.
2. During the upgrading process, do not turn off or reset the extender.
3. If the upgrade is interrupted, it’s possible your extender may stop working and its LEDs blink once a second. In this case, please connect your computer to the extender via an Ethernet cable, and set your computer to static IP 192.168.0.X and subnet mask 255.255.255.0. Then visit http://192.168.0.254 to complete the upgrade.
3.7 Back Up and Restore Configuration Settings
The configuration settings are stored as a configuration file in the extender. You can back up the configuration file to your computer for future use and restore the extender to a previous settings from the backup file when needed. Moreover, if needed, you can erase the current settings and reset the extender to the default factory settings.
1. Connect to the powerline extender wirelessly. Visit http://tplinkplc.net, and log in with the password you set for the extender.
2. Go to System > Backup & Restore.
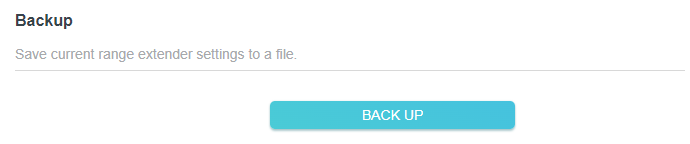
To backup configuration settings:
Click BACK UP to save a copy of the current settings to your local computer. A ‘.bin’ file of the current settings will be stored to your computer.
To restore configuration settings:
1. Click BROWSE to locate the backup configuration file stored on your computer, and click RESTORE.

2. Wait a few minutes for the restoring and rebooting.
Note: During the restoring process, do not turn off or reset the extender.
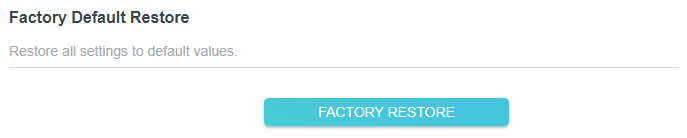
To reset the extender to factory default settings:
1. In the Factory Default Restore section, click FACTORY RESTORE.
2. Wait a few minutes for the resetting and rebooting.
Note:
1. During the resetting process, do not turn off the extender.
2. We strongly recommend you back up the current configuration settings before resetting the extender.
3.8 Change Login Password
The account management feature allows you to change your login password of the web management page.
1. Connect to the powerline extender wirelessly. Visit http://tplinkplc.net, and log in with the password you set for the extender.
2. Go to System > Change Login Password.
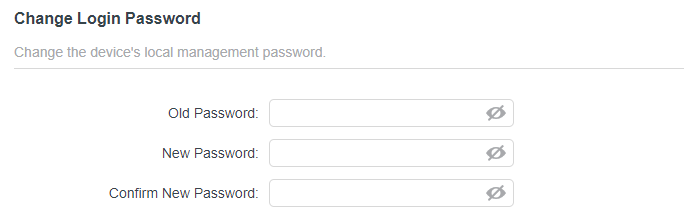
3. Enter the old password, then a new password twice (both case-sensitive). Click SAVE.
Note:
1. The new password must be 6-32 characters long and not include any spacing.
4. Use the new password for future logins.
3.9 System Log
When the extender does not work properly, you can save the system log and send it to the technical support for troubleshooting.
Follow the steps below to save the system log:
1. Connect to the powerline extender wirelessly. Visit http://tplinkplc.net, and log in with the password you set for the extender.
2. Go to System > System Log.
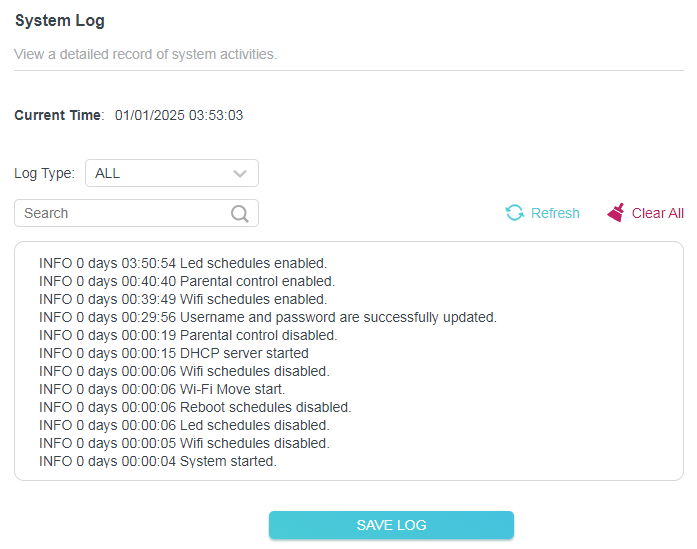
3. Choose the type of the system log according to your need.
4. Click SAVE LOG to save the system log to local.
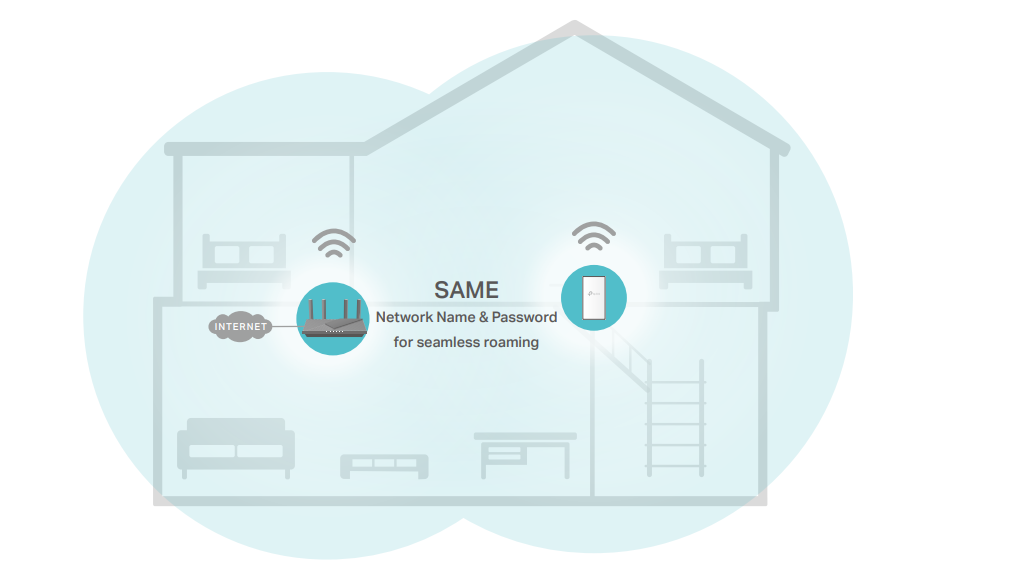
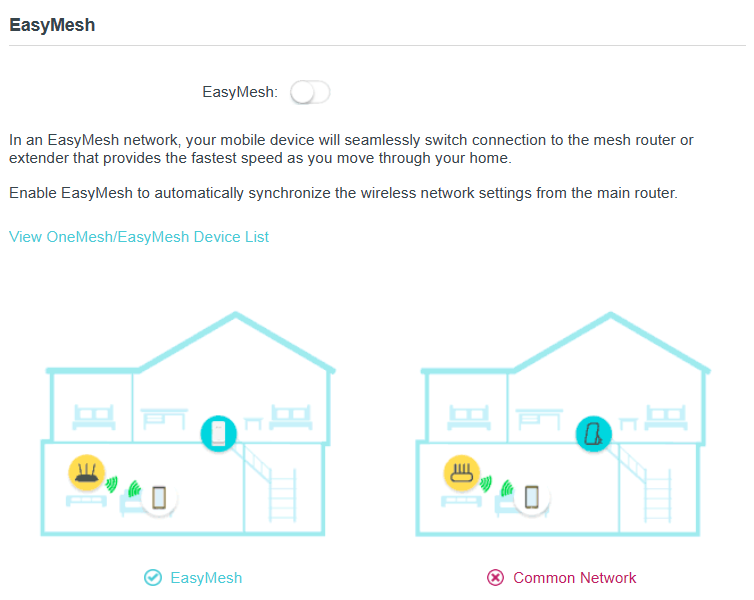
4. EasyMesh with Seamless Roaming
4.1 What‘s an EasyMesh Network
EasyMesh routers and extenders work together to form one unified Wi-Fi network. Walk through your home and stay connected with the fastest possible speeds thanks to EasyMesh’s seamless coverage.
Note:
• Routers and range extenders must be compatible with EasyMesh or OneMesh™. Firmware upgrades may be required.
• TP-Link EasyMesh-compatible products can network with other devices that use EasyMesh. Failed connections may be due to firmware conflicts of different vendors.
• The EasyMesh-Compatible function is still being developed on some models and will be supported in subsequent software updates.
 Flexible Scalability
Flexibly scale your home networking with different vendors,* different topologies, different Protocols and different product categories.
 Seamless Roaming
Connects mobile devices to your routers or extenders that provide the best coverage. Devices compatible with EasyMesh also share a single Wi-Fi name so you stay connected in every room.
 Easy Setup and Management
Easily set up and manage a unified Mesh network. For more information, visit https://www.tp-link.com/easymesh/.
4.2 How to Set Up an EasyMesh Network
1. Make sure your router is compatiable with EasyMesh or OneMeshTM. Firmware updates may be required. For TP-Link EasyMesh-compatible products, visit https:// www.tp-link.com/en/easymesh/product-list/.
2. Make sure your router is accessing the internet normally.
3. Follow To Set Up a New Secure Wireless Network to connect your computer to the extender wirelessly.
4. Choose any of the following methods to set up one unified EasyMesh network throughout your home.
Method 1: Via the Web Interface
1. Connect your device to the powerline extender wirelessly.
2. Visit http://tplinkplc.net, and log in with the password you set for the extender.
3. Go to Wi-Fi > EasyMesh.
4. Enable EasyMesh. The your powerline extender will automatically join an EasyMesh network and copy the wireless settings from the main router.
Method 2. Via the tpPLC app
1. Connect your device to the powerline extender wirelessly.
2. Launch the tpPLC app, select your powerline extender and log in with a password.
3. Go to EasyMesh and enable it. Then your powerline extender will automatically join an EasyMesh network and copy the wireless settings from the main router.
4.3 How to Manage an EasyMesh Network
• To leave or join an EasyMesh network:
1. Visit http://tplinkplc.net, and log in with the password you set for the extender.
2. Go to Wi-Fi > EasyMesh.
3. Toggle off or on EasyMesh according to your needs.
Note: This function is available only when the extender is connected to an EasyMesh router.
• To change wireless settings:
Simply change wireless settings on your EasyMesh router, the extender will automatically copy the settings.
• To manage devices in the EasyMesh network:
1. Connect your device to the extender‘s or router’s network.
2. Log in to your router’s web management page (http://tplinkwifi.net).
3. Go to the EasyMesh page to view and manage all mesh devices and their clients.