What should I do if I fail to configure Kasa Camera?
Introduction
Kasa app provides step-by-step guidance during the initial setup. However, some interference may prevent you from completing all configuration steps. This article is designed to assist you if you encounter issues at any stage of the setup process.
Requirements
- Download the latest Kasa app from the App Store or Google Play.
- Make sure you select the correct camera model during the configuration process.
Troubleshooting
This error message indicates that your phone does not have internet access.
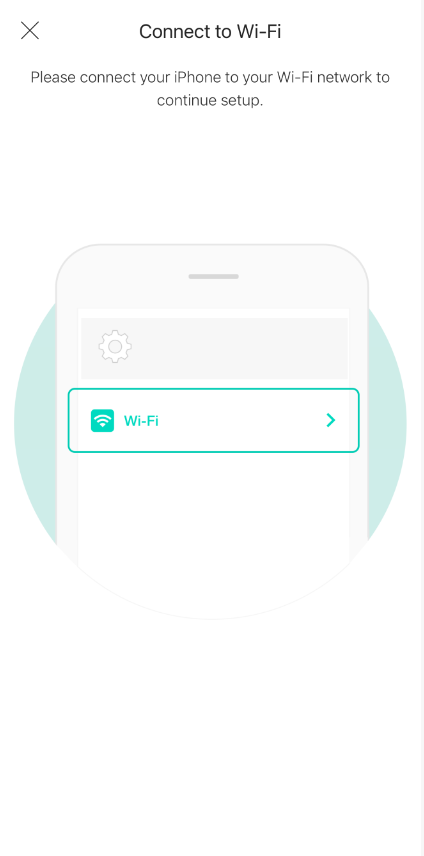
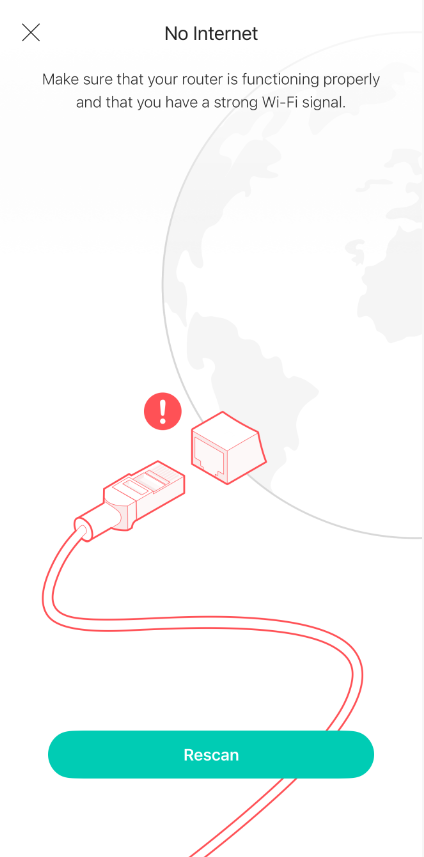
Step 1. Please double-check that your phone is connected to your router’s Wi‑Fi and has internet access.
Step 2. Please turn off any services that may be blocking internet access, such as VPNs or firewall apps.
Step 3. Try forcing the Kasa app to close and stop it from running in the background. Launch it again, and wait a few more seconds to see if you can proceed to the next step to connect to the Kasa Camera’s Wi-Fi.
Step 1. Ensure Kasa Camera is powered on with the rated voltage.
Step 2. Power off the device for a few minutes, then power cycle and reset the Kasa Camera, ensuring its LED is blinking red and green.
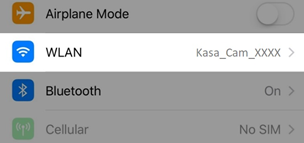
Step 3. Choose the correct wireless network to connect to. Camera’s default Wi-Fi should be ‘Kasa_Cam_XXXX’. (XXXX is usually the last 4 bits of the device's MAC Address).
Note: If your phone displays a message such as “This Wi‑Fi network is unsecured/unprotected. Your privacy and data may be at risk,” with options to Disconnect or Connect anyway, don’t worry. Simply select Connect anyway and continue the setup.
Step 4. Change the location where you set up the smart device to reduce potential interference in the same frequency band at the original location (to avoid interference from devices such as Bluetooth, USB 3.0, microwave ovens, and ZigBee devices).
Step 5. Reboot the phone, or try a different phone.
This error message indicates that your phone cannot connect to the camera Wi-Fi.
Step 1. Place your smartphone close to the camera to ensure the device’s Wi‑Fi signal is strong (full Wi‑Fi bars).
Step 2. Make sure there is no VPN or VPN software, such as Lookout or AdGuard, on the phone. If a VPN is running, turn it off on the phone.
Step 3. Choose the correct wireless network to connect to. Camera’s default Wi-Fi should be ‘Kasa_Cam _XXXX’. (XXXX is usually the last 4 bits of the device's MAC Address). Ensure your phone stays connected to the camera’s Wi‑Fi. Some phones may automatically disconnect from Wi‑Fi networks that do not have internet access.
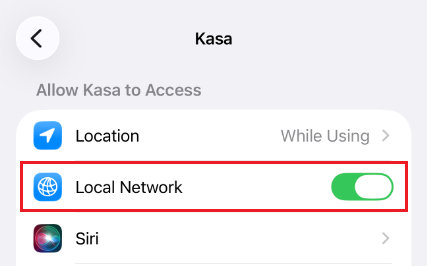
Step 4. (Only for iPhone/iPad) Click "Settings" on your phone, find the Kasa app in the list, then enable the "Local Network" option. Reopen the app and try again. If you can't find the "Local Network" permission, please go back to the app and tap "I’ve already given Local Network Permission".
Step 5. Go back to the Kasa app and tap on Try Again to continue the configuration steps.
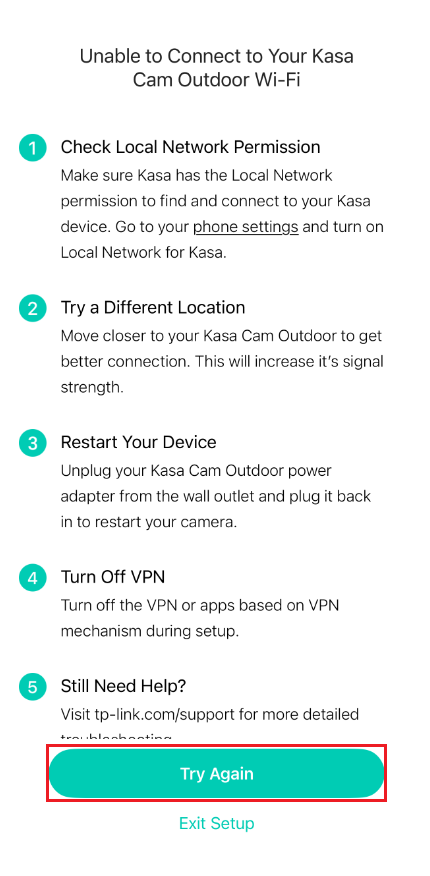
Step 6. If the issue persists, try with a different phone/tablet.
This error message indicates that your camera cannot find a suitable Wi-Fi network after scanning the surrounding area.
Step 1. If your router’s Wi‑Fi name does not appear automatically, tap “Try Again” to refresh the Wi‑Fi list several times and check whether it appears.
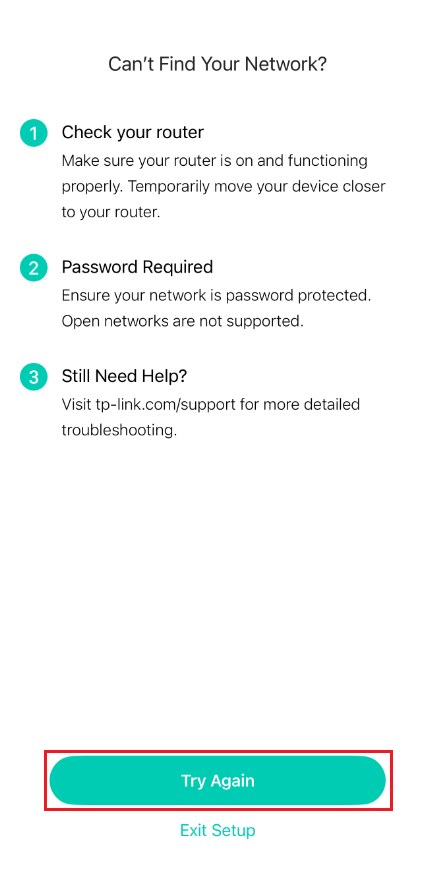
Step 2. Check your router’s wireless network settings and make sure the 2.4 GHz Wi‑Fi is enabled and not hidden. Try changing the security settings to WPA2 with a password.
If the router’s SSID is hidden, please select Join Other Network and manually enter the Wi‑Fi name (SSID) and password.

Step 3. Use another phone or tablet to try again.
Step 4. Reset the camera and reconfigure it to repeat the process.
This error message indicates that your camera failed to connect to the router WI-FI.
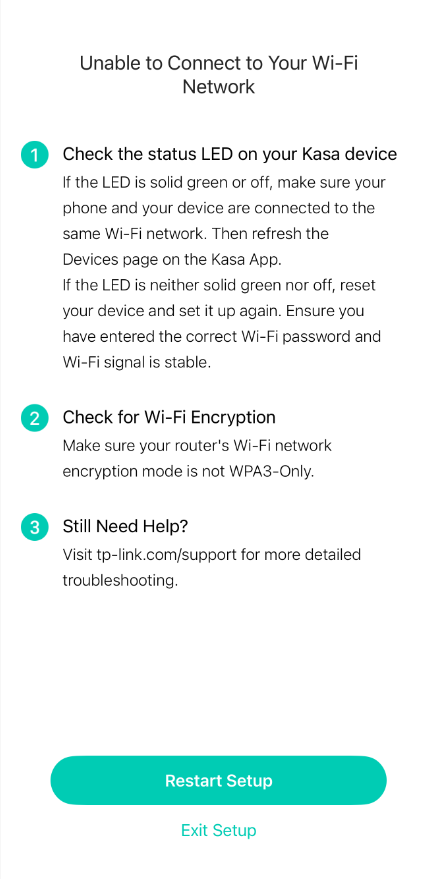
Step 1. Make sure the smart device is close to the router to receive a strong Wi-Fi signal, and enter the correct Wi-Fi password in the app. You can verify the password by forgetting the Wi‑Fi network in your phone’s settings and reconnecting to it.
Step 2. Ensure VPN is Disabled on the phone and router.
Step 3. Make sure the wireless settings on the router or access points are configured correctly, and try changing the encryption method to WPA2 with a password. If you are using multiple access points, ensure they all use the same Wi‑Fi password.
Step 4. Try a different phone and router. You could connect the camera to an independent 2.4 G Guest Wi-Fi/Hotspot for a try.
Step 5. Please reset camera, and start over with the setup process.
The situation occurs when you get stuck at the last step of renaming the camera, or when you cannot finish the reset configuration steps.
Step 1. Check if the Wi-Fi that the camera is connected to has internet access. If you have multiple access points, please connect the camera to the main router to test it.
Step 2. Change the DNS server on the router to 8.8.8.8 and 8.8.4.4
Step 3. Disable the firewall and Antivirus settings on the router and modem. Check whether any advanced settings on the router are blocking the Kasa Camera, such as Access Control or MAC Filtering.
Step 4. Try forcing the Kasa app to close and stop it from running in the background. Launch it again and check if you can see the camera in the device list.
Step 5. Reset Kasa Camera and try again.
Please contact TP-Link technical support with the following information if you still fail to configure the Kasa camera after the above suggestions.
- Your TP-Link ID or cloud account;
- The model number of your Kasa Camera and its MAC address;
- Whether you have tried all the suggestions listed above or not. If yes, what are the results?
QA
Q1: What encryption types do Kasa cameras support?
A1: Kasa cameras currently support WEP, WPA/WPA2, and WPA3 (on some models).
Portal, WPA/WPA2-enterprise, and open/unsecured networks are not supported.
Q2: What do the Kasa Camera’s LED colors mean?
A2:
|
System LED |
Status |
|
Solid amber/orange |
Rebooting |
|
Blinking amber/orange and green |
Ready for setup |
|
Blinking red |
Connecting to Wi-Fi |
|
Blinking green |
Connected to Wi-Fi |
|
Solid green |
Connected to the Cloud |
|
Blinking amber/orange |
Resetting |
Q3: How do I mount my Kasa Camera?
A3: Use the provided mounting equipment and follow the in-app guide for mounting your camera.
Is this faq useful?
Your feedback helps improve this site.


TP-Link Community
Still need help? Search for answers, ask questions, and get help from TP-Link experts and other users around the world.