How to Set Up a TP-Link DSL Modem Router via the Web Management Page (New Interface)
This guide shows you how to set up a TP-Link DSL modem router via the Web Management Page, whether your internet service arrives through a DSL phone line or an Ethernet cable. (Applicable Models: Archer VR400 V4 and Archer VX1800v)
If this interface doesn’t match your router, refer to this guide instead:
How to Set Up a TP-Link DSL Modem Router via the Web Management Page (Classic Interface)
If you prefer to set up the router using the Tether app, refer to this guide instead:
How to Set Up a TP-Link DSL Modem Router Using the Tether App (New Interface)
Key Takeaways
- Connect to the router’s Wi-Fi or a LAN port before opening tplinkmodem.net; internet access is not required for local setup.
- Select DSL-WAN for a phone line connection or EWAN for an Ethernet connection.
- Check your model and hardware version, then follow the matching setup section.
- Enter your ISP’s connection type and any required PPPoE credentials, VLAN ID, or DSL type (VDSL or ADSL).
- Save your settings, reconnect to Wi-Fi if needed, and open a website to confirm internet access.
Before You Begin
1. Check the model and hardware version on the router’s label.
2. Identify Your Internet Cable and Determine the Correct Operation Mode.
A DSL modem router combines a DSL modem and a Wi-Fi router. Choose its operation mode based on the cable that brings internet service into the router:
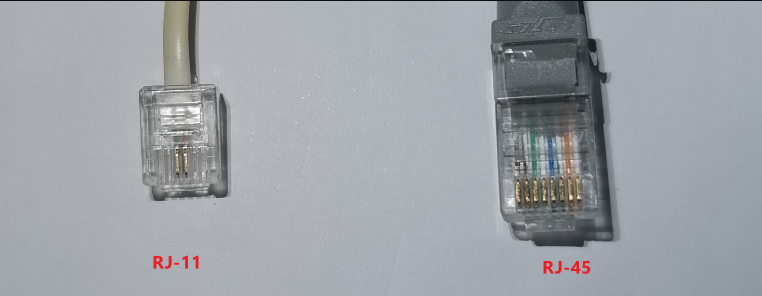
- DSL phone cable (RJ11): Connect it to the smaller port labeled DSL. Use DSL-WAN Mode. If your ISP requires a splitter or filter, connect it as instructed by your ISP.
- Ethernet cable (RJ45): Connect it to the larger port labeled LAN4/WAN. Use EWAN Mode. Connect the other end to your existing modem, fiber terminal/ONT, main router, or internet-enabled wall outlet.
For help identifying the connectors, see RJ11 vs. RJ45.
3. Gather Information from Your ISP.
Contact your Internet Service Provider (ISP) for the following to confirm the settings required for internet connection:
1) Internet Connection Type:
- Dynamic IP: Typically requires no credentials.
- PPPoE: Requires a specific username and password provided by your ISP.
- Static IP: Requires a fixed IP address, Subnet Mask, Gateway, and DNS servers.
2) VLAN ID: Required by certain ISPs.
3) DSL Modulation Type (if using DSL): VDSL or ADSL.
Step-by-Step Guide
Guide for Setting DSL-WAN Mode
Step 1. Access the Web Management Page
Connect your phone or computer to the router via Wi-Fi or an Ethernet cable.
Open a web browser and enter https://tplinkmodem.net/ in the address bar.
Log in with your admin password. (For first login, you’ll be asked to create an admin password)
Step 2. Start Quick Setup and Select Your Region
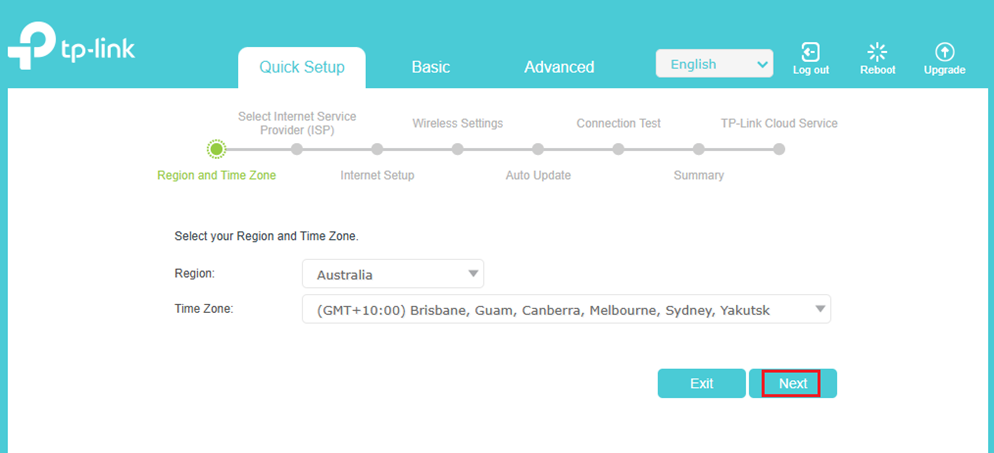
Open Quick Setup, select your Region and Time Zone, and click Next.
Step 3. Select Your ISP
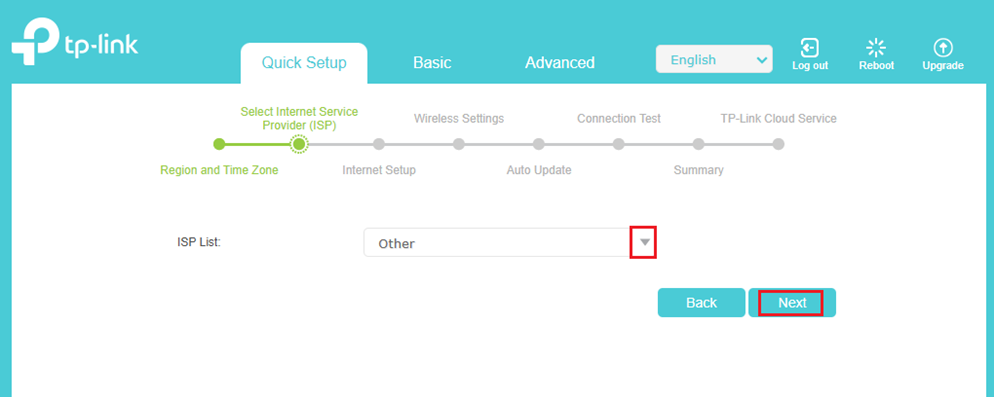
Choose your provider from the ISP List dropdown. Select Other if your ISP is not listed, then click Next.
Step 4. Enter Your Internet Settings
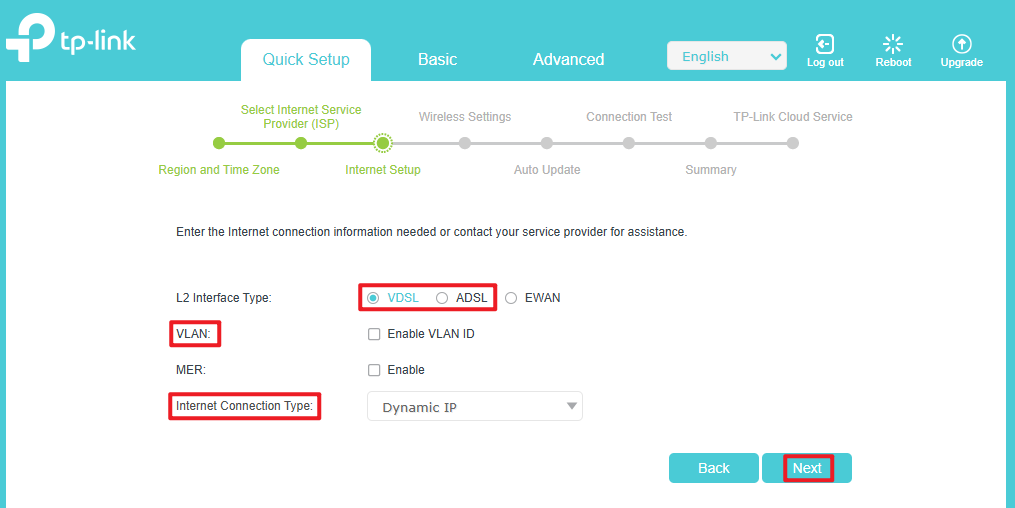
Enter the connection details provided by your ISP:
- L2 Interface Type: Select VDSL or ADSL.
- VLAN ID: Check Enable VLAN ID and enter the number if required by your provider.
- Internet Connection Type: Choose PPPoE, Dynamic IP, or Static IP, and enter credentials if prompted.
Click Next.
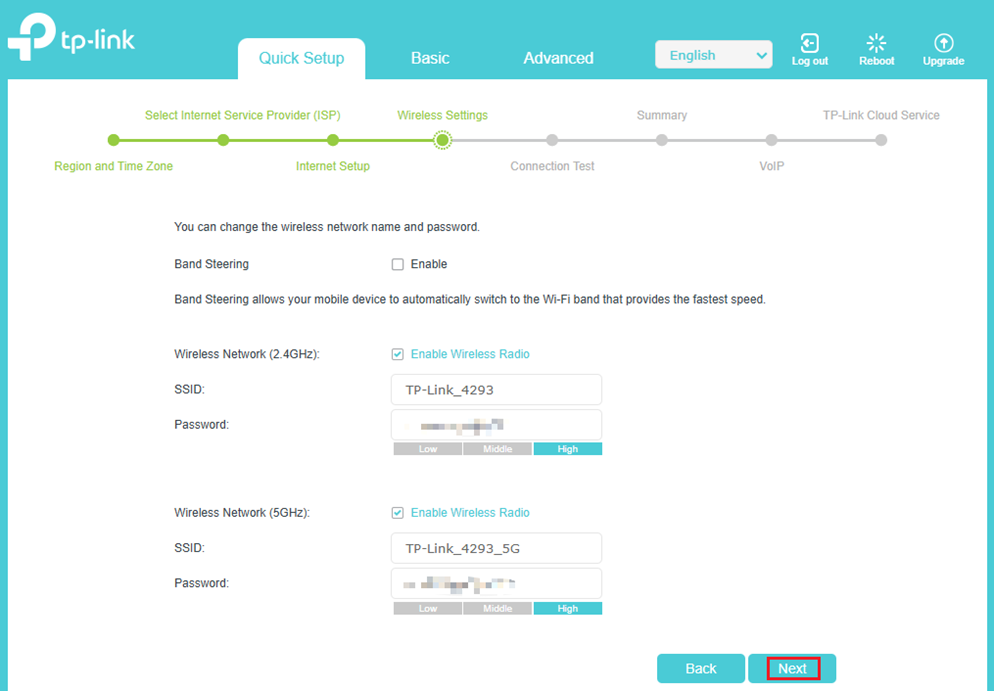
Step 5. Set Your Wi-Fi Network Name and Password
Step 6. Complete Setup and Bind TP-Link ID
Note: If you changed the default Wi-Fi settings, please reconnect to the new Wi-Fi network, then return to the web interface. (You can skip this step if connected via Ethernet.)
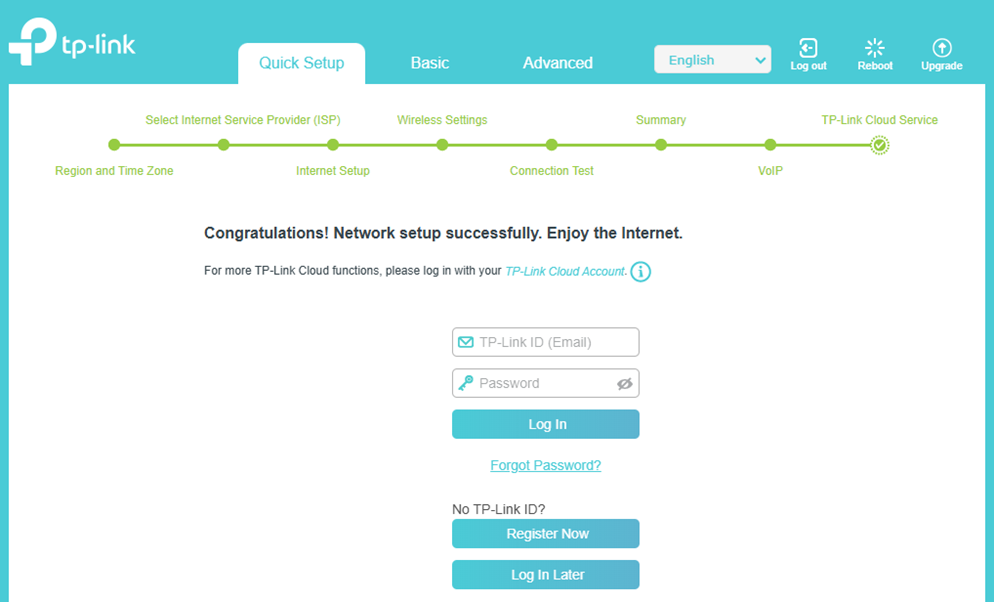
Wait for the router to test the internet connection. Once successful, click Next. You can optionally log in with your TP-Link ID for remote cloud management, or click Log in Later to complete the setup.
If the test fails, double-check your cable connection, operation mode, and ISP credentials.
Guide for Setting EWAN Mode
Step 1. Access the Web Management Page
Connect your phone or computer to the router via Wi-Fi or an Ethernet cable. (Do not connect the Ethernet cable to the LAN4/WAN port for now, to avoid being unable to log in to the web interface).
Open a web browser and enter https://tplinkmodem.net/ in the address bar.
Log in with your admin password. (If logging in for the first time, you will be prompted to create an admin password.)
Step 2. Start Quick Setup and Select Your Region
Connect the Ethernet cable to the LAN4/WAN port.
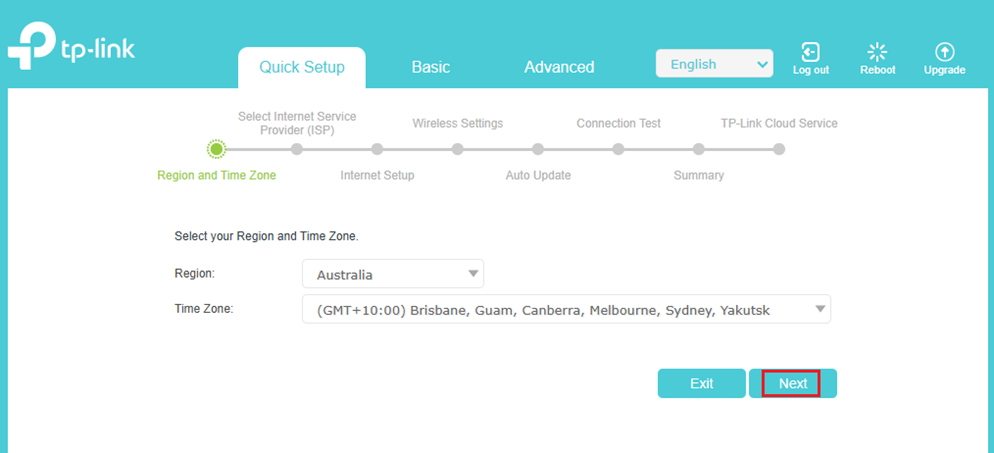
Open Quick Setup, select your Region and Time Zone, and click Next.
Step 3. Select Your ISP
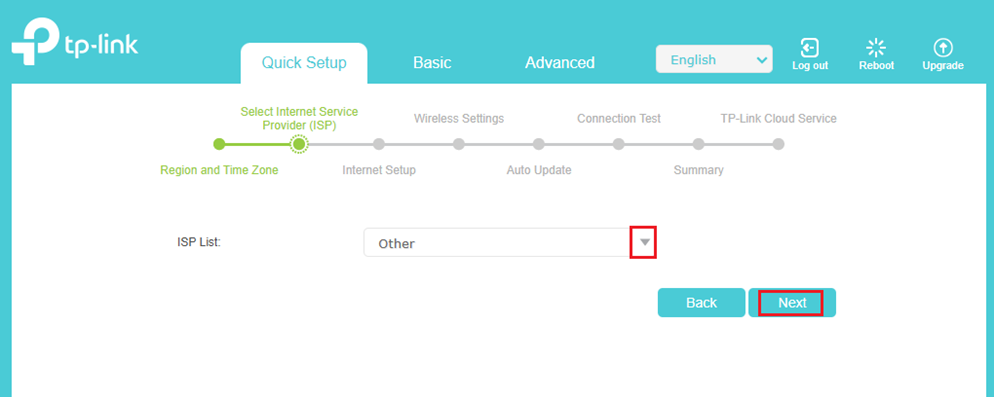
Choose your provider from the ISP List dropdown. Select Other if your ISP is not listed, then click Next.
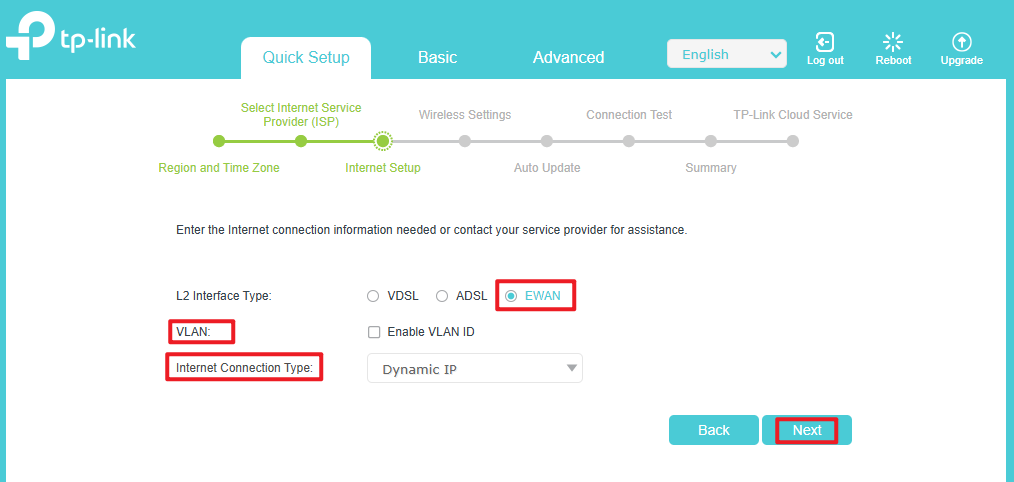
Step 4. Enter Your Internet Settings
Enter the connection details provided by your ISP:
- L2 Interface Type: Select EWAN.
- VLAN ID: Check Enable VLAN ID and enter the number if required by your provider.
- Internet Connection Type: Choose PPPoE, Dynamic IP, or Static IP, and enter credentials if prompted.
Click Next.
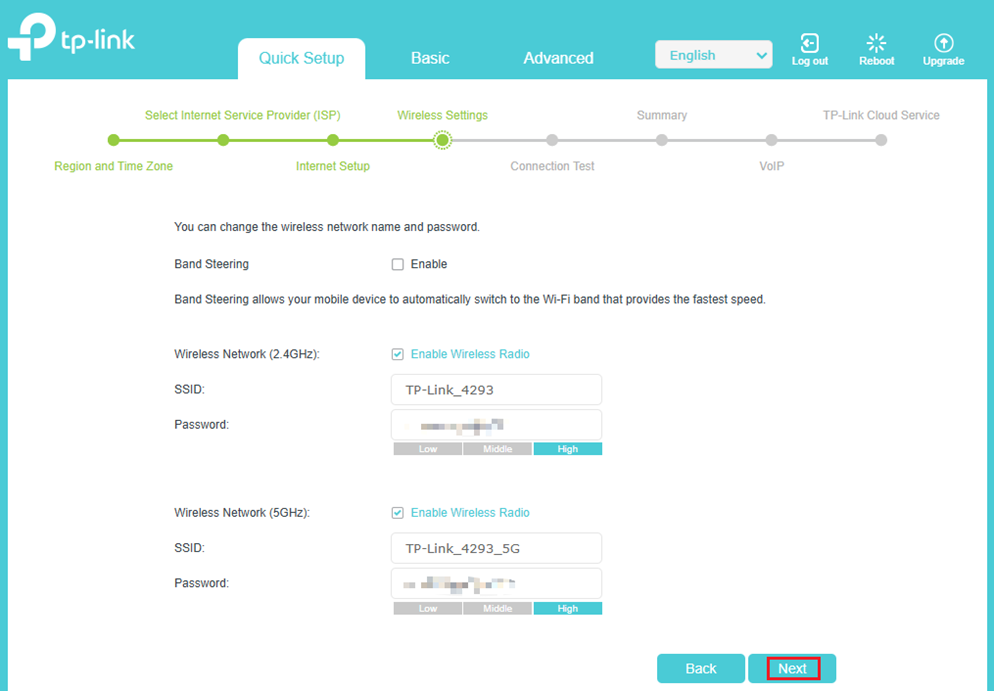
Step 5. Set Your Wi-Fi Network Name and Password
Set the Wi-Fi name (SSID) and password. If you want the 2.4G & 5G Wi-Fi names and passwords to be the same, enable Band Steering. If it is disabled, configure each band separately as needed. Click Next.
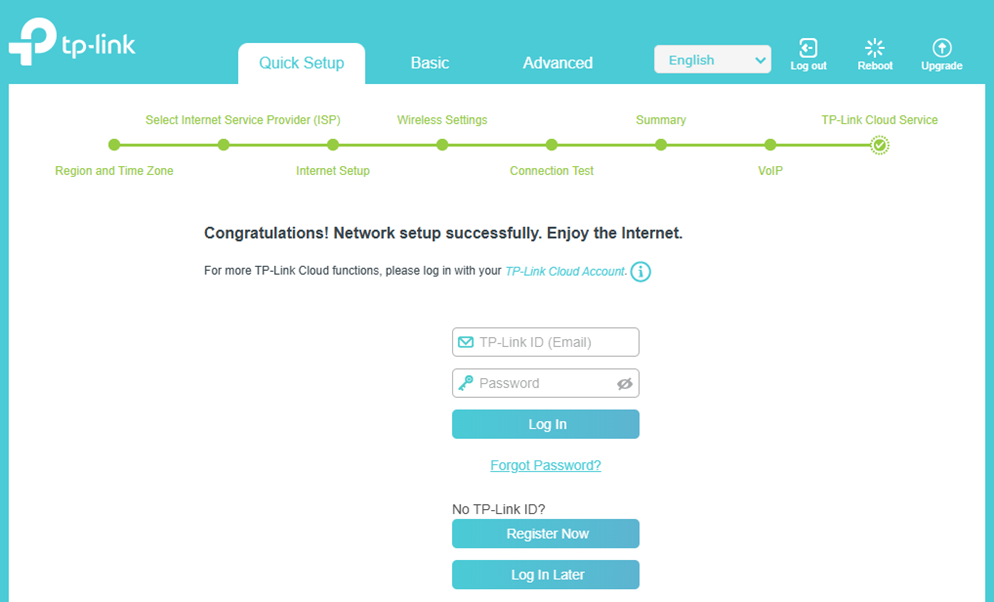
Step 6. Complete Setup and Bind TP-Link ID
Note: If you changed the default Wi-Fi settings, please reconnect to the new Wi-Fi network, then return to the web interface. (You can skip this step if connected via Ethernet.)
Wait for the router to test the internet connection. Once successful, click Next. You can optionally log in with your TP-Link ID for remote cloud management, or click Log in Later to complete the setup.
If the test fails, double-check your cable connection, operation mode, and ISP credentials.
Looking for More
Is this faq useful?
Your feedback helps improve this site.


TP-Link Community
Still need help? Search for answers, ask questions, and get help from TP-Link experts and other users around the world.