Tapo/Kasa Camera Not Working: Cannot View Camera Troubleshooting Guide
If your Tapo or Kasa camera is not working and you are unable to view it after setup, this guide covers four troubleshooting scenarios: camera offline or not viewable on the local network, camera not accessible remotely, live view not loading or slow, and audio/video sync issues. If your camera is not appearing in the app at all, that is a separate issue — refer to the setup troubleshooting article first: What can I do if I can't find my Tapo camera on the Tapo app?
Key Takeaways
- If your Tapo or Kasa camera is not working or appears offline, start by checking the LED status. It indicates whether the camera is trying to connect to Wi-Fi or is already connected but unable to reach the cloud server.
- A solid amber LED means the camera is connected to the local Wi-Fi network but cannot reach the cloud. Check your Internet connection and DNS settings.
- VPN connections and network filtering apps such as AdGuard or DuckDuckGo on your phone are a common cause of Tapo camera viewing problems and should be disabled during troubleshooting.
- For remote viewing issues, switching your router's DNS server to a public DNS address (8.8.8.8) can resolve cloud connectivity problems.
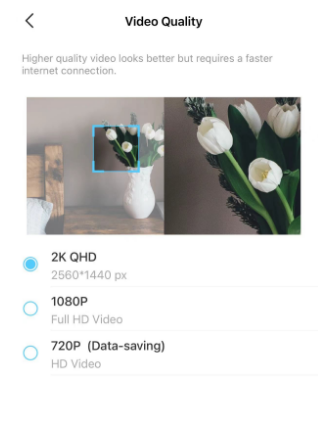
- If the live view is slow or fails to load, lowering the video quality in the Tapo app under Device Settings > Video and Display is the fastest fix to test.
- Using a third-party or extension power cable with your Tapo or Kasa camera can cause instability. Always use the original power supply.
Before You Start: Check These First
If you're having trouble viewing or controlling your camera, which may often appear as offline on the app, please check:
- Ensure you use the original power supply provided with the camera. Third-party power supplies may not provide the required voltage or current for optimal function.
- If you are using a power extension cable, temporarily remove it and check whether the camera becomes more stable.
- Ensure both the camera firmware and the Tapo or Kasa app are up to date.
Troubleshooting
Scenario 1: Camera Offline or Not Viewable on Local Network
Connect your phone and camera to the same Wi-Fi network, open the Tapo/Kasa app on the same network, and check if you can access the Camera. If the Camera is still offline, please try the following troubleshooting suggestions.
Step 1. Check the Camera's system LED status to see if it is connected to the Wi-Fi network. You can find detailed information about the LED light status at the end of this article.
Otherwise, reset the camera to factory default settings, then reconfigure it. To reset the camera, you can refer to How to reset Tapo Camera, and How to reset the TP-Link Kasa camera
Step 2. Close the Tapo/Kasa app and relaunch it.
Turn off any active VPN connection (AdGuard, DuckDuckGo, NordVPN, etc.) and disable Cellular Data on the phone while attempting this. If you have another phone available for testing, try using it and ensure it is connected to the same Wi-Fi network as the camera.
Step 3. Reboot the router and the camera, then check whether the camera reconnects to the Wi-Fi network.
Disable client isolation on your router if enabled. Also, make sure both the phone and the camera are connected to the same Wi‑Fi network, and avoid connecting one to guest Wi‑Fi and the other to the main Wi‑Fi. After making these adjustments, restart both the router and the camera.
Step 4. Check the camera’s signal strength and delay. Optimize camera placement when signal strength is low or network connectivity is slow. Position the camera closer to the Wi-Fi router, avoiding obstacles like walls, furniture, or appliances that could block the Wi-Fi signal.
Step 5. Keep the smart device away from potential sources of interference, such as microwave ovens, Bluetooth devices, USB 3.0 devices, or baby monitors.
Step 6. Contact your router's support to optimize network stability based on your network topology. For example:
- In your router's 2.4 GHz wireless settings, set the channel width to 20 MHz, set the password authentication method to WPA2/WPA3-Personal, and the wireless channel to 1, 6, or 11. Choose the best wireless channel according to your actual wireless environment.
- Turn off Advanced Wi-Fi settings on the router, like Smart Connect, Wi-Fi Optimizing, or Channel optimization, etc.
Scenario 2: Camera Offline or Not Viewable Remotely
If your phone can only access the camera while connected to the same local network, please try the following troubleshooting suggestions.
Step 1. Ensure that the Wi-Fi or cellular network your phone is currently connected to has an internet connection. You can test this by opening other websites or simply try using another phone.
Step 2. Using a public DNS server may improve the connection. Try changing your router's DNS server settings to 8.8.8.8. If you don't know how to do this, please contact your router's customer support.
Step 3. Verify if any firewall or security settings are blocking the connection to the Cloud Server. Temporarily disable any antivirus, firewall, or security software to see if it resolves the issue.
Step 4. To eliminate potential issues with the router's Wi-Fi network, it is recommended to use a mobile hotspot and configure the Camera to test its functionality.
Scenario 3: Live View Is Slow or Fails to Load, or Playback Is Not Working
Sometimes you may find that you can't watch the camera live view or playback properly, the video takes a long time to load, keeps spinning, or even fails to load (Error: "Try Again" or "Tap to refresh"), and needs to be reloaded several times. For this situation, the following suggestions may help you.
Step 1. Ensure that both the camera firmware and the Tapo app are up to date.
Step 2. Ensure that the camera receives a strong Wi-Fi signal from the router. How to check the network connection stability of a Tapo Camera.
Step 3. Check whether there are any electronic devices around the camera that may cause wireless interference, and try to place the camera away from them (a running microwave oven, hair dryer, TV, etc.) or use a wired connection if supported.
Step 4. Check if you can stream the camera properly in the local network. Try connecting your phone to the same Wi-Fi as the camera and see if the camera's live view or playback videos load properly.
Step 5. Try manually lowering the video quality on the Live Streaming page or in Device Settings > Video & Display, and see if it improves.
Step 6. Try a different network on your phone, such as using mobile data or connecting to a different Wi-Fi network. Ensure the internet quality and signal strength are good on your phone, for example, check the mobile data or Wi-Fi signal bars.
Step 7. Try turning off any active VPN connection (AdGuard, DuckDuckGo, NordVPN, etc.) or disabling network filtering and security software that rely on VPN mechanisms.
Step 8. Try re-entering the app, streaming the camera on only one device (phone/tablet) at a time, or rebooting the camera.
Step 9. If you own another mobile device, try streaming the camera from it.
Scenario 4: Live View Not Syncing / Sound Stutters or Lag
Step 1.Check the internet quality and signal strength of the phone. Try to switch to another network if the signal is weak or unstable.
Step 2. Check the signal strength of the camera. If the signal is weak, try to move the camera closer to the router.
Step 3. Try turning off any active VPN connection or disabling any network filtering or security software that uses VPN mechanisms, then reopen the app.
Step 4. Lower the video quality.
Step 5. Check whether there are electronic devices around the camera that may cause interference with the signal, and try to place the camera away from these devices. For example, a running microwave oven, hair dryer, TV, etc.
Step 6. Check if the video plays normally on the local network.
QA
Q1: How to Read Your Camera LED Status Lights
A1: When the camera is offline or inaccessible, it is often in one of the following two states:
State 1: Connecting to Wi-Fi (Camera is attempting to connect to the Wi-Fi network of the router)
- If you are configuring the product for the first time, it is recommended that you check whether the password entered during configuration is correct.
- If the issue occurs during use, please check if the Wi-Fi network of the router is normal. For example, whether other devices can connect to the same 2.4Ghz Wi-Fi network normally. You can try to power off and restart the camera to see if it can be restored. If you have adjusted the position of the router or camera, it is recommended that you move the camera closer to the router to ensure that it has a good wireless signal.
- We recommend setting your router's 2.4 GHz Wi-Fi channel to a specific one, such as 1, 6, or 11. This can enhance the stability of connected devices in certain scenarios.
State 2: Connected to Wi-Fi (Camera has connected to the Wi-Fi network of the router, but cannot connect to the cloud server via the internet)
- Please check your internet connection and ensure that your other devices can connect to the internet properly.
- Verify if any firewall or security settings are blocking the connection to the Cloud Server. Temporarily disable any antivirus, firewall, or security software to see if it resolves the issue.
- Using a public DNS server may improve the connection. Try changing your router's DNS server settings to 8.8.8.8. If you don't know how to do this, please contact your router's customer support.
You can differentiate the current status of the lights using the table below:
|
System LED Indication |
|||
|
Most Tapo Cameras |
HomeKit version Tapo Cameras |
||
|
LED |
Status |
LED |
Status |
|
Solid red |
Starting up |
Solid red |
Starting up, video recording or live streaming |
|
Blinking red and green (for Wi-Fi setup) |
Ready for setup |
Blinking red and blue (for Wi-Fi setup) |
Ready for setup |
|
Blinking red slowly (for Wi-Fi setup) |
Connecting to Wi-Fi |
Blinking blue slowly (for Wi-Fi setup) |
Connecting to Wi-Fi |
|
Solid amber |
Connected to Wi-Fi or wired network |
Blinking red slowly |
Connected to Wi-Fi |
|
Solid green |
Connected to the cloud |
Solid blue |
Connected to the cloud |
|
Blinking red quickly |
Camera resetting |
Blinking red quickly |
Camera resetting |
|
Blinking green quickly |
Camera updating |
Blinking red quickly |
Camera updating |
Please contact TP-Link technical support with the following information if you still can't view the TP-Link camera successfully after the above suggestions.
- Your TP-Link ID or cloud account.
- The model number of your TP-Link Cam and its MAC address.
- The model number of the host router.
- How frequently the issue happens and how to recover from it.
- Whether you have tried all the suggestions listed above or not. If yes, what are the results?
Get to know more details of each function and configuration. Please go to the Download Center to download the manual of your product.
ค้นหาเพิ่มเติม
คำถามที่พบบ่อยนี้มีประโยชน์หรือไม่?
ความคิดเห็นของคุณช่วยปรับปรุงเว็บไซต์นี้


TP-Link Community
Still need help? Search for answers, ask questions, and get help from TP-Link experts and other users around the world.